According to statistics, images take up 70% of all data downloaded by the web browser. We cannot underestimate the importance of making images faster, lighter, and more streamlined.
The challenge with image files is that they are a natural and most common bottleneck when trying to reach fast website speed. Even though Magento 2 has tons of JS files, complex DOM structure, and countless CSS styles to load, images will still take the lion’s share of all page loading.
In this article, we’d like to give 10 tips for optimizing images on your Magento 2 online store. Plus, we’ll address the often-asked questions on the subject.
Table of Content
10 Ways to Make Images Load Faster for Magento
We’ve explained in detail in our how you can improve your online store performance to pass every Google audit.
Here, we take the matter of Magento 2 image optimization to a new level, detailing every last tip we know to help you reduce the website loading time thanks to lighter images.
1. Compress Images So They Load Faster
Uncompressed JPG, PNG, and animated GIF files create a huge amount of overhead on the website. The bigger the image and the more significant number of pixels it contains, the more it will benefit from being compressed properly.
Don’t be afraid to lose picture quality. First of all, there are two types of compression: lossy and lossless. Both techniques reduce the size of a file, but the former denotes quality loss to some extent. The latter leaves the quality of the original file the same and just eliminates statistical redundancy in the data. So when decompressing, algorithms restore the file as it was.
But even with some quality loss implications, lossy compression is not as bad as it sounds. If you don’t overdo it, lossy quality removes invisible elements of the compressed file that don’t affect perceived image quality. All you get is a trade-off between a loss of some data and greater compression.
Ecommerce space sells using product images. They are your best friends and the most powerful tool in trying to close a deal. Losing image quality to the point where it becomes noticeable is not an option.
So when you choose lossy, we recommend that you go for 82% of lossy image compression.
There are 3 main ways you can compress and optimize images in your store.
a) Compressing images within the store
First, you can use , , , or any other tools you like to compress images inside your store. These ones are server-side and work exactly as you’d expect. For SaaS solutions, look towards and its alternatives.
b) Compressing images prior to their upload
Second, there are , TinyJPG, , , , and other services and command-line tools that can optimize your original image before you upload it. It takes some discipline to use these tools consistently before uploading images, though. Where manual optimizations are free of charge if you need an API implementation (or two), get ready to invest in a new paid service.
c) Magento 2 image compression using a content delivery network (CDN)
The third option you have is a content delivery network. The best CDNs offer smart image compression as an additional perk of your subscription. Cloudflare’s Polish feature is a good example.
Good CDNs can boast countless built-in image optimization features. All you have to do is use them to your benefit. We wouldn’t want to make this guide into a CDN promo page, but a really capable CDN extremely helps with optimization, caching, and delivery of your image files.
Some CDNs even go as far as converting assets to modern image formats (WebP, JPEG XR, JPEG 2000), reducing latency, compressing pictures on the fly, etc. You’ll have to carefully compare CDN providers to see what features are available since all CDNs have different capabilities and pricing.
One of the drawbacks of CDN image optimization is that it won't change the original image on your server. The image stays the same. Instead, the CDN will compress that image in its own server and keep it there inside the cache.
Any user who comes to the store will be served a cached optimized image, which reduces bandwidth use and improves browsing performance. CDNs can serve images in the WebP format to suitable web browsers. Depending on the type of browser your customer has, your CDN will show them either newer WebP images or the older JPEG version of the file.
But in case the CDN cache becomes invalidated, the CDN will be forced to serve the original unoptimized image before a new cache can be built.
Onilab recommendation:
Combine a server-side tool (imagemin is a good choice) with a capable CDN to get the best of both worlds. This way, you can easily compress your existing images and leverage the benefits of CDN image caching.
If you are unfamiliar with the fundamentals of CDN, you may find this concept challenging. Turn to Onilab's for hassle-free image management and correct CDN use.
2. Switch to Modern File Formats
New and more efficient image formats offer significant performance savings. For example, the WebP format can save up to 30% in size over JPEG and JPEG 2000, providing both lossy and lossless compression. As of today, WebP also enjoys wide support from most mainstream browsers. Opera, Firefox, Android, MS Edge, and Chrome support WebP images.
Another format worth considering is AVIF (the AV1 image file format). Even if it’s still in its infancy and has limited browser support, it bears the potential of better compression than WebP and JPEG, keeping high image quality.
In addition to that, if you use a capable CDN (that was mentioned in the previous section), there’s no need to switch to the WebP format. If you don’t want to use a CDN for new format delivery, you can detect WebP image support yourself (for example, you can use , a JS library that detects HTML5 and CSS3 support in web browsers). Then, you may serve WebP to suitable clients using the HTML5 <picture> element (which we’ll cover in the 8th section).
Bear in mind that hosting a second version of every image in WebP format in Magento 2 will effectively mean you need almost twice as much data storage as you already use. Carefully assess your infrastructure costs and the inevitable rise in data storage investments before the implementation.
3. Enable Progressive JPEG Images for Magento Optimization
Another tip for image optimization for Magento 2 is enabling Progressive JPEG. The progressive JPEG image format allows the browser to load qualitatively, not quantitatively. In other words, it loads the site’s images gradually, little by little improving the quality of the displayed image from 0 to 100 percent.
To compare, the images below show how a regular JPEG usually loads.
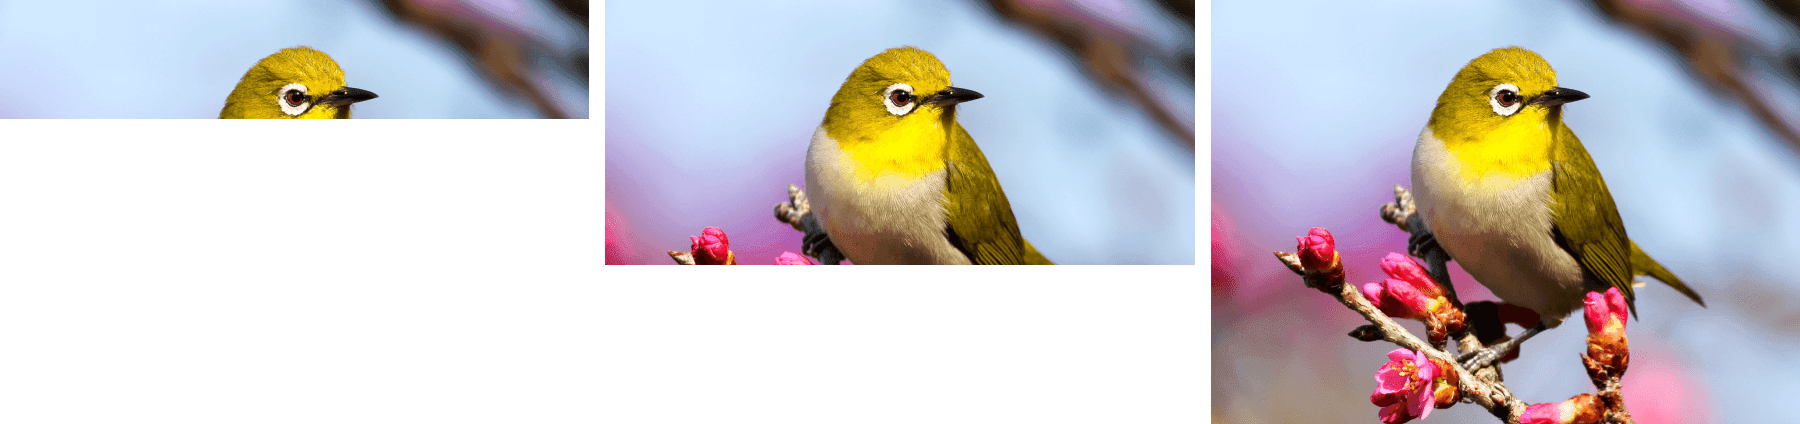
Alternatively, this is how a progressive JPEG image loads on a page.

Although progressive JPEG appeared quite a while ago (about 10 years back), there are still not that many sites using this technology. To be fair, the difference between sequential and progressive JPEG may not be noticeable on computers with a decent Internet connection (over 100 Mbit per second). In such cases, the browser loads the image so quickly that it’s downloaded almost instantly in its maximum quality.
Yet if the connection is weak (a common case with mobile networks like 3G) or if the image is too large, then the difference between the sequential and progressive format will be very visible. Obviously, when the entire globe is equipped with the fifth-generation Internet, there won’t be a noticeable difference between the usual and progressive JPEG. But since we’re not quite there yet, switching to progressive JPEG can do your online store good.
There are several ways you can save an image in the progressive JPEG format. The simplest of them is by using an online service like . Furthermore, you can make use of a plugin or configure your server.
4. Use Vector Images Where Possible
Clean design is fast design. This might sound like trivial advice, but take a long look at your design. Are there any unnecessary images? What kind of pictures can you get rid of? Some of them you can replace with vectors and even fonts, others with CSS.
Sure, you can speed up the rest with a good CDN and a smart lazy loading configuration (more on that later). But the best course of action is to actually make your store cleaner and lighter.
SVGs offer better image quality, lower file size, and good scaling to any resolution. They will not be suitable for every image, but where vector files really shine are icons and other small UI elements. Raster images create less CPU load, but in any other way, the vector format demonstrates its superiority:
- best design responsiveness;
- no loss of detail;
- zoom-friendly images, among other things.
In addition to a smaller size, you can make SVGs take even less space when you minify and gzip compress them. These steps strip SVG images from metadata, namespaces, and comments that tail the image without adding any value to the user.
Pro tip:
Add SVG UI elements to a custom font and load it as a single file. This type of bundling will reduce the number of individual requests on the page and improve page load speed. The advice doesn’t offer as much performance gain for Magento 2 stores using HTTP/2 and QUIC protocols. It’s more valuable for those who still stick to HTTP/1.1.
5. Defer Image Loading to Clear Critical Rendering Path
Deferring image loading is another trick in Magento 2 to optimize images. It will help declutter the Critical Rendering Path, , and speed up overall page loading. Deferred loading is done with a lazy load script that determines how images (GIFs, photos, and other media) appear on the screen.
Put simply, lazy load allows you to display pictures only if the user scrolls down to reach them. What's not in the viewport is not downloaded.
Lazy load is one of the most powerful tools at your disposal since it improves perceived performance without sacrificing anything. You don’t need more CPU or RAM to implement it. It’s SEO-friendly, and you actually save bandwidth with users who don’t scroll all the way down, etc. Implemented right, lazy load can enhance user experience without becoming a drag on your server resources.
Onilab's caution:
Don't use lazy loading for your largest element above the fold. It can negatively affect the LCP score as well as your overall perceived performance. You can lazy load everything that is out of view, even menu icons and the logo. But exclude the LCP element from this method and opt for a standard img or picture tag instead, as recommended in our guide on .
6. Enable Fastly Image Optimization
Also referred to as just Fastly IO, this Magento 2 image compression service is used for making image delivery much faster. It is a good choice for handling various formats of images, including JPG, PNG, and GIF files. Noting its strengths, Fastly is capable of:
- driving lossy conversions (making files smaller by using a method that removes some details);
- using pixel ratios that are adaptive to various screen resolutions (very handy for progressive web applications like the ones from this list of );
- and resizing product images from lossless to lossy by default (if enabled).
To get Fastly to run well on your store, you’ll need to enable, configure, and verify it afterward. If you experience difficulties configuring Fastly for image optimization, turn to our for support.
What’s for its configuration, luckily, Fastly has quite flexible settings. Based on the selected options, you can indicate the extent to which you’ll allow images to lose quality during compression.
Other Magento 2 image compression settings configure more features of image optimization, like resizing filters. For instance, if you select the “Default JPEG format” to be “Progressive”, your images will first be displayed in low resolution and only then gradually improve their quality.
Once you start using the tool, it makes sense to validate it. I.e., test your store in terms of website speed to compare how the site performs with Fastly and without it.
7. Set Static Cache Expiration to One Year
Google PageSpeed Insights recommends 1-year static cache for most files. It’s a good piece of advice, especially if you already control versioning with filenames (e.g., upload new product photos using different names than previously).
This change is enough to ensure that the new file will update correctly instead of getting stuck in the old version (because the browser doesn’t recognize it as new and uses browser cache instead of fetching the new visuals).
Using longer cached images will save bandwidth, improve the browsing experience for returning customers, and make Google PageSpeed Insights happy. Most of the time, a good CDN will offer a longer cache lifetime by default and, to some extent, handle this setting for you.
The changes you need to make are to set Cache-Control: max-age=31536000 for your images to one year.
8. Use Multiversion Images Based on Screen Size
Responsive design offers new challenges and opportunities to Magento 2 developers. One such opportunity is the use of various image versions for different screen resolutions. Depending on your viewport, Magento 2 can show you the version of the image that suits your display best.
As an example, narrowing your screen from 960-pixel wide to 240-wide will force the server to switch from a wider image to a narrower one as elements bundle together and have to find their place inside a changing layout:
<img
  alt="image alt text"
  src="medium.jpg"
  srcset="
     small.jpg 240w,
     medium.jpg 300w,
     large.jpg 720w
  "
  sizes="
     (min-width: 960px) 720px,
     100vw
  "
>
Here’s an alternative implementation. We’ve already discussed the <picture> tag in our , although in a different light. In addition to improving responsive designs and optimizing for different viewport options, HTML5 <picture> allows you to list multiple alternative image sources for a single file in priority order.
<picture>
  <source srcset="'images/1_lg.jpg'" media="(min-width: 1025px)">
  <source srcset="images/1_md.jpg" media="(min-width: 641px)">
  <img src="images/1_xs.jpg">
</picture>
Either of these methods will work. The <picture> tag method has the advantage of simpler testing: you can easily simulate a smaller device with software and see how the design works.
The srcset method is a bit more primitive in comparison. It provides less control, allowing you only to specify different image files based on the browser’s display size or resolution. The browser will then automatically pick the most appropriate image from the list. Unlike ‘<picture>’, you can’t leverage different image formats or use more complex conditions based on media queries.
Furthermore, don’t use images larger than you need. Constantly loading larger image sizes than you really need is bad practice. Depending on the file size difference, additional data quickly adds up and can result in noticeable overhead. The larger the image size, the more unnecessary pressure it puts on your server in terms of bandwidth.
Browsers have to scale these kinds of images on their own, which leads to reduced visual quality and slowdowns in delivery speed.
9. Replace Images With CSS3 Styles
CSS3 can cope with so much more than most people expect it to. Replacing some images with CSS3 styles is entirely real and offers a great vector of optimization. CSS3 is 100% capable of handling shadows, animations, and gradients for any screen resolution, device, or zoom level.
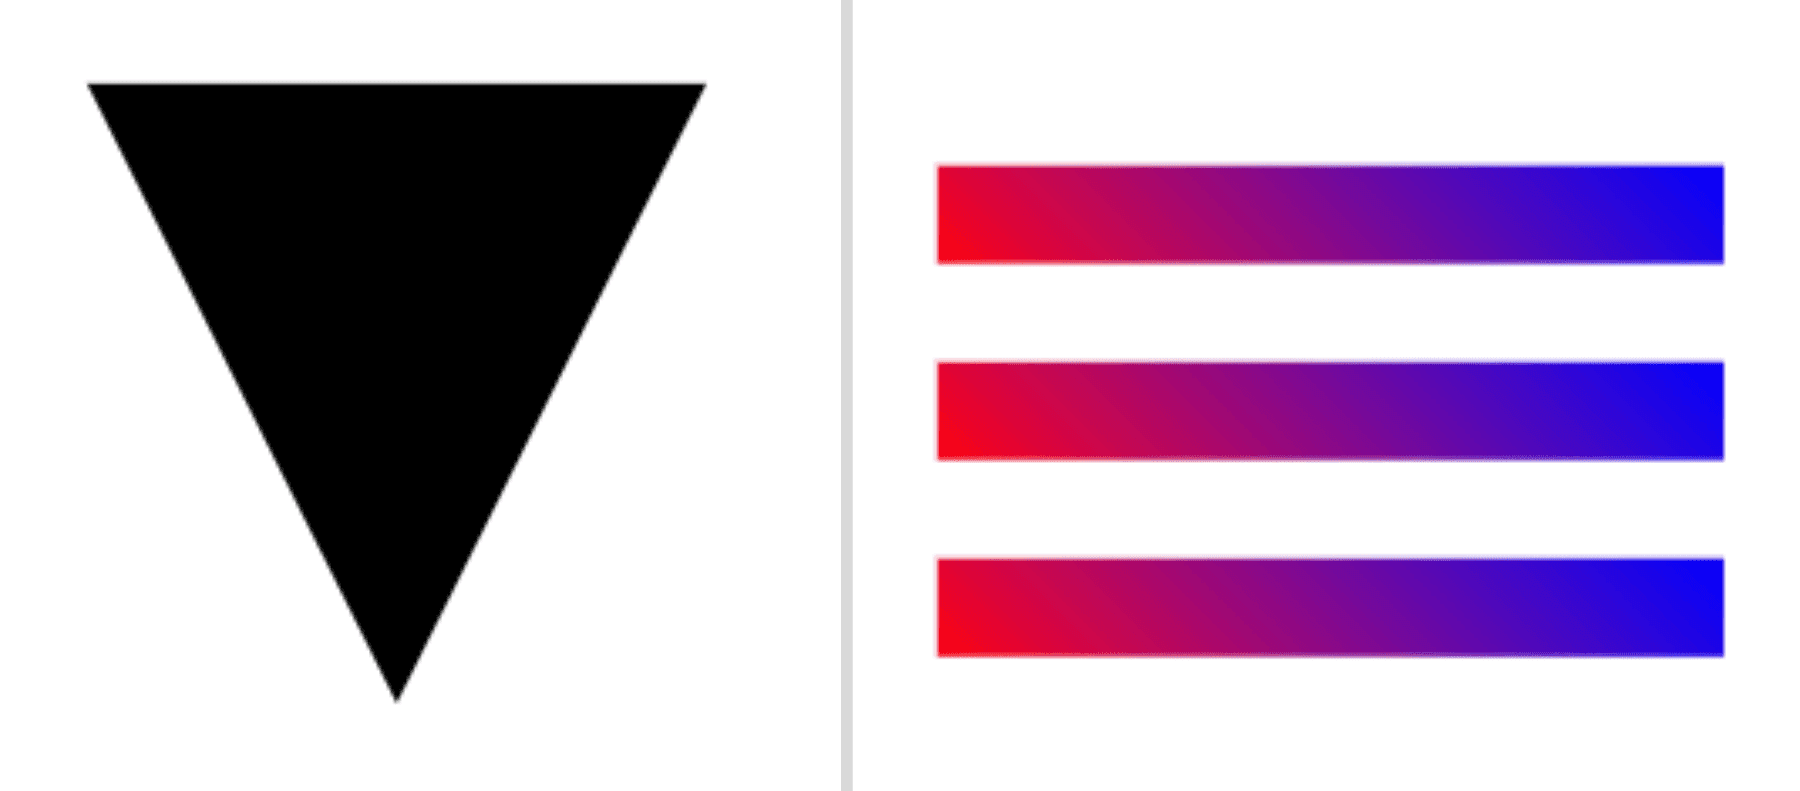
CSS3 takes care of the creation of simple geometry really well. In the example below, you can see how we can build the same complex geometrical figure and apply a gradient to it using CSS instead of SVG.
Replacing these elements with CSS boosts site speed and offers performance gains. The more replacements you can have, the more impact these Magento 2 image optimization techniques create.
For example, using the code below, you can create CSS figures (this example allows you to make an upside-down black triangle and gradient rectangles).
/* Arrow down */
#triangle-down {
     width: 0;
     height: 0;
     border-left: 20px solid transparent;
     border-right: 20px solid transparent;
     border-top: 40px solid black;
}

/* Menu Hamburger */
#hamburger {
 width: 40px;
 height: 25px;
 display: flex;
 flex-direction: column;
 justify-content: space-between;
}
#hamburger span {
 width: 100%;
 height: 5px;
 background: linear-gradient(45deg, red, blue);
}

/* Menu Hamburger */
#hamburger {
 width: 40px;
 height: 25px;
 display: flex;
 flex-direction: column;
 justify-content: space-between;
}
#hamburger span {
 width: 100%;
 height: 5px;
 background: linear-gradient(45deg, red, blue);
}
As a result, we get:
10. Improving Magento: Optimize Images by Removing Text On Images
Surprisingly, around the web, there are still a lot of images with text. It’s a bad decision in every possible way: images are heavier, non-searchable, and, in general, they are awful for text.
As you work on your strategy to optimize images in Magento 2, instead of pictures, use actual text and quality fonts. It's fully searchable, selectable, zoomable, accessible, SEO- and high-DPI device-friendly.
Top 5 Image Optimization Extensions for Magento 2
Now that you know how to optimize images for Magento 2, it's time to review some tools helping to streamline this task. Magento is abundant with corresponding extensions, such as:
- Mageplaza Image Optimizer: compressing and converting images to WebP, Lossless and Custom (Lossy) compression options, the ability to select only specific directories to optimize images in Magento and automate the optimization process to boost website performance and conversion rates;
- Image Optimizer for Magento 2 by Apptrian: optimizing pictures in the Magento admin backend, the ability to reduce image sizes without losing their quality, boost website performance, and even swap utilities to configure the extension to suit your particular needs;
- Lazy Load for Magento 2 by Amasty: improving website performance by loading product images on demand;
- Magento 2 Convert Images to WebP by BSS: simplifying image conversion to WebP, preserving decent Magento 2 image quality;
- Magento 2 WebP Images Extension by Magefan: image optimizer for Magento, allowing you to reduce the image size by converting them to the WebP format.
5 Questions You May Have Concerning Image Optimization for Magento 2
Finally, to dispel all your doubts regarding the website image optimization on Magento 2, we bring you answers to the often-asked questions on the subject.
1. Will Optimizing Images Really Make My Magento Store Faster?
Images are crucial for an eCommerce website to present its products in the best possible way. This is why there are common cases when, in the pursuit of displaying only high-quality images, store owners do harm to the website speed and performance.
By approaching Magento image compression in a smart way, you can get the best of both worlds: great quality images and ultimate performance. This requires effort, though. Therefore, it’s only fair to say that yes, if you give your store’s image optimization due attention in terms of their proper sizing, this will bring you back positive results.
Other ways to improve the store are front-end optimization, server-side tweaks, and code-level enhancements. You can also give your the needed attention to achieve better load speed.
2. What Is the Best Image Optimization Extension for Magento 2?
Depending on the needs of your store, there’s more than one Magento image optimization extension that you can choose. The plugin options differ by the offered feature set. Plus, some of them are free, and others come on a paid basis. To give you a better understanding of which one is right for you, read the section of this article in which we’ve overviewed the top 5 most popular Magento image optimization extensions.
3. What Is the Best Image Format and Size for Products in Magento?
As stated earlier in this article, converting images into the next-generation image format is surely worth considering. Switching to WebP, JPEG, and JPEG 2000 use alone can enhance your page speed.
What’s for image size, a lot depends on the type of page that the picture is shown on. Yet regardless of how your galleries look on the desktop, you must keep in mind the dimensions of the most common screen sizes that are in use and make sure that your pictures look decent on them. This way, you can avoid the pictures getting scaled down by the browser.
4. Can Image Optimization Improve the UX of the Store?
Again, thinking that high-weight, impeccable-resolution images are the only way to go for your online store is a huge mistake. Remember, people hate to wait and will get frustrated if a picture takes forever to load. So, don’t underestimate the importance of image size when you work on improving your Magento store and optimizing images.
There are many ways that compressing images or approaching how they are loaded can help improve the store’s UX. Lazy loading or image caching, described in this article above, are some of the solutions. However, lazy loading can create delays, which are attributed to image loading and decoding processes. In addition, when pages are not configured to accommodate lazy loading scripts, content shifts may occur. These issues can be prevented if you turn to experienced .
5. Does Magento 2 Image Optimization Influence the Site’s SEO?
Because SEO is very closely tied to performance, the speed of the store does influence the site’s rankings and positions. Image optimization for SEO on Magento 2 shouldn’t be overlooked, by all means. This concerns appropriate image naming, Alt tags, and descriptions, to say the least.
While visual content matters a lot, if it causes the page speed to backpedal, this is a problem of high priority to be fixed. High-resolution photos can look good yet without being properly handled in terms of their loading, they can cause severe harm to the site’s performance and Magento SEO.
Conclusion
In this image optimization guide, we've outlined some urgent steps to take regarding your visuals. Remove excessive images on Magento, don't ignore the product image size, use the lazy load extension, and replace website images with CSS3 styles. Improve your images SEO-wise, adding Alt tags and proper names and descriptions.
Check how well your optimization process goes using profilers and Google PageSpeed Insights. All these tools will help you make the most out of Magento 2 image optimization. And if you'd like to partner with an experienced team, we are here to even faster.