Although transferring data using fax machines may seem quite outdated in the 2020s, numerous businesses still need such a solution. Those who are using CRM systems like Salesforce may opt for online fax integrations. It'll allow you to receive and send fax documents, securely store them in the CRM, and even automate processes.
On this page, we'll walk you through the process of fax integration with Salesforce. We’ve put together a step-by-step guide on how it’s done using the example of an application solution provided by RingCentral, which is one of the most popular services for sending digital faxes from Salesforce.
Table of Content
RingCentral Salesforce Integration in 6 Steps
Let's go over the Salesforce integration process that'll allow you to send PDF files that are linked to a specific lead using fax. We will create an LWC component and several Apex classes in Salesforce. In turn, they'll access open API and transmit all the data that's required for sending a fax to RingCentral.
Step 1: Create a RingCentral Account & Add an Application
Salesforce fax integration begins with account creation. If you don’t have a account yet, you’ll need to get one.
Then add a new application. Its credentials will be used for authorizing and sending data from Salesforce.Be careful when selecting the application type for your RingCentral Salesforce app. Mind that the integration with Salesforce requires a type of app that supports password authorization. So, you can choose “Other Non-UI (e.g., cronjob, daemon, command line)” as shown in the screenshot below. You can leave the rest of the default settings unchanged.
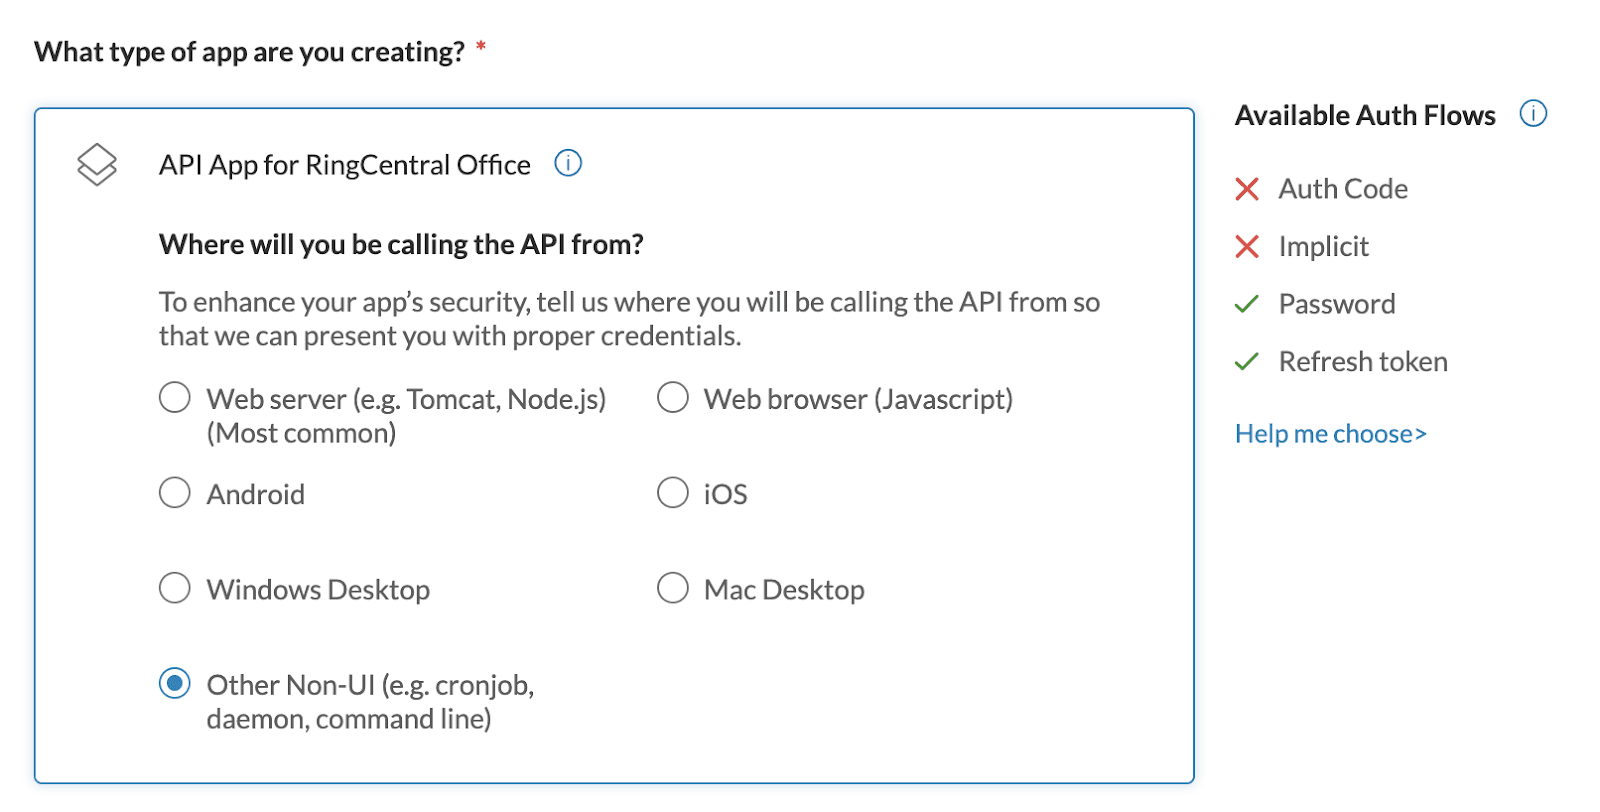
Note: the new application will have the “Sandbox” status. To switch it to “Production”, make a minimum of 5 requests to each endpoint you used in the "Sandbox" status. Mind that you need at least 20 successfully sent requests in total.
Step 2: Save RingCentral Credentials to Salesforce
Next, add RingCentral to Salesforce by saving the RingCentral application credentials in the Salesforce system. This should be done so that you have the opportunity to edit the credentials from the Admin Panel and to have access to them from the apex code.To do this, create a Salesforce “Custom Setting” object by going to Setup → Custom Code → Custom Settings and name it “RingCentral_Credentials”.This object needs the following fields that are required for integration data:
- App Key;
- App Secret;
- Username;
- Password;
- Extension.
Then create a default data set and enter the values obtained from the RingCentral application.
Step 3: Develop the Component & Apex Classes
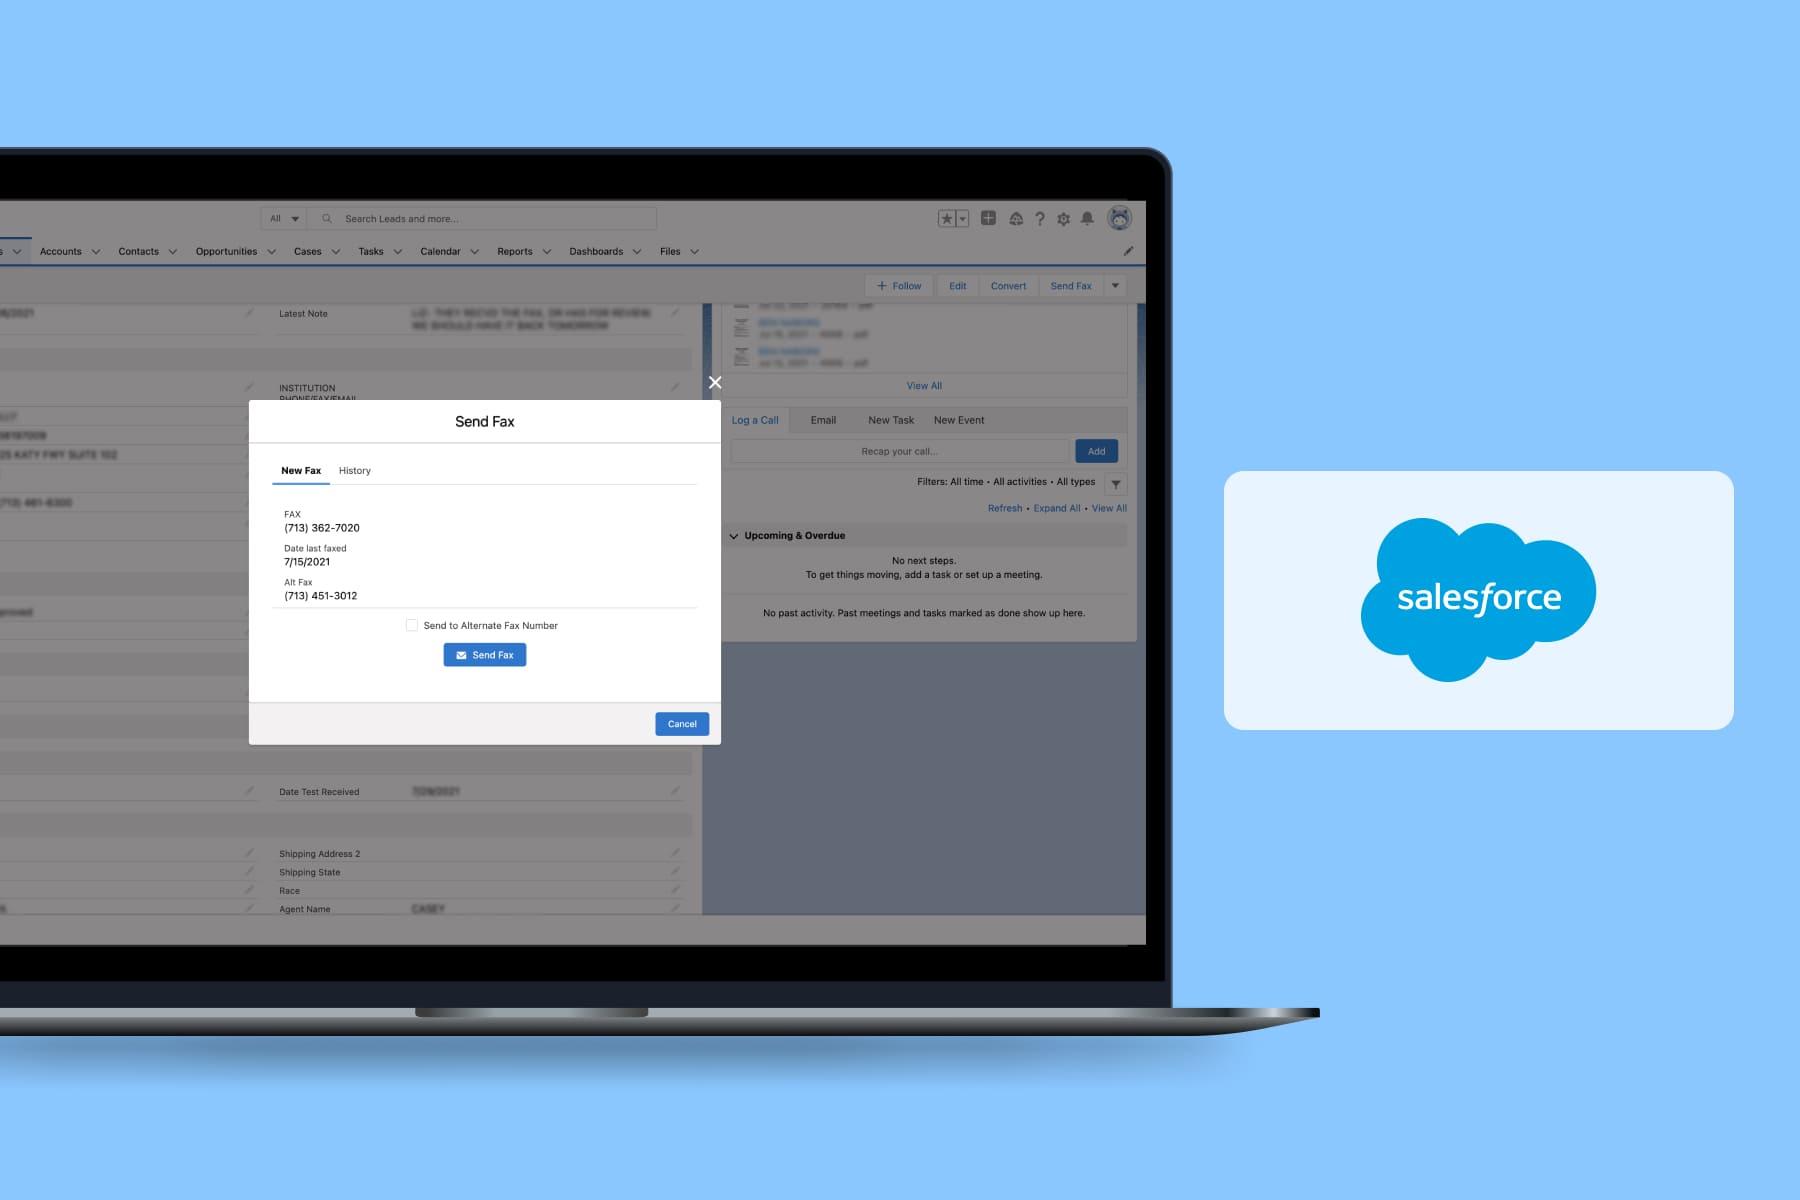
Now you can start developing the component and your apex classes. The created LWC component looks like this:
This will allow Salesforce users to send PDF files attached to a current lead via fax. In addition, the user will also have the chance to view the history of sent faxes for the given lead with the corresponding sending status.
We'll only consider the fax sending button code. To create a component, add a new folder with the component name in the directory of your project named lwc (for example, "SendFaxForm").
a) Then, in the new folder, create a sendFaxForm.js-meta.xml file with a description of the component:
<?xml version="1.0" encoding="UTF-8"?>
<LightningComponentBundle xmlns="http://soap.sforce.com/2006/04/metadata">
   <apiVersion>52.0</apiVersion>
   <isExposed>true</isExposed>
</LightningComponentBundle>
b) This is a sendFaxForm.html file with markup:
<template>
   <lightning-button
           class="send-fax-button"
           onclick={handleSendFaxClick}
           variant="brand"
           label="Send Fax"
           icon-name="action:email">
   </lightning-button>
</template>
c) This is a file with JS code (sendFaxForm.js):
import {LightningElement, api} from "lwc";
import sendFaxAction from "@salesforce/apex/FaxController.sendFaxAction";
import {ShowToastEvent} from "lightning/platformShowToastEvent";
export default class SendFaxForm extends LightningElement {
   @api recordId;
   handleSendFaxClick(event) {
       let button = event.target;
       button.disabled = true;
       sendFaxAction({leadId: this.recordId})
           .then(() => {
               this.dispatchEvent(
                   new ShowToastEvent({
                       title: "Success",
                       message: "Fax has been added to queue",
                       variant: "success"
                   })
               );
               button.disabled = false;
           })
           .catch((error) => {
               this.dispatchEvent(
                   new ShowToastEvent({
                       title: "Error while sending fax",
                       message: error,
                       variant: "error"
                   })
               );
               button.disabled = false;
           });
   }
}
At this point, the creation of the LWC component can be considered complete.
Step 4: Create a Class with Apex Code
The next step of your RingCentral and Salesforce integration is creating a class with apex code. It’ll be responsible for sending data to the RingCentral server.
a) To do this, add the FaxController.cls-meta.xml file to the classes/controllers folder:
<?xml version="1.0" encoding="UTF-8"?>
<ApexClass xmlns="http://soap.sforce.com/2006/04/metadata">
   <apiVersion>52.0</apiVersion>
   <status>Active</status>
</ApexClass>
b) Continue the RingCentral Salesforce setup by adding a FaxController.cls file with your apex code. There are a few things worth noting. The class declaration looks like this:
public with sharing class FaxController {

}
c) Next, create two methods:
- getAccessToken (this function allows getting an access token from RingCentral);
- sendFaxAction (this function is responsible for sending the fax).
d) To get an access token, you must send a request to RingCentral's API server by sending data from your Custom Setting object to the endpoint /restapi/oauth/token.
A token can be requested only 5 times per minute. So, if you need to send faxes very often, the tokens need to be saved in your system. One of the ways to organize such a process is by using Platform Cache by Salesforce. Note that this solution is available only in the Salesforce Enterprise version and those that follow, so it might not be your case.Moreover, unfortunately, you won't be able to use the Custom Setting field for this. This is because the field's maximum length is 255 characters, whereas the token consists of more than 300. An alternative option may be creating a custom object with the token fields and the expiration date. In our case, the code for receiving the token looks like this:
private static String getAccessToken(Ringcentral_Credentials__c rc){

 if (!Cache.Org.contains('ringcentralAccessToken')) {
   Ringcentral_Credentials__c rc = Ringcentral_Credentials__c.getOrgDefaults();
   HttpRequest req = new HttpRequest();
   req.setEndpoint(rc.API_Url__c + '/restapi/oauth/token');
   req.setMethod('POST');
   String authorizationHeader = 'Basic ' + EncodingUtil.base64Encode(Blob.valueOf(rc.App_Key__c + ':' + rc.App_Secret__c));
   req.setHeader('Authorization', authorizationHeader);
   req.setHeader('Content-Type', 'application/x-www-form-urlencoded;charset=UTF-8');
   req.setBody('grant_type=password&username=' + rc.Username__c + '&extension=' + rc.Extension__c + '&password=' + rc.Password__c);
   Http http = new Http();
   HTTPResponse res = http.send(req);
   Map<String, String> responseData = (Map<String, String>)JSON.deserialize(res.getBody(), Map<String, String>.class);
   String accessToken = responseData.get('access_token');
   Cache.Org.put('ringcentralAccessToken', accessToken, Integer.valueOf(responseData.get('expires_in')));
 }
 return String.valueOf(Cache.Org.get('ringcentralAccessToken'));
}
Step 5: Handling the Fax Sending Requests Matter
After receiving the token, you're ready to send any requests to RingCentral. However, there is a minor challenge with fax sending requests.
The thing is that the class used in Salesforce to send requests to third-party services doesn't support sending files. For this reason, you have to manually put together the body of the request and send it using the setBodyAsBlob function. For convenience, we used a ready class that you can check out .
Below is the code of the sendFaxAction function:
@AuraEnabled(cacheable=false)
public static String sendFaxAction(String leadId) {
 Lead leadRecord = [Select Id, FAX_REPORT_TO__c from Lead Where Id =: leadId];
 String receiverFaxNumber = '+1' + leadRecord.FAX_REPORT_TO__c.replaceAll('[^0-9]', '');
 String pdfDocumentDescription = 'PDF_FORM_' + leadId;
 ContentDocument pdfDocument = [SELECT LatestPublishedVersionId FROM ContentDocument WHERE Description =: pdfDocumentDescription];
 ContentVersion pdfVersion = [select Id, Title, ContentDocumentId, FileExtension, versionData from ContentVersion where Id = :pdfDocument.LatestPublishedVersionId limit 1];
 string fileName = pdfVersion.Id;
 if (pdfVersion.FileExtension != null && pdfVersion.FileExtension != ''){
   fileName = fileName + '.' + pdfVersion.FileExtension;
 }
 string contentType = EinsteinVision_HttpBodyPart.GetContentType();
 //  Compose the form
 string form64 = '';
 form64 += EinsteinVision_HttpBodyPart.WriteBoundary();
 form64 += EinsteinVision_HttpBodyPart.WriteBodyParameter('to', receiverFaxNumber);
 form64 += EinsteinVision_HttpBodyPart.WriteBoundary();
 form64 += EinsteinVision_HttpBodyPart.WriteBodyParameter('coverIndex', '0');
 form64 += EinsteinVision_HttpBodyPart.WriteBoundary();
 form64 += EinsteinVision_HttpBodyPart.WriteBlobBodyParameter('attachment', EncodingUtil.base64Encode(pdfVersion.versionData), fileName);
 blob formBlob = EncodingUtil.base64Decode(form64);
 string contentLength = string.valueOf(formBlob.size());
 Rigncentral_Credentials__c rc = Rigncentral_Credentials__c.getOrgDefaults();
 HttpRequest req = new HttpRequest();
 req.setEndpoint(rc.API_Url__c + '/restapi/v1.0/account/~/extension/~/fax');
 req.setMethod('POST');
 String authorizationHeader = 'Bearer ' + getAccessToken();
 req.setHeader('Authorization', authorizationHeader);
 req.setHeader('Connection', 'keep-alive');
 req.setHeader('Content-Length', contentLength);
 req.setHeader('Content-Type', contentType);
 req.setTimeout(120000);
 req.setBodyAsBlob(formBlob);
 Http http = new Http();
 HTTPResponse response = http.send(req);
 return 'done';
}
Step 6: Add the Component to the Lead Page
The final step of integrating RingCentral and Salesforce is adding the component to the Lead page. This can be done using a button in the Actions list, which will call a pop-up with your component. To do that, create an aura component:
a) Create a folder in the aura directory and call it “SendFaxFormAction”.
b) Add the SendFaxFormAction.cmp-meta.xml file containing the following:
<?xml version="1.0" encoding="UTF-8" ?>
<AuraDefinitionBundle xmlns="http://soap.sforce.com/2006/04/metadata">
   <apiVersion>52.0</apiVersion>
   <description>Action to send fax</description>
</AuraDefinitionBundle>
c) Create a SendFaxFormAction.cmp file:
<aura:component implements="flexipage:availableForAllPageTypes,force:hasRecordId,force:lightningQuickAction"
access="global">
<c:sendFaxForm recordId="{!v.recordId}"></c:sendFaxForm>
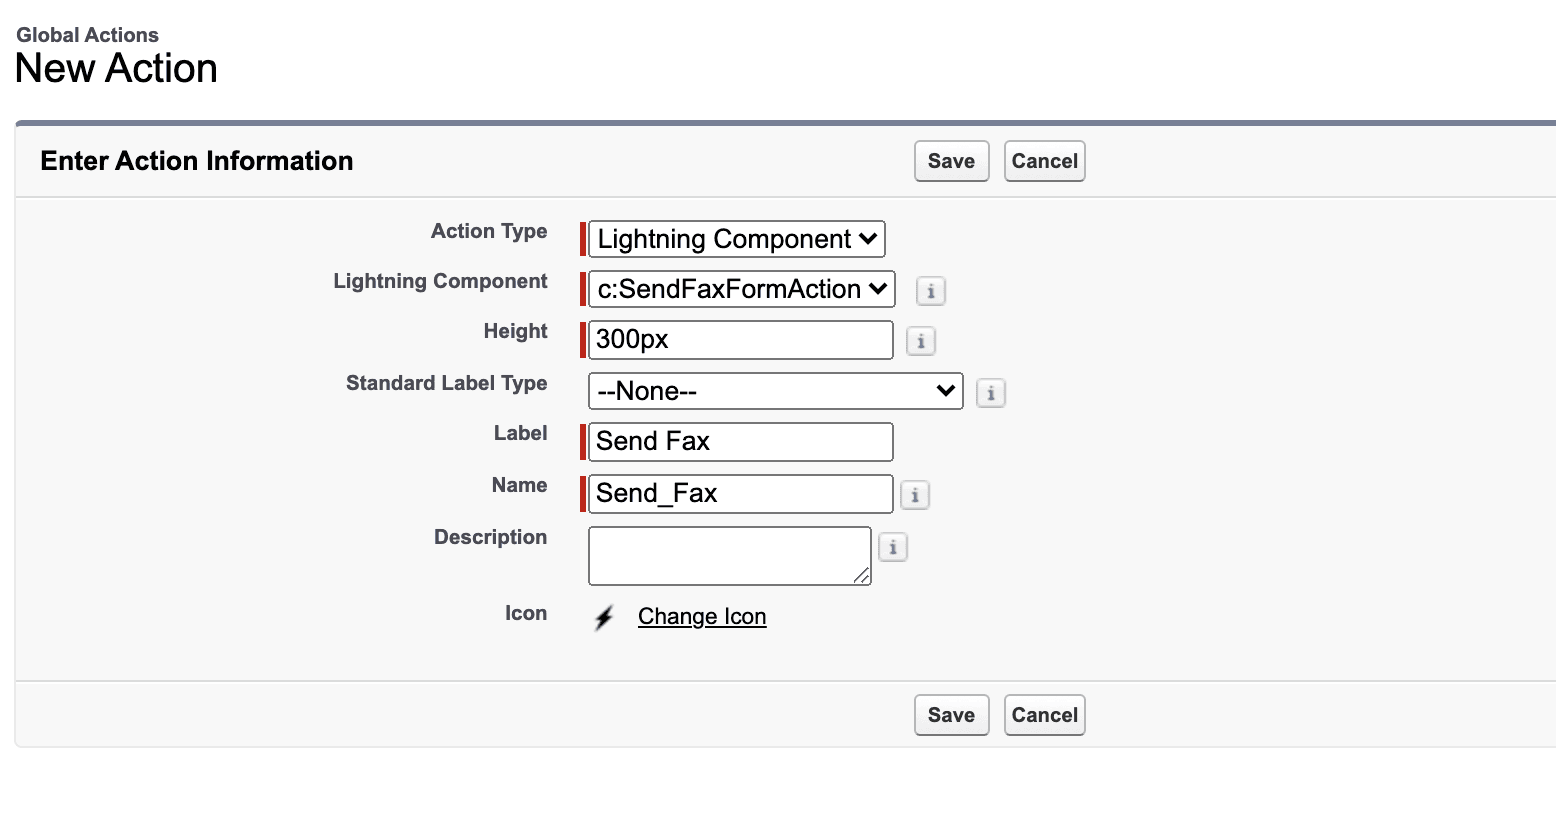
</aura:component>Now that the aura component is ready, you can select it when creating a new Global Action and add it to your layout where necessary. To do this, go to Setup → User Interface → Global Actions.

Get a Free Salesforce Audit Example
Explore our Salesforce audit report on diagnosing common bottlenecks in the Salesforce ecosystem.
In Conclusion
Those companies in need of a digital fax solution can benefit from a cloud-fax solution like the one described in this RingCentral Salesforce integration guide.
Sending faxes automatically from Salesforce using RingCentral can streamline processes, enhance agent productivity, and keep your send-outs organized within one secure environment. Feel free to reach out to us if you need a consultation on electronic faxing integration or professional .