In November 2018, Magento 2.3.0 update quietly introduced integration with message queue management tool RabbitMQ. The new feature opened powerful optimization options for both Magento 2 Commerce and Open Source editions.
Both editions are designed to handle the stress of thousands of high-load network operations that take a lot of server time and effort: , checkout and credit card transactions, email campaigns, and other high load tasks. All these operations require a tremendous effort from the backend of your store.
It’s especially challenging during peak hours. Imagine you need to process hundreds of requests at any given time but your server can't handle them all because it's executing a separate long-term process that should actually be in the background. A single lost request is the money you failed to earn. All this effort, lost.
And if the process depends on a third-party HTTP(S) connection, upgrading to a better server will not solve the problem. No matter how powerful your own server is if you have to wait for other stuff to happen, things won’t go faster.
For previous implementations, Magento proposed solutions based on MySQL+cron message queue management but the use of cron is suboptimal for this task. It’s just not built for that. Cron executes an extremely crucial set of tasks in the system but it’s hard to use well for asynchronous message queue management. The cyclic nature of cron runs means it can't instantly react to all events that take place in order to provide a smooth queue parallelization.
RabbitMQ offers a completely different approach to the challenge. It became the tool of choice for many developers who want to optimize high load operations and . It’s an effective message queue system when you need to spread out the load and do stuff asynchronously.
In general, any operation that takes more than 7 seconds of real-time to process should go through a message broker. For Magento 2, these are:
- third-party services and integrations,
- checkout and credit card transactions,
- bulk email campaigns,
- various high load operations.
The installation and setting up of RabbitMQ shouldn't raise significant difficulties. However, we've been using the tool for many years and have seen many configuration mistakes amateur developers make. Hence, you may turn to Onilab's if you face any troubles.
1. Install RabbitMQ in Magento 2
Important things first! Before you install Magento 2, you need to configure a messaging system. Setup RabbitMQ and all its prerequisites before you install Magento. This is imperative for smooth operation.
For Ubuntu 16, use the following command:
sudo apt install -y rabbitmq-serverхThis will install the latest RabbitMQ version. For us, it’s RabbitMQ v3.7.14 released in March 2019. Note that the command takes care of Erlang as well. There’s no need to install Erlang language packages separately.
Next you install Magento. In order to connect RabbitMQ to Magento, you need to add the following parameters (valid for Magento Open Source and Magento Commerce versions):
--amqp-host="" --amqp-port="5672" --amqp-user=""
password="" --amqp-virtualhost="/"
Naturally, you have to replace <hostname> and other variables with your actual config values:
- amqp-host put here the hostname of your RabbitMQ installation,
- amqp-port is 5672 by default, no need to change, works fine as it is,
- amqp-user should be changed to something unique, leaving default values is a bad idea, the default pair for user/password is guest/guest,
- amqp-password – same here, get creative, change to something unique,
- amqp-virtualhost – leave it “/” if you have installed Magento 2 to the default folder,
- amqp-ssl should be set to “true” if you want to use SSL to connect to RabbitMQ.
2. Setup SSL Certificate for RabbitMQ
RabbitMQ needs a correct SSL config in order to work as intended. Find your env.php file and edit ssl and ssl_options to look like this:
'queue' =>
 array (
   'amqp' =>
   array (
     'host' => 'rabbitmq.yoursite.com',
     'port' => '11213',
     'user' => 'magento',
     'password' => 'magento',
     'virtualhost' => '/',
     'ssl' => true,
     'ssl_options' => [
           'cafile' =>  '/etc/pki/tls/certs/DigiCertCA.crt',
           'certfile' => '/path/to/magento/app/etc/ssl/test-rabbit.crt',
           'keyfile' => '/path/to/magento/app/etc/ssl/test-rabbit.key'
      ],
    ),
 ),
3. Configure RabbitMQ for Magento 2Now we need to start the message queue consumers. If you use Magento Commerce Cloud as the AMQP provider, first we add RabbitMQ to services.yaml and magento.app.yaml files.
In .magento/services.yaml, allocate disk space for your RabbitMQ installation:
rabbitmq:
	type: rabbitmq: 3.7.14
	disk: 1024
Now link in .magento.app.yaml your environment variable in the Git branch, e.g.:
relationships:
rabbitmq: "rabbitmq:rabbitmq"
If you use a third-party AMQP service provider such as CloudAMQP or RabbitMQ, setup your QUEUE_CONFIGURATION environment variable there to link Magento 2 and RabbitMQ together:Note that “merge: true” will update just the mentioned variables in env.php file without overwriting everything else. If you write “merge: false”, every single setting will be overwritten.
4. Check That RabbitMQ Is Working Correctly
Log into the Admin Panel of your web service of choice to make sure that the sessions are being recorded correctly.
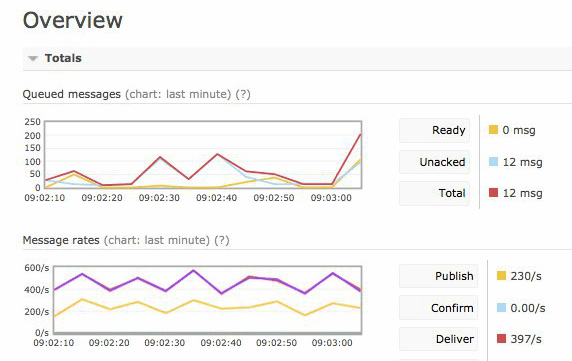
Depending on your load, you’ll typically see a lot of logged activity here. It means everything works fine. Good job!

40 Hours of Magento Services. FOR FREE
Try our custom development, optimization, support, and design services. One week, free of charge, no strings attached.
Building a Strong Backbone for Your Magento 2 Store
With Magento 2 you have a unique opportunity to integrate a robust message queue system without a lot of customization work.
The integration process is much harder when you need to use RabbitMQ for Magento 1 stores. Onilab developer team has ample experience in e-commerce store optimization including RabbitMQ integrations. We provide outstanding and reach lightning-fast performance. Let’s discuss your exact challenges to determine how we can help you overcome them together.