Keeping things nice and organized is great for any business. The same goes for saving precious time on routine work, which well-orchestrated “conveyor belt” processes could easily replace. Salesforce for workflow management embodies this principle, allowing you to streamline and enhance operations. is, by all means, a lifesaving and efficient feature to surely get ahold of and use to your business’ advantage.
That said, among the key automation tools you can exploit are , Visual Workflow (Cloud Flow Designer), Process Builder, Flow Builder, and Workflow Rules.
In this article, we’ll answer commonly asked questions revolving around Salesforce workflow rules, give examples of their use cases, explain which elements the rule consists of, and even provide you with an easy step-by-step guide on how to set up workflow rules on several example cases. Let’s get started!
Table of Content
What is a Workflow Rule in Salesforce?
Workflow rules (or simply workflow) is an automation tool in Salesforce that offers time-saving solutions for making different internal processes of a company switch from manual work and for optimizing various procedures. Workflow rules indicate specific criteria to be met in order to trigger automated actions. For instance, based on a record change (like the “Date” field) on an Opportunity, an auto-notification email alert can be sent to a User.
This means that with properly functioning workflows, you may simply eliminate the human factor “from the everyday work equation”, stop wasting resources, and get rid of the constant necessity to keep things in your head.
Salesforce Workflow Rule Use Cases
There are endless ways you can use workflows, but of course, it is easier to illustrate what is a workflow in Salesforce with some examples. Mentioning the specific things that can be performed, you may automate the following 4 workflowactions in Salesforce:
- creating tasks,
- updating fields,
- sending email alerts,
- sending outbound messages.
To see these four actions in use, let’s take a look at a couple of cases.
1. Task creation
Automatically creating assignments for individual users based on a change on the object is a great time-savor. Here’s a bright scenario of when workflows could be used like this. Let’s assume that the customer has completed the purchase of his large order that’s comprised of different product types. As the Order status changes to “Paid”, the specialist who’s in charge of assembling and afterward mailing out the package to the client can get an automatically assigned task to begin putting together the order for shipping.
2. Updating fields
A common use case of workflow rules is the function to overwrite field values with new data. This is, perhaps, the most frequently used action but note that it won’t work in the cross-object case.
An example of when an auto field update could be applicable would be, f.i. on an Order page. If a payment is overdue from the client’s side, the “Payment Status” field could be automatically changed to “Delayed” based on the Date. This time-dependent action could be handy for monitoring the orders and taking further action.
3. Email alerts
The third way to benefit from workflows is by setting up email alerts (via email templates) that would be sent to receivers or lists. For instance, creating a workflow rule that would track the end dates of contracts and then send out notifications would be very handy. Case in point, if the expiration date of a contract with an employee/partner/client/etc is coming up, an automatic alert could be sent to the manager or person responsible for keeping track of such things. This way you can avoid missing deadlines and unfortunate consequences.
A great life hack for team leads and heads of departments is receiving email reminders about an employee’s upcoming “workaversary”. Congratulating your teammate on his/her accomplishments and another year on the job is a wonderful way to show that you care, agree?
4. Outbound messages
The fourth workflow action is used for forwarding SOAP messages to external systems using notifications. An example of this action’s use is when apart from Salesforce, you have another external system where data is kept, say, for marketing purposes. Let’s suppose that these systems have common client data, and if a change is made on a field in Salesforce (f.i. in the last name of a customer) a workflow rule can send an outbound message to this marketing system, signaling an analogous field update in the client name.

Get a Free Salesforce Audit Example
Explore our Salesforce audit report on diagnosing common bottlenecks in the Salesforce ecosystem.
How to Create a Workflow in Salesforce: Explained on Cases
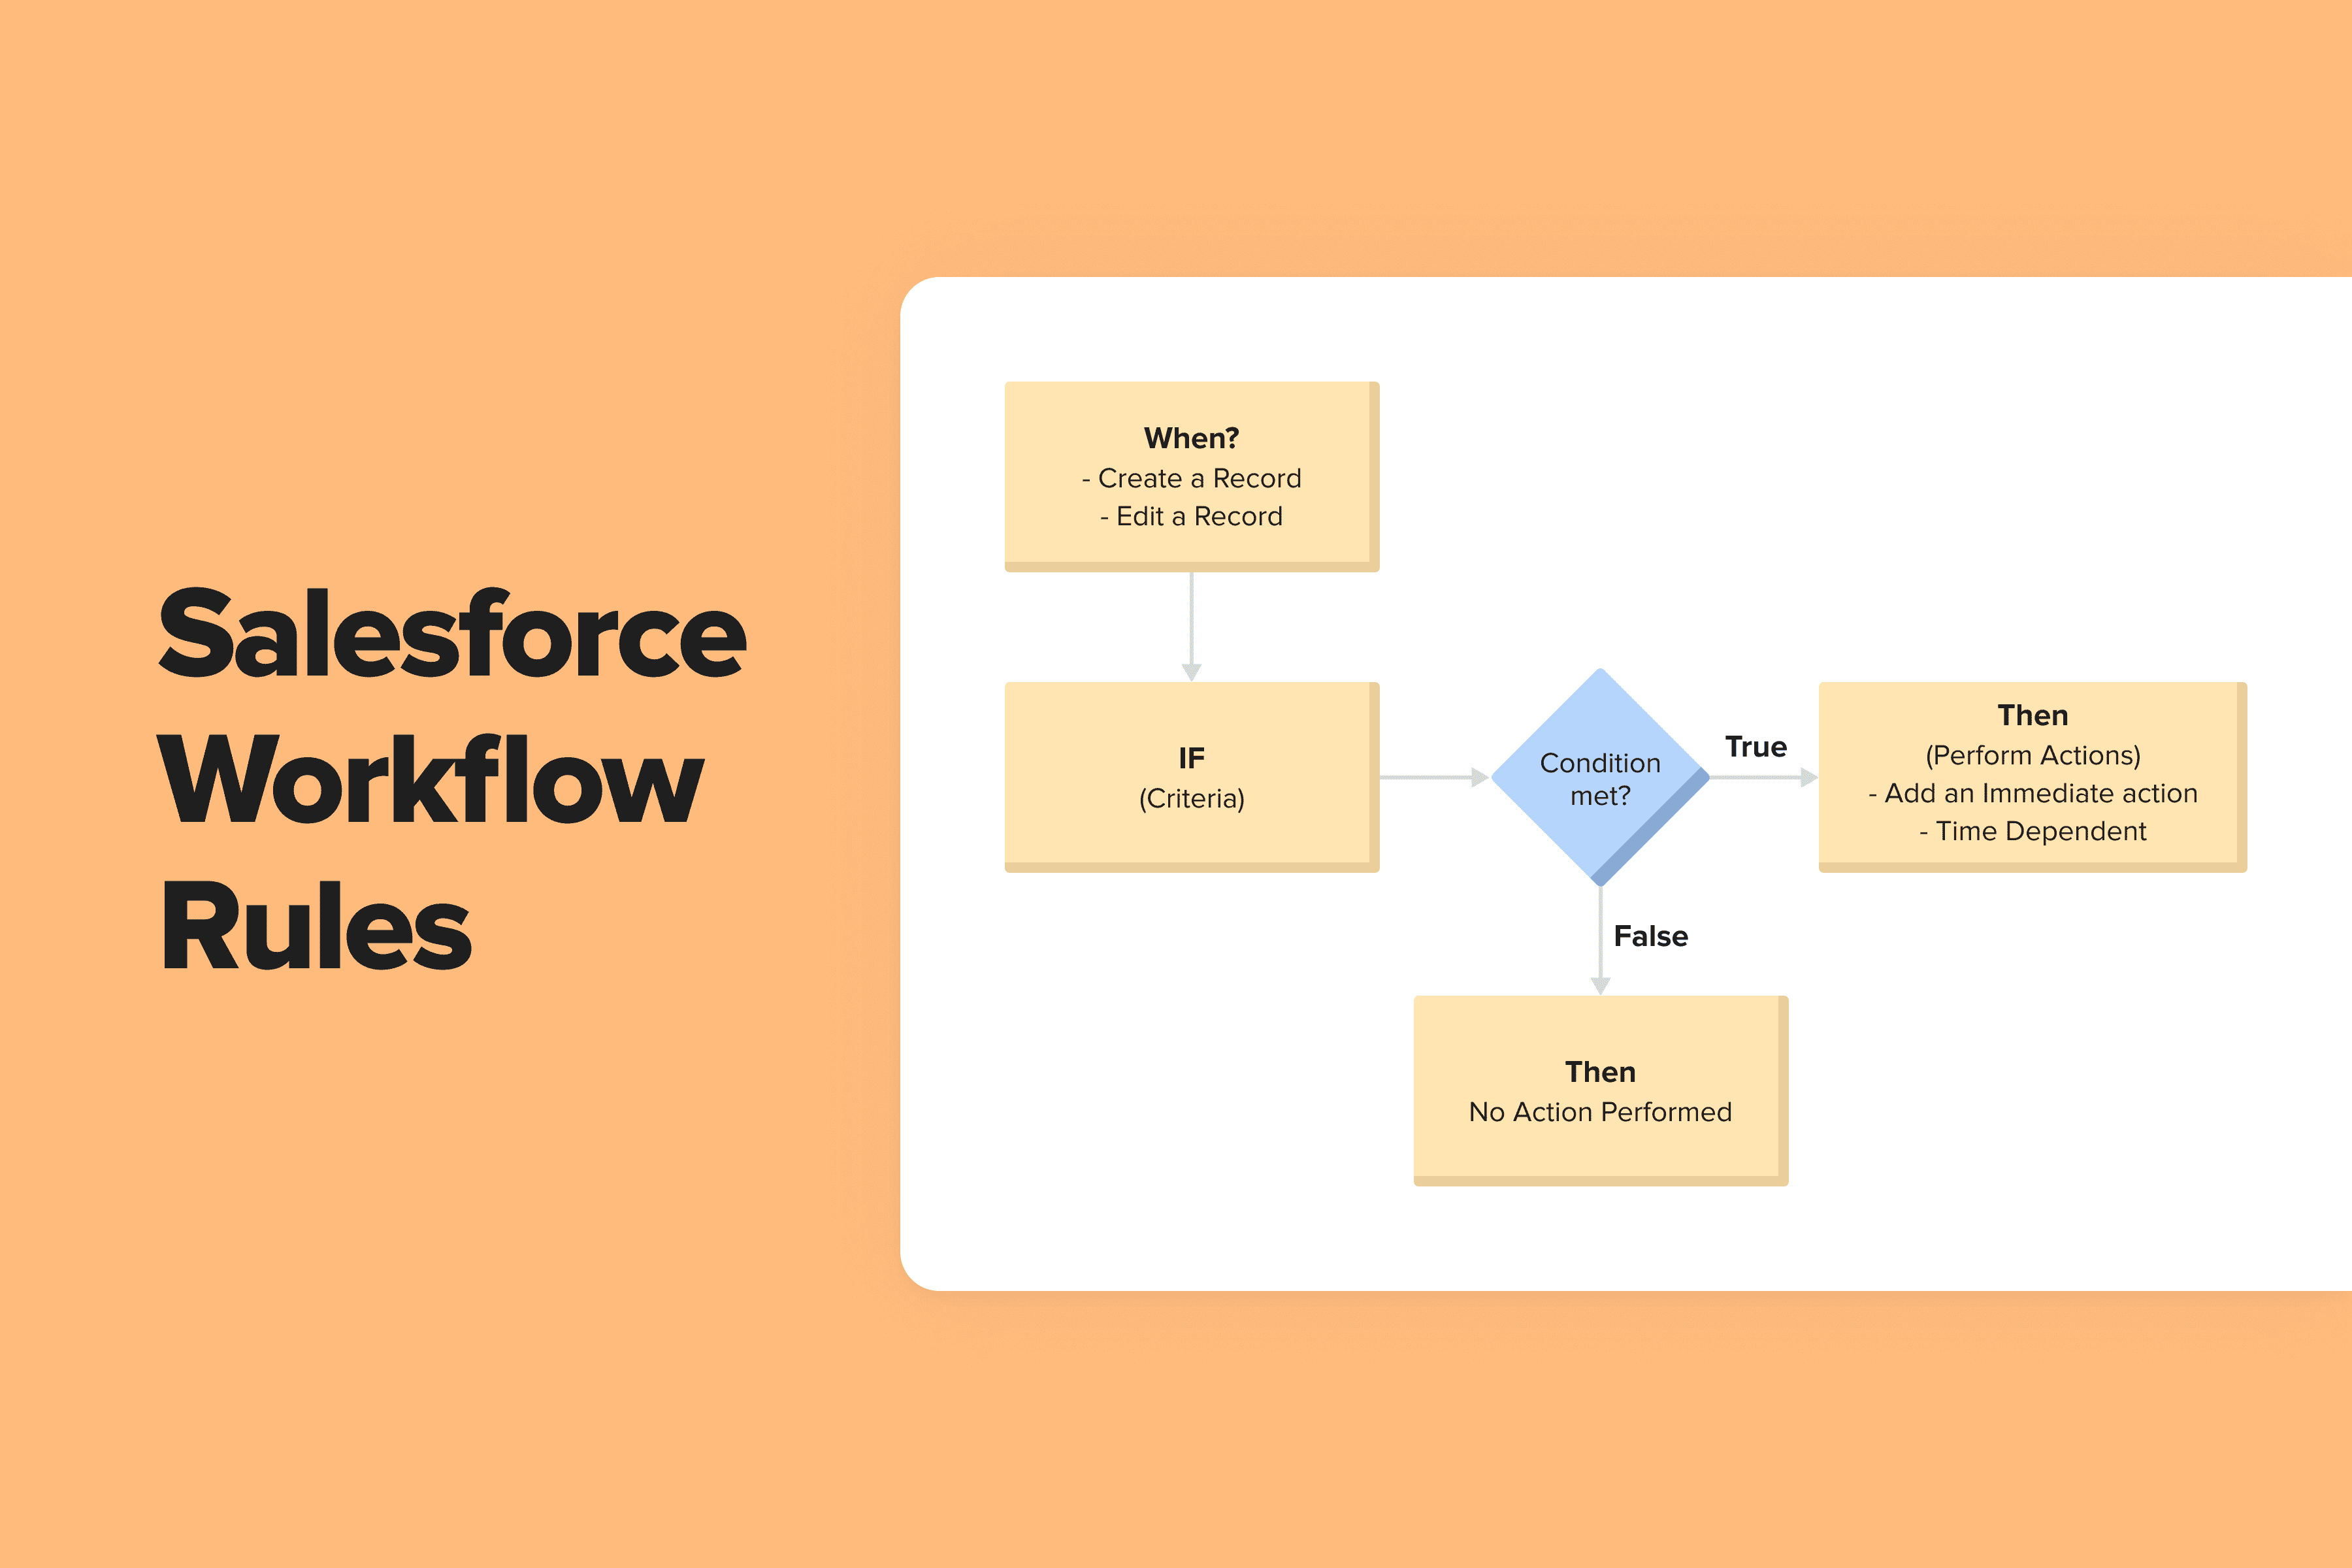
1. Which Elements Make up a Workflow Rule?
Now that we have a better understanding of where workflows can be applied, let’s figure out what a workflow is comprised of before we proceed to the actual setup:
- the object (the record on which the workflow will be performed, f.i. Opportunity, Product, Account, Order, etc),
- evaluation criteria (the first step of the rule that determines in which cases will the workflow evaluation process begin, i.e. only when the record is created or after there’s a saved change on it),
- rule criteria (the second step that’s made up of conditions which should be met to trigger the action),
- actions (the specified things which will be done if the rule criteria coincide, ex. a field will be changed or a task will be assigned),
- (optional) the recipient of the action (f.e. who will get the email alert) and his role.
Depending on whether the triggered action of the workflow should fire straight away or only at a specific time, there exist immediate action workflows and time-based ones. We have prepared two separate cases for each of these setups.
2. Case 1: Immediate Action Workflow Rule
Case Description
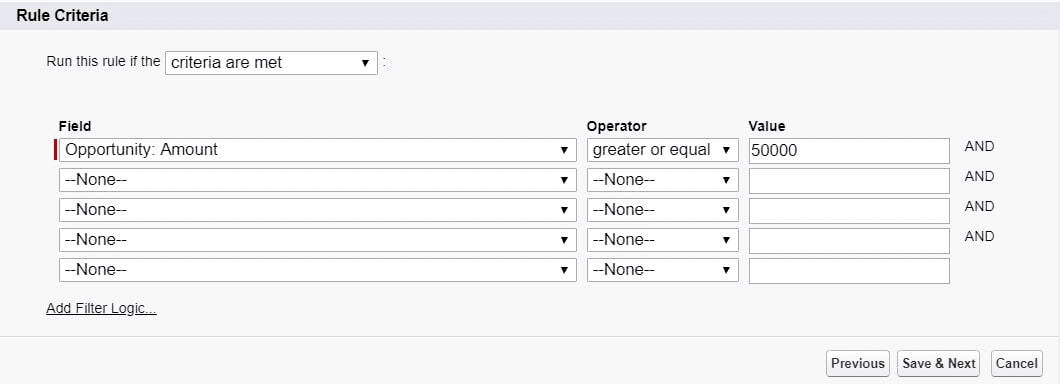
Johnson Building Materials LTD offers various products for floor construction. To handle large orders worth more than 50k efficiently, they’ve decided to go over the delivery plan process in detail by discussing it with their Vice President of Sales. When the Opportunity amount is 50000$ or higher, the workflow rule in Salesforce should automatically assign a task to the VP of Sales to review the Opportunity and discuss the further action plan with the sales specialist.
Step 1: Select the object
In order to get started with the process, type in “Workflow” in the “Quick Find”, select the “Workflow Rules” under “Process Automation”, and press the “New Rule” button in the center of the page. In the “Object” field select “Opportunity” from the dropdown list and press “Next”.
Step 2: Choose the evaluation criteria
When creating workflow rules, be careful when picking evaluation criteria. This is the starting step of the verification procedure that your rule will have to go through.
There are three types of evaluation criteria in Salesforce to choose from which will determine how the selected record will undergo the cycle of evaluation depending on what’ll be applied:
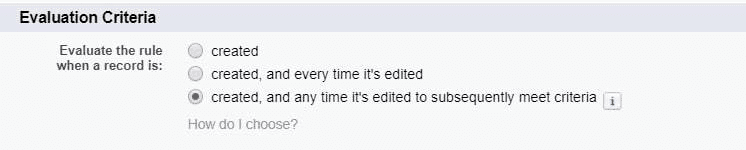
- Created (means that the rule will be evaluated for meeting the criteria only once when the record has just been made),
- Created, and every time it’s edited (the evaluation step will work when a new record is made, as well as whenever any change on it is saved and the criteria match),
- Created, and every time it’s edited to subsequently meet criteria (the evaluation will work when the record is made; plus it’ll trigger if the rule criteria is met but when previously it hadn’t).
The second and third evaluation criteria types — “Created, and every time it’s edited” and “Created, and every time it’s edited to subsequently meet criteria” — often cause confusion. Let’s clarify what is the key difference between the two.1) In the case with “Created, and every time it’s edited”, the evaluation rule will fire:
- for the first time when a new record was just created,
- repeatedly, every single time there’s absolutely any saved update/change on this record afterward, but as long as these changes don’t break the indicated workflow rule criteria. Meaning it’ll trigger and perform the action again and again (f.e. send an email notification) each time an edit is saved, even if the updated field on the record was just a typo fix that’s not connected with the workflow rule criteria directly, and even if an analogous action (email sent) was performed before for the record.
2) As for the case with “Created, and every time it’s edited to subsequently meet criteria”, the evaluation rule will trigger:
- for the first time when a new record was created,
- as well as after an update was made on the record that would make the workflow rule criteria match, when previously this record didn’t meet the criteria (but now it does). Unlike the previous option, this rule doesn’t fire continuously and ignores edits made on the record which don’t have anything to do with the rule itself. It’ll only trigger the action (f.e. send an email notification) if there was no necessity in doing so previously since the record didn’t meet the criteria, but because of a saved change, the record now does meet the criteria, so the action will be fired.
3) Let’s take a look at an example. For instance, the rule states that if the Opportunity Amount is equal or greater than 10000, send an email notification to the VP of Sales.
When created on December 1st, Opportunity “X” had the Opportunity Amount 10200. In a week, on December 8th, the Sales Specialist contacted the potential client and made changes in the “Comment” field. After one more week, on December 15th, after a follow-up call with the client, the Opportunity Amount was changed to 9500. The fourth time, on December 22nd, the client confirmed different numbers, and the Opportunity Amount was changed to 11000.
- If “Created, and every time it’s edited” was chosen: the workflow rule would run 3 times and send email notifications to the VP of Sales (on December 1st, 8th, and 22nd), even the second time when only a comment was added. And if other changes will be made later on to any fields on Opportunity “X” when the amount is equal to or greater than 10000, more of the same notification will be sent.
- If “Created, and every time it’s edited to subsequently meet criteria” was chosen: the rule would work 2 times: when Opportunity “X” was created on December 1st and on December 22nd when the amount now fits the rule criteria although it didn’t the week before. In case some other field will be updated (f.e. a comment will be added) when the amount is equal to or greater than 10000, no more notifications will be sent to the VP of Sales.
→ For the Johnson Building Materials LTD case, select the third radio button “Created, and every time it’s edited to subsequently meet criteria”.
Step 3: Set up the rule criteria
To set up the rule, indicate the following criteria to be met:→ In the “Field” find “Opportunity: Amount”, set the “Operator” as “greater or equal”, and type in “50000” in the “Value”. Then press “Save & Next”.
Step 4: Indicate the workflow action
This step will configure automatic task assignment. In the “Immediate Workflow Actions” section press the “Add Workflow Action” button, and select the “New Task” from the drop-down.
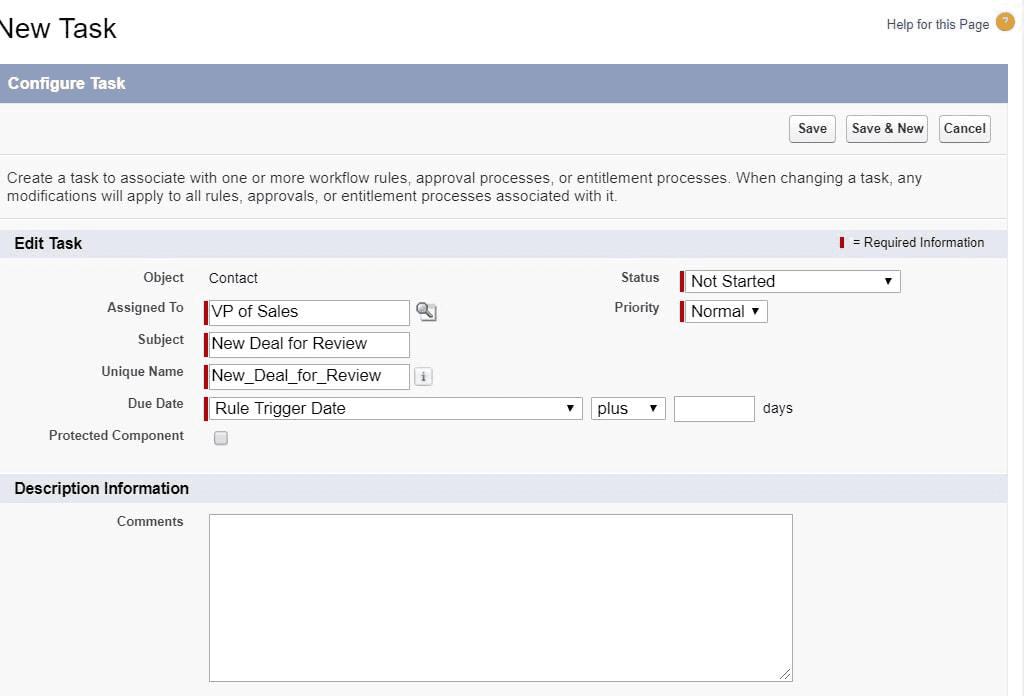
- Fill out the “Assigned To” by choosing the user via the finder (VP of Sales), write the “Subject” (New Deal for Review), add a “Due Date” to “Rule Trigger Date” and indicate the plus/minus number of days.
- If necessary, change the “Status” and set the “Priority”.
Step 5: Activate the workflow
Now we’re on the workflow action setup’s Step 3 of 3. Click on “Done” in the top right corner, then press “Activate” in the center of the page to complete the workflow. And we’re good to go!
3. Case 2: Time-Based Workflow Rule
Not all actions have to be run instantly if the specified workflow rule criteria match. Time-dependent workflows in Salesforce are handy when certain actions need to be executed within indicated hours or on a particular date (as opposed to immediate actions described in the first case above). Let’s take a look at such an example:
Case Description
The sales specialists of the TYX Appliance Store, selling professional cameras and photographic equipment, are in need of client birthday reminders. The client database is continuously growing, and it is customary to send email greeting cards wishing customers a happy and healthy birthday with an included discount coupon in honor of their big day. They’ve decided to automate the notification process using Salesforce CRM workflow rules so as not to miss any birthdays. They would prefer for the alert to appear on the day before the greetings email should be sent out.
Step 1: Select the object
The object on which this workflow rule will be set up on is the “Contact”, containing the key information about the client, including his date of birth.
- Just as in the previous case, via “Workflow Rules” create a “New Rule”. In the “Object” field choose “Contact” from the drop-down list, and press “Next”.
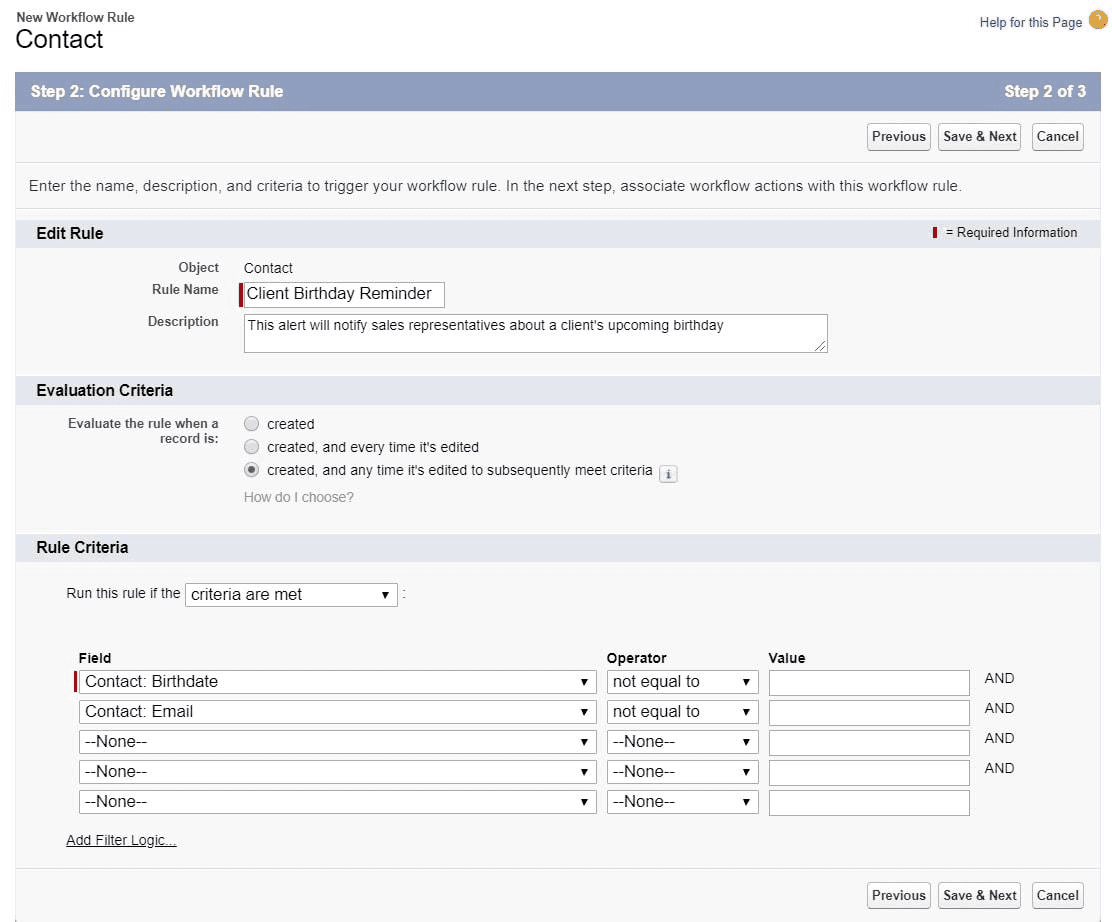
- Fill out the “Rule Name” (Client Birthday Reminder), optionally, add a “Description”.
Step 2: Choose the evaluation criteria
Since the action will be time-triggered, the evaluation criteria, in this case, can not be “Created, and every time it’s edited” according to Salesforce. Moreover, keep in mind that it isn’t possible to add time-triggered actions to the workflows which are already active.→ For the Birthday reminder, choose the third radio button “Created, and any time it's edited to subsequently meet criteria” (the first option “Created” wouldn’t be a good fit as the rule should work on records which already exist).
Step 3: Set up the rule criteria
To set up the birthday reminder, indicate the following criteria:→ In the “Field” find “Contact: Birthdate” among the options in the drop-down and then find the “Contact: Email”, indicate the “Operator” as “not equal to” for both fields, and leave the “Value” fields empty. Then press “Save & Next”.
Step 4: Indicate the time triggers
When setting up a non-immediate workflow, you should indicate the triggers which will launch your pre-defined action and specify the time frame (Date or Date/Time) when the rule must be performed.
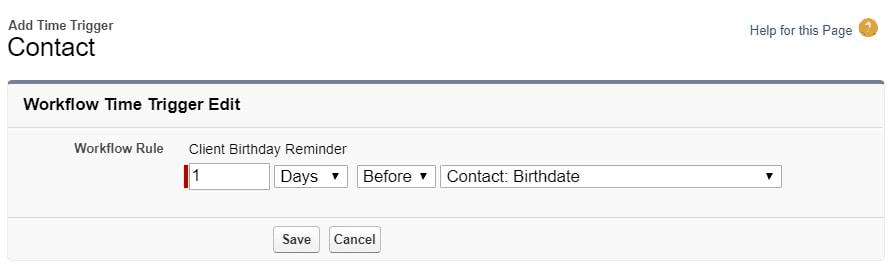
- On the Client Birthday Reminder Workflow Rule page scroll to the “Time-Dependent Workflow Actions” section and press “Edit”.
- Click on the “Add Time Trigger”, and fill out the needed time limits (for the Birthday reminder case: 1, Days, Before, Contact: Birthdate), press “Save”.
Step 5: Add the workflow action & Activate the workflow
Now it’s time to set up the actual email notification. Scroll to the “Time-Dependent Workflow Actions” section on the Client Birthday Reminder workflow rule page, click on the “Add Workflow Action” button, and select the “New Email Alert” from the drop-down.
- Fill out the “Description” (This email alert notifies Sales specialists about a client's birthday), “Unique Name” (Client_Birthday_Notification).
- In the “Email Template” choose the separately created email template (Upcoming Client Birthday). If you don’t have an email template for this purpose, you may quickly create one in the setup’s “Classic Email Templates” section.
- In the “Recipient Type” search field find “Owner” and place the “Contact Owner” from “Available Recipients” to the right “Selected Recipients” block using the “Add” arrow, press “Save”.
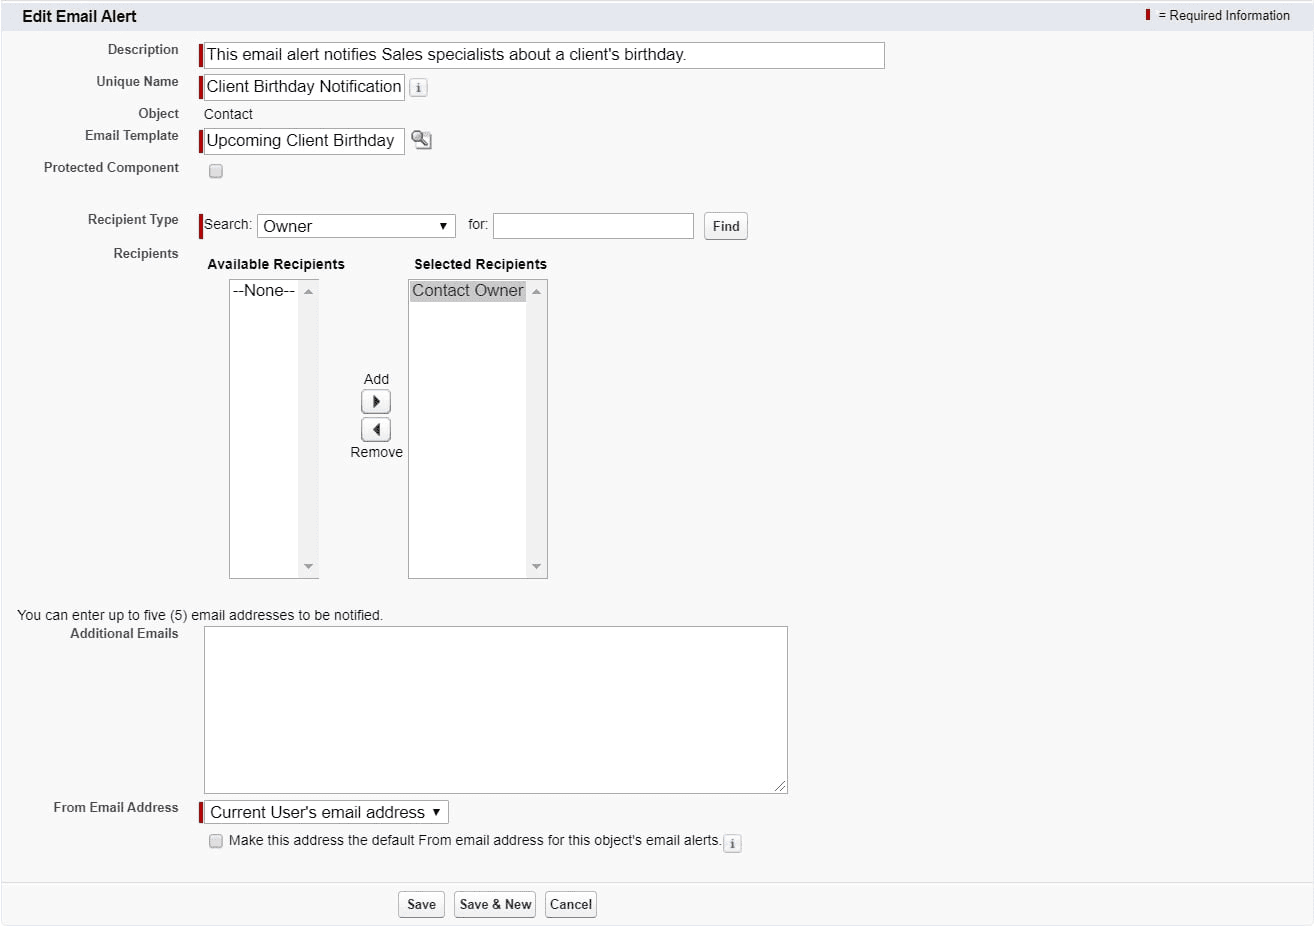
In the top right corner click on “Done”, then, finalize the process by pressing the “Activate” button on the Client Birthday Reminder workflow page. Your workflow rule is now ready!
Salesforce Workflow Limits
Dwelling on the topic of workflow limitations, we can state that there are only 4 types of workflow actions we can use (see above). This means that not everything can be done using this automation process, for instance, making an update of all child items that are connected to a parent record (optionally, you can use the Process Builder for this).
Similarly, in case you don’t want to be tied to the 3 types of evaluation criteria (which basically mean that the workflow rule enters the evaluation stage only when a record is newly created or when some changes are saved on it), you’ll need the Visual Workflow feature which you can design using the simple Cloud Flow Designer tool.
Notably, a workflow rule can be tied only to one object. Therefore, even if you need identical functionality for a second object, you’ll need to set up more than one rule.
What is more, in order to avoid such situations when an object is overburdened, there exist limitations to the number of triggers, actions, and email alerts per each workflow. As such, when configuring workflows, it is vital to bear in mind that there are restrictions to the overall number of active workflow rules you can have as well as how many actions and triggers are permitted within a time frame for such rules (f.i. 1000 actions per hour max.). All in all, these digits may vary and depend on several factors, including the Salesforce edition you are using and the Salesforce license you have (standard or not).
Likewise, there also exists a maximum when it comes to how many emails may be automatically sent per day or per hour. It is important to note that if the number of emails planned for the send out in the queue exceeds what you’re allowed to send within 24 hours, Salesforce won’t attempt to mail these extras out once again after some time, the system will dispose such emails.
Finally, when working on automating your work processes in Salesforce, it is vital to make sure that your rules don’t contradict each other. This may be a common thing when you have many rules which can have conflicts and not work properly.
Summing up, Salesforce workflow rules are a wonderful solution for boosting your team’s productivity and making your work processes run in a quick and organized manner. Be it an email alert, task, or automatic field update, workflows are a great match for optimization. And if you're looking for professional , we'd be glad to help!