If you’re on the lookout for ways to automate and enhance your company’s workflows, don’t miss out on the solutions offered by Salesforce. Thousands of companies have already reaped the rewards for exploiting the elements of its approval processes!For those of you wondering what is an approval process in Salesforce, it’s a sequence of steps that have to be taken in order to confirm requests and records. This is achieved by setting up well-thought-out and working mechanisms for authorizing how some decisions are made and what will follow afterward. By all means, this gives you numerous opportunities to gain from. For instance, you can establish rules, easily interrogate data, stay organized, and keep every single one of your employees connected and on the same page.
In this guide, we’ll happily introduce you to the Salesforce approval processes and share specific examples of where they can be applied. We'll give tips regarding what to take into account when planning the implementation and even show you how to create a Salesforce approval process on a case, walking you through the setup step by step. Ready to learn how to use this knowledge to your advantage?
Table of Content
What Is the Approval Process in Salesforce Needed for?
Dwelling on why such approvals are beneficial, it is more than safe to state that when using automation tools wisely, companies (including ) can optimize their work processes and save both time and money. If you struggle to keep your SF in good shape, including solving problems with setting up the approval processes, you can consider our . Having well-working Salesforce approval procedures based on outlined rules can help to:
- avoid possible financial losses,
- assure that predetermined process rules are followed,
- eliminate dozens of unnecessary discussions and debates,
- get rid of overlaps and other cases of data inconsistency.
Simply put, the approval process is responsible for putting various employee requests through a vortex of authorization. Requests which require decisions made by a superior manager or person of authority are first submitted and then approved, declined, or postponed.
For understanding how does the Salesforce approval process work, note that it is applied either to every record that gets added to the Salesforce object or only to the records that match specific criteria. Which user roles (or specific users) take part in the approval process also matters for the setup. The same story goes when determining the steps of approval and what happens to the records that get accepted, rejected, or recalled.
All in all, a properly set up approval process means a lot for the company . It can define pretty much everything that happens with the new records and their managers. So, for which specific segments can you apply it?

Get a Free Salesforce Audit Example
Explore our Salesforce audit report on diagnosing common bottlenecks in the Salesforce ecosystem.
Salesforce Approval Process Use Cases
1. Discount Administration
One of the top ways you can make use of the approval process in Salesforce is for offering discounts. While salespeople are used to giving out generous, rounded up discounts, qualifying each of such offers through the approval cycle will set specific boundaries and eliminate excessive spending.Generally, the discount authorization process is spontaneous and chaotic which often results in nothing more than the company’s reduced revenues. This happens when the salespeople offer discounts of, say, 10 or 15 percent right from the start, wherever 6.5 or 9 percent off the full price would have been enough to convert the lead into a customer and close the deal.
The Salesforce discount approval process function allows you to control and optimize the giveaway policies. As such, the formulas can calculate the specific discount amount that the lead qualifies for, safeguarding your profits from burning. Plus, it provides the opportunity to which won’t allow discounts that are higher than your standards to pass through without getting the “green light” from the manager.When setting up the Salesforce approval process for such purposes you can:
- indicate the approval process entry at any X percent discount (to discourage offering excessive discounts and establish a threshold),
- display how the opportunity discount amount affects profit margin (calculated in percentage and cash value),
- schedule tasks for approvers to review the previously approved discounts (handy for subscription-based reduced pricing review after some time passes),
- track discount effectiveness by teams and individuals.
2. Marketing Campaign or Event Approval
To give you another use case of an approval process for Salesforce, marketing departments continuously run various campaigns as well as come across trade shows and other events that present promotional opportunities. Namely, each event the Marketing Team wishes to attend can be submitted as a request object to Salesforce and go through an approval process. Establishing such a borderline can be one more way to reduce your business’ spendings.
For instance, there’s a marketing festival coming up which your team would like to participate in. To keep things organized, the event must meet the minimum and maximum criteria to enter the approval process. The criteria that you can indicate may include:
- participation cost,
- justification of the reasons to go (how the company can benefit from this),
- the event industry,
- the dates when the event will be held,
- involved employees,
- other fields that will be visible and of importance to the approving manager.
Once each new event is approved or rejected, respective notifications (for example, emails) may be sent both to the submitters and to the management. In this scenario, events rejected previously get added to the database and may be resubmitted in, say, 6 months.
Similarly, well-planned processes of approval can be applied for routing and making decisions regarding various occurring marketing needs and additional campaign expenses.
3. PTO (Paid Time Off) Requests
Speaking of other great approval process examples in Salesforce, handling the question of organizing and recording your employees’ paid time off is a real wild card.
It’s not unusual that planning preliminary vacation time and syncing it with the whole team often becomes a thorny issue in companies simply because so many things need to be considered, such as:
- the number of paid days a person is allowed to take off during a certain time period (f.e. no more than 15 working days per calendar year),
- overlapping vacations of people working in one team (f.i. both senior managers of a project cannot leave on vacation at the same time according to the company policy),
- weekend shifts (scheduling specific day “swaps” when a person will be off and when he’ll be making up for the missed day instead),
- sometimes, PTO requests are even used for registering sick days.
Establishing PTOs as a process helps to track each of the employee’s requests and get a clear picture of your team capacity during a certain day/week/month/etc. Among the fields you can set up for the PTO object may optionally include:
- the date of the request,
- reason for time off (using a predefined picklist),
- start date and end date (via calendars),
- comment field.
What is more, custom solutions may even provide you with the chance to calculate the number of paid days off a person has already used during the designated period of time and how many of them he/she has remaining. For example, Employee A has taken 10 out of the 15 allowed days off counting from January 1st to December 31st. Of course, in case your business is need of some super customized processes, you can always for assistance.
Before You Start Your Setup
1. What Should Be Defined
When set up the approval process, they should take into account many factors. Thus, it makes sense to roll out a “blueprint” of your expectations prior to starting your setup process and to use the best practices of other companies. Often, this can be carried out in a that's used as a playground.
The main parts of the approval process deal with defining:
- the object (the app where the approval process takes place),
- сriteria (conditions that need to be met for the process to be triggered),
- who can approve (selecting the user or multiple approvers who’ll be in charge of the record’s approval),
- actions based on approval or rejection (what exactly will be done once each record is approved or rejected).
In addition to optimizing your approval processes, leveraging tools like Salesforce CPQ can further enhance your company's efficiency by automating the quoting and pricing process, ensuring accuracy and speed in sales operations. Learn more about and how it can benefit your business.
2. Approval Process Questions in Salesforce
As mentioned before, it is crucial to do some preliminary research, thinking, and planning. You need to not only clearly understand which elements the process of approval should be made up of but also who your major figures are, as well as how the overall process should be lined out.To help you be more organized, before , try to answer the following questions prior to beginning your Salesforce approval process setup:
- Which users (or user roles) should be allowed to submit requests for approval?
- Which fields should be mandatory for creating the approval request (f.e. requiring the “Comment” or “Date of creation” field to be filled out by hand)?
- When can a request be submitted (should there be restrictions based on an object’s status, for instance, an indicated stage of the sale)
- Who will be responsible for approving the request (a specific user, a manager, etc)?
- Will there be multi-level approval based on role hierarchy (for example, if some decisions require escalation and should be made only when given the permission of the top manager or CEO)?
- Is there a necessity in a strict time frame for the approver’s first response (f.i., 24 hours or 2 business days for handling the request)
- Should there be any additional restrictions for the actions of submitters or designated approvers (such as, is there a necessity in setting up an “Auto reject” or maybe some “Custom error message”)?
- Do you need any automatic notifications when a request is created or when its status changes from Pending to Approved, Rejected, Recalled, etc?
- What happens to the request after it is approved, rejected or recalled (i.e. which next steps follow the status change)?
- Do you need any additional functions (e.g. calculating the price, setting up an auto approve process)?
3. Which Elements Comprise the Approval Process
Last but not least, keep in mind that most approval processes include the following set of elements:
- the object on which the approval process is requested (f.e. Opportunity, Custom Object),
- custom fields that should be filled out (e.g. a calendar, picklist, text field for comments),
- users with different roles and permissions (such as submitter/approver),
- (optional) a custom tab that appears in the navigation bar (f.i. there you can keep requests for approval queues),
- (recommended) email template(s) for automated notifications.
That seems to be it in terms of preparation. Now let’s proceed to the detailed step-by-step guide shown on a case and get started with the setup!
Salesforce Approval Process Guide: Approval Process Case Description
GBN Motors is a car dealership with a team of 15 sales representatives. Using Salesforce, they’ve decided to set up an approval process that would help to coordinate and organize the procedure of client giveaways. After everything is set up, agreeing on the additional freebies that are sometimes offered to potential customers to close the car sale deal (for example, car tires or baby seats) will be a breeze.
1. Preparation Stage
Step 1: Planning
a) Answering questions
- Which users (or user roles) should be allowed to submit requests for approval?
- Only our Sales Team users or the Opportunity Owner. - Which fields should be mandatory for creating the approval request?
- There should always be a link to the Opportunity. Selecting the type of accessory for the giveaway should be obligatory (the requested freebie for the client can be: tires, rubber car floor mat sets, a baby car seat, a car seat massage cushion or a mini portable car fridge). Also, the sales rep should always leave a comment. - When can a request be submitted (should there be restrictions)?
- The request should be submitted only if the Opportunity is in the “Negotiation” stage. - Who will be responsible for approving the request?
- The Head of Sales should approve such requests, his deputy manager can take care of such requests in case he’s off or on vacation. - Will there be multi-level approval?
- No, the approval of only the Head of Sales is enough. - Is there a necessity in a strict time frame for the approver’s first response?
- No, there’s no need in time frames. - Should there be any additional restrictions for the actions of submitters or designated approvers?
- No, additional restrictions would be needed. - Do you need any automatic notifications when a request is created or when its status changes from Pending to Approved, Rejected, Recalled, etc?
- Yes, it would be good to send an email to the approver about a new request and to the submitter about the status change from Pending to Approved or Rejected. - What happens to the request after it is approved or rejected?
- Status changes are needed, as well as email notifications. - Do you need any additional functions?
- No, this won’t be necessary.
b) Defining key approval process units
- The object where the approval process takes place: “Giveaway”.
- Criteria to be met: the request for approval should pass only if the stage of the linked Opportunity equals “Negotiation”; the “Type of Giveaway” must be selected from the picklist; the “Comment” field must be filled out too.
- Who can create such requests: only Sales Team users.
- Who can approve such requests: the Head of Sales or his deputy.
- Actions based on approval or rejection: change of status on the object “Giveaway”; email notifications must be sent to the submitter and the approver.
Step 2: Creating the Object, Fields, and Tab
a) Adding the Custom Object
In order to start the setup process, we need to take care of adding the Custom Object first. In this case, it’ll be the “Giveaway”:
- Type in “Object” in the Quick Find, and select “Object Manager” under “Objects and Fields”.
- In the top right-hand corner click “Create” → “Custom Object”.
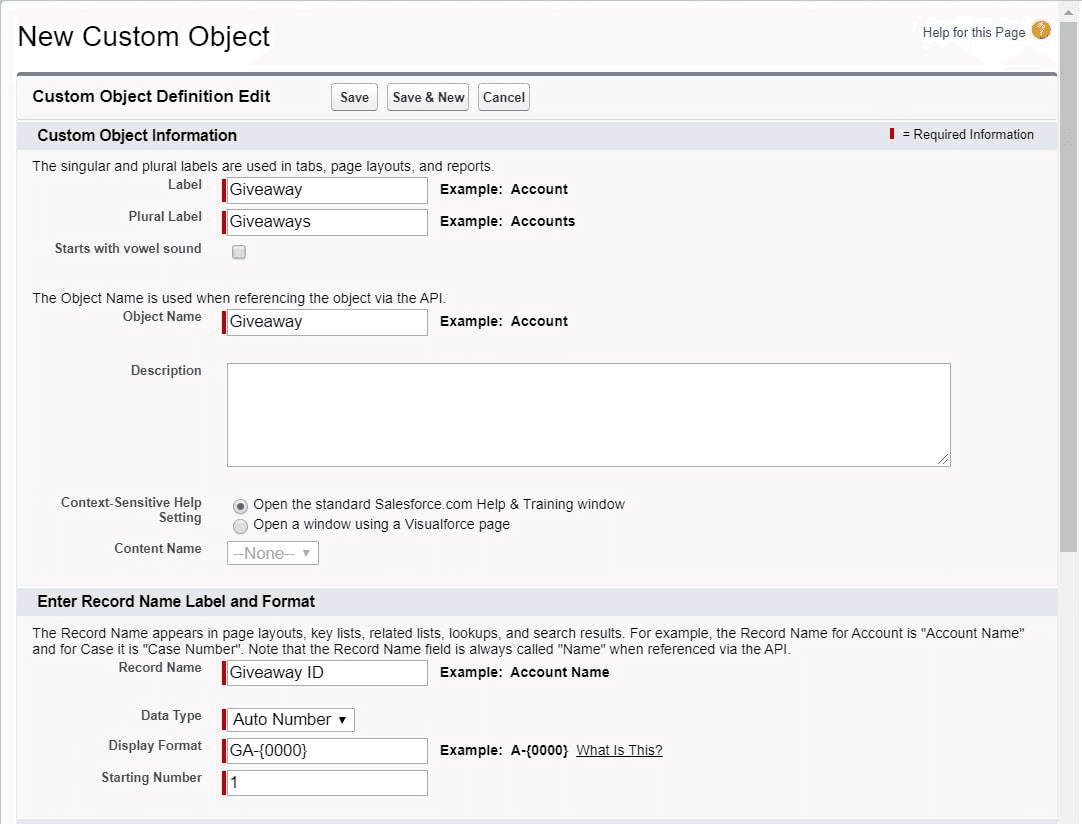
- Fill out the “Label” (Giveaway), “Plural Label” (Giveaways), and “Object Name” (Giveaway) fields.
- Enter the “Record Name” (Giveaway ID), select “Auto Number” in the “Data Type”, put in the “Display Format” in the A-{0000} format where “A” is the abbreviation for your Custom Object name and the “0000” stands for the unique number that’ll be assigned to your future request (GA-{0000}), indicate the “Starting Number”.
- Tick the “Allow Search” checkbox in the “Search Status” section, press “Save”.
b) Creating Custom Fields for the Object
Now that the Giveaway Object is created, it already has some fields:
| Name of the field | Type of the field |
| Giveaway ID | Auto Number |
| Created By | Lookup(User) |
| Last Modified By | Lookup(User) |
But to make the process work, we need to add the following Custom Fields to the Giveaway Object:
| Name of the field | Type of the field | Is it mandatory? | Values | Editability |
| Opportunity | Master-Detail (Opportunity) | Yes | View only | |
| Date Submitted | Date/Time | No | View only | |
| Date Approved | Date/Time | No | View only | |
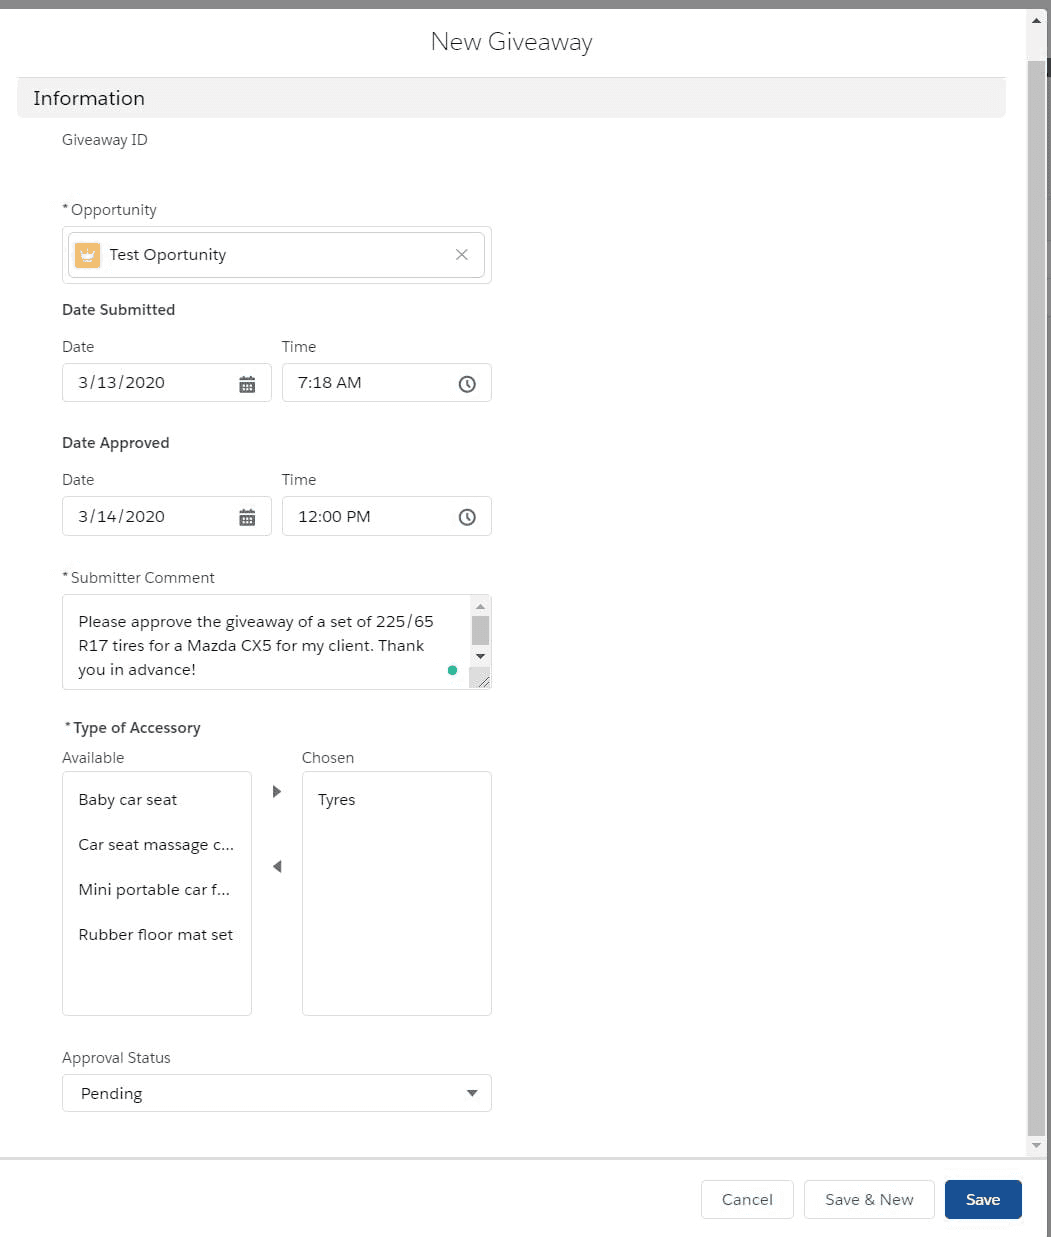
| Submitter Comment | Text Area | Yes | Editable | |
| Type of Accessory | Picklist (Multi-select) | Yes | Tires, Rubber car floor mat set, Baby car seat, Car seat massage cushion, Mini portable car fridge | Editable |
| Approval Status | Picklist | Yes | Pending (default), Submitted, Approved, Rejected, Recalled | View only |
We’ll be creating each field one by one, let’s add the obligatory “Type of Accessory” field as an example:
- Type in “Object” in the Quick Find, and select “Object Manager” under “Objects and Fields”, choose “Giveaway” from the list and click “Edit” on the right.
- On the left-hand side select “Fields & Relationships”, in the top right corner → “New”.
- Select the “Data Type” (for the “Type of Accessory” field we’ll need a “Picklist (Multi-Select)”, press “Next”.
- Fill out the “Field Label” (Type of Accessory), input the values for the selection separating each one by a new line (Tires, Rubber car floor mat set, Baby car seat, Car seat massage cushion, Mini portable car fridge), check the box “Always require a value in this field in order to save a record” to make the field mandatory, proceed to the last step via “Next” buttons and “Save”.

c) Making a Custom Object Tab
Optionally, let’s add a separate “Giveaways” tab to the top Salesforce navigation menu. It’ll allow easy access for viewing recent Giveaway requests in one list straight from the main menu. To create a Custom Object tab:
- Type in “Tabs” in the Quick Find and select “Tabs”. In the center of the page click “New”.
- Select the “Object” from the drop-down list (Giveaway), choose a “Tab Style” from the offered options, proceed to the last step via “Next” buttons and “Save”. Now your main menu has a new tab!
Step 3: Email Templates for Notifications
The next step of the preparation stage prior to setting up the approval process is creating customized email templates for the notifications. We need a total of 4 email templates:
- an email that’s sent to the submitter confirming that the request has been successfully submitted,
- an email that’s sent to the approver, notifying that there’s a request that’s pending approval,
- an email that will be sent to the submitter when the request has been approved,
- an email that will be sent to the submitter if the request has been declined.
Each email template has to be added separately, as an example, let’s add the “Approval Confirmation” one that’ll be sent to the submitter:
- Type in “Email templates” in the Quick Find, and select “Classic Email Templates”.
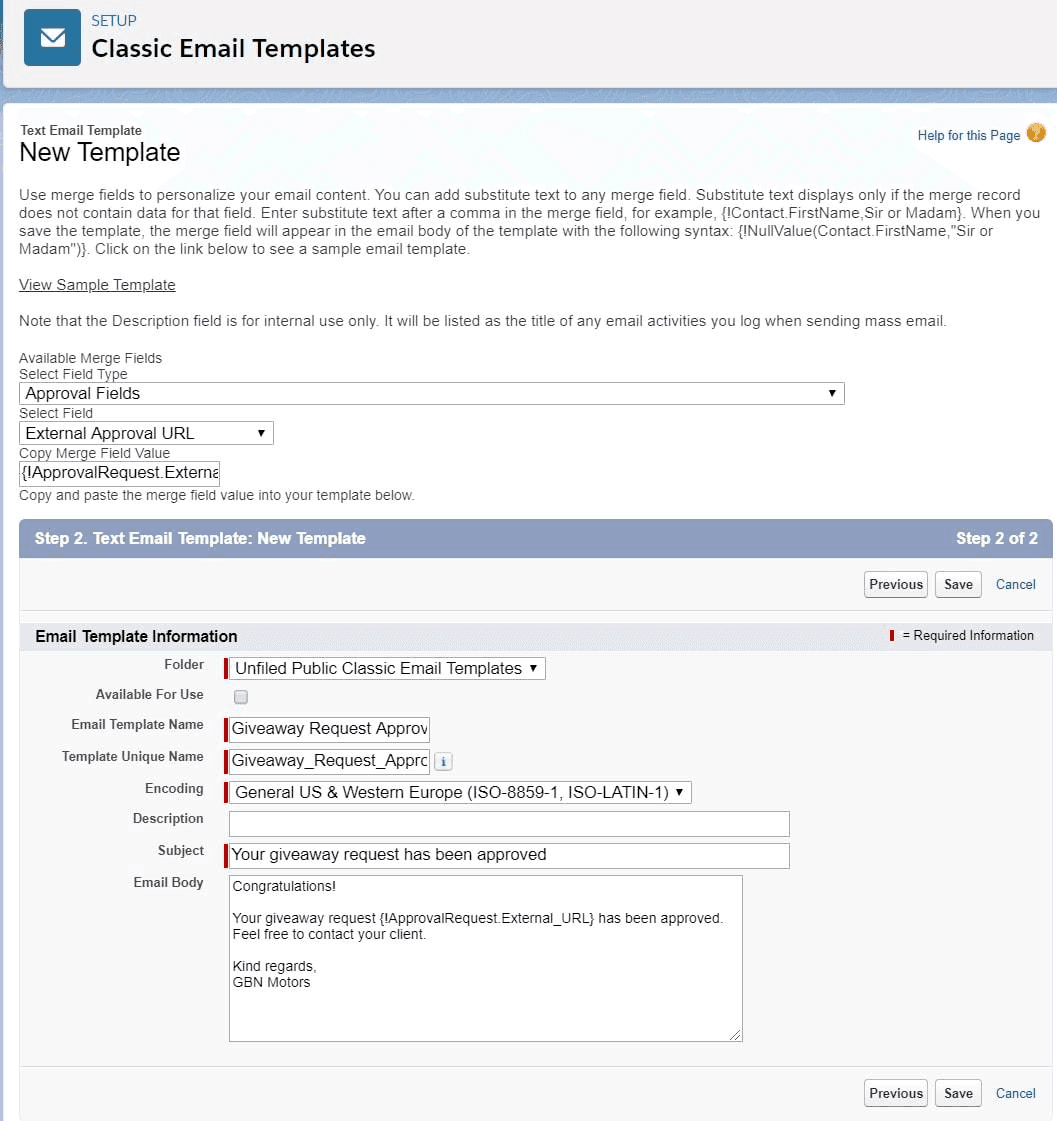
- Click on the “New Template” button in the middle, select the type “Text”, press “Next”.
- Fill out the “Email Template Name” (Giveaway Request Approved), the “Subject” line (Your giveaway request has been approved), and the “Email body” text.
- To make sure that the email will always contain a relevant link to the request, using the “Available Merge Fields” section of the page, choose the Field Type → “Approval Fields”, select the field “External Approval URL”, and copy the Merge Field Value which has appeared in curly brackets ({!ApprovalRequest.External_URL}), place the code in your email body text, and press “Save”.
Note that if you’ll need any other additional information indicated in the email body, for instance, some other custom field that should be pulled out automatically from your Object or Opportunity, you can make use of the field section of the email template “Available Merge Fields” once again.
2. Create and Manage the Salesforce Approval Process
Now that all the preparation work is finalized, it’s time to proceed to the actual setup.
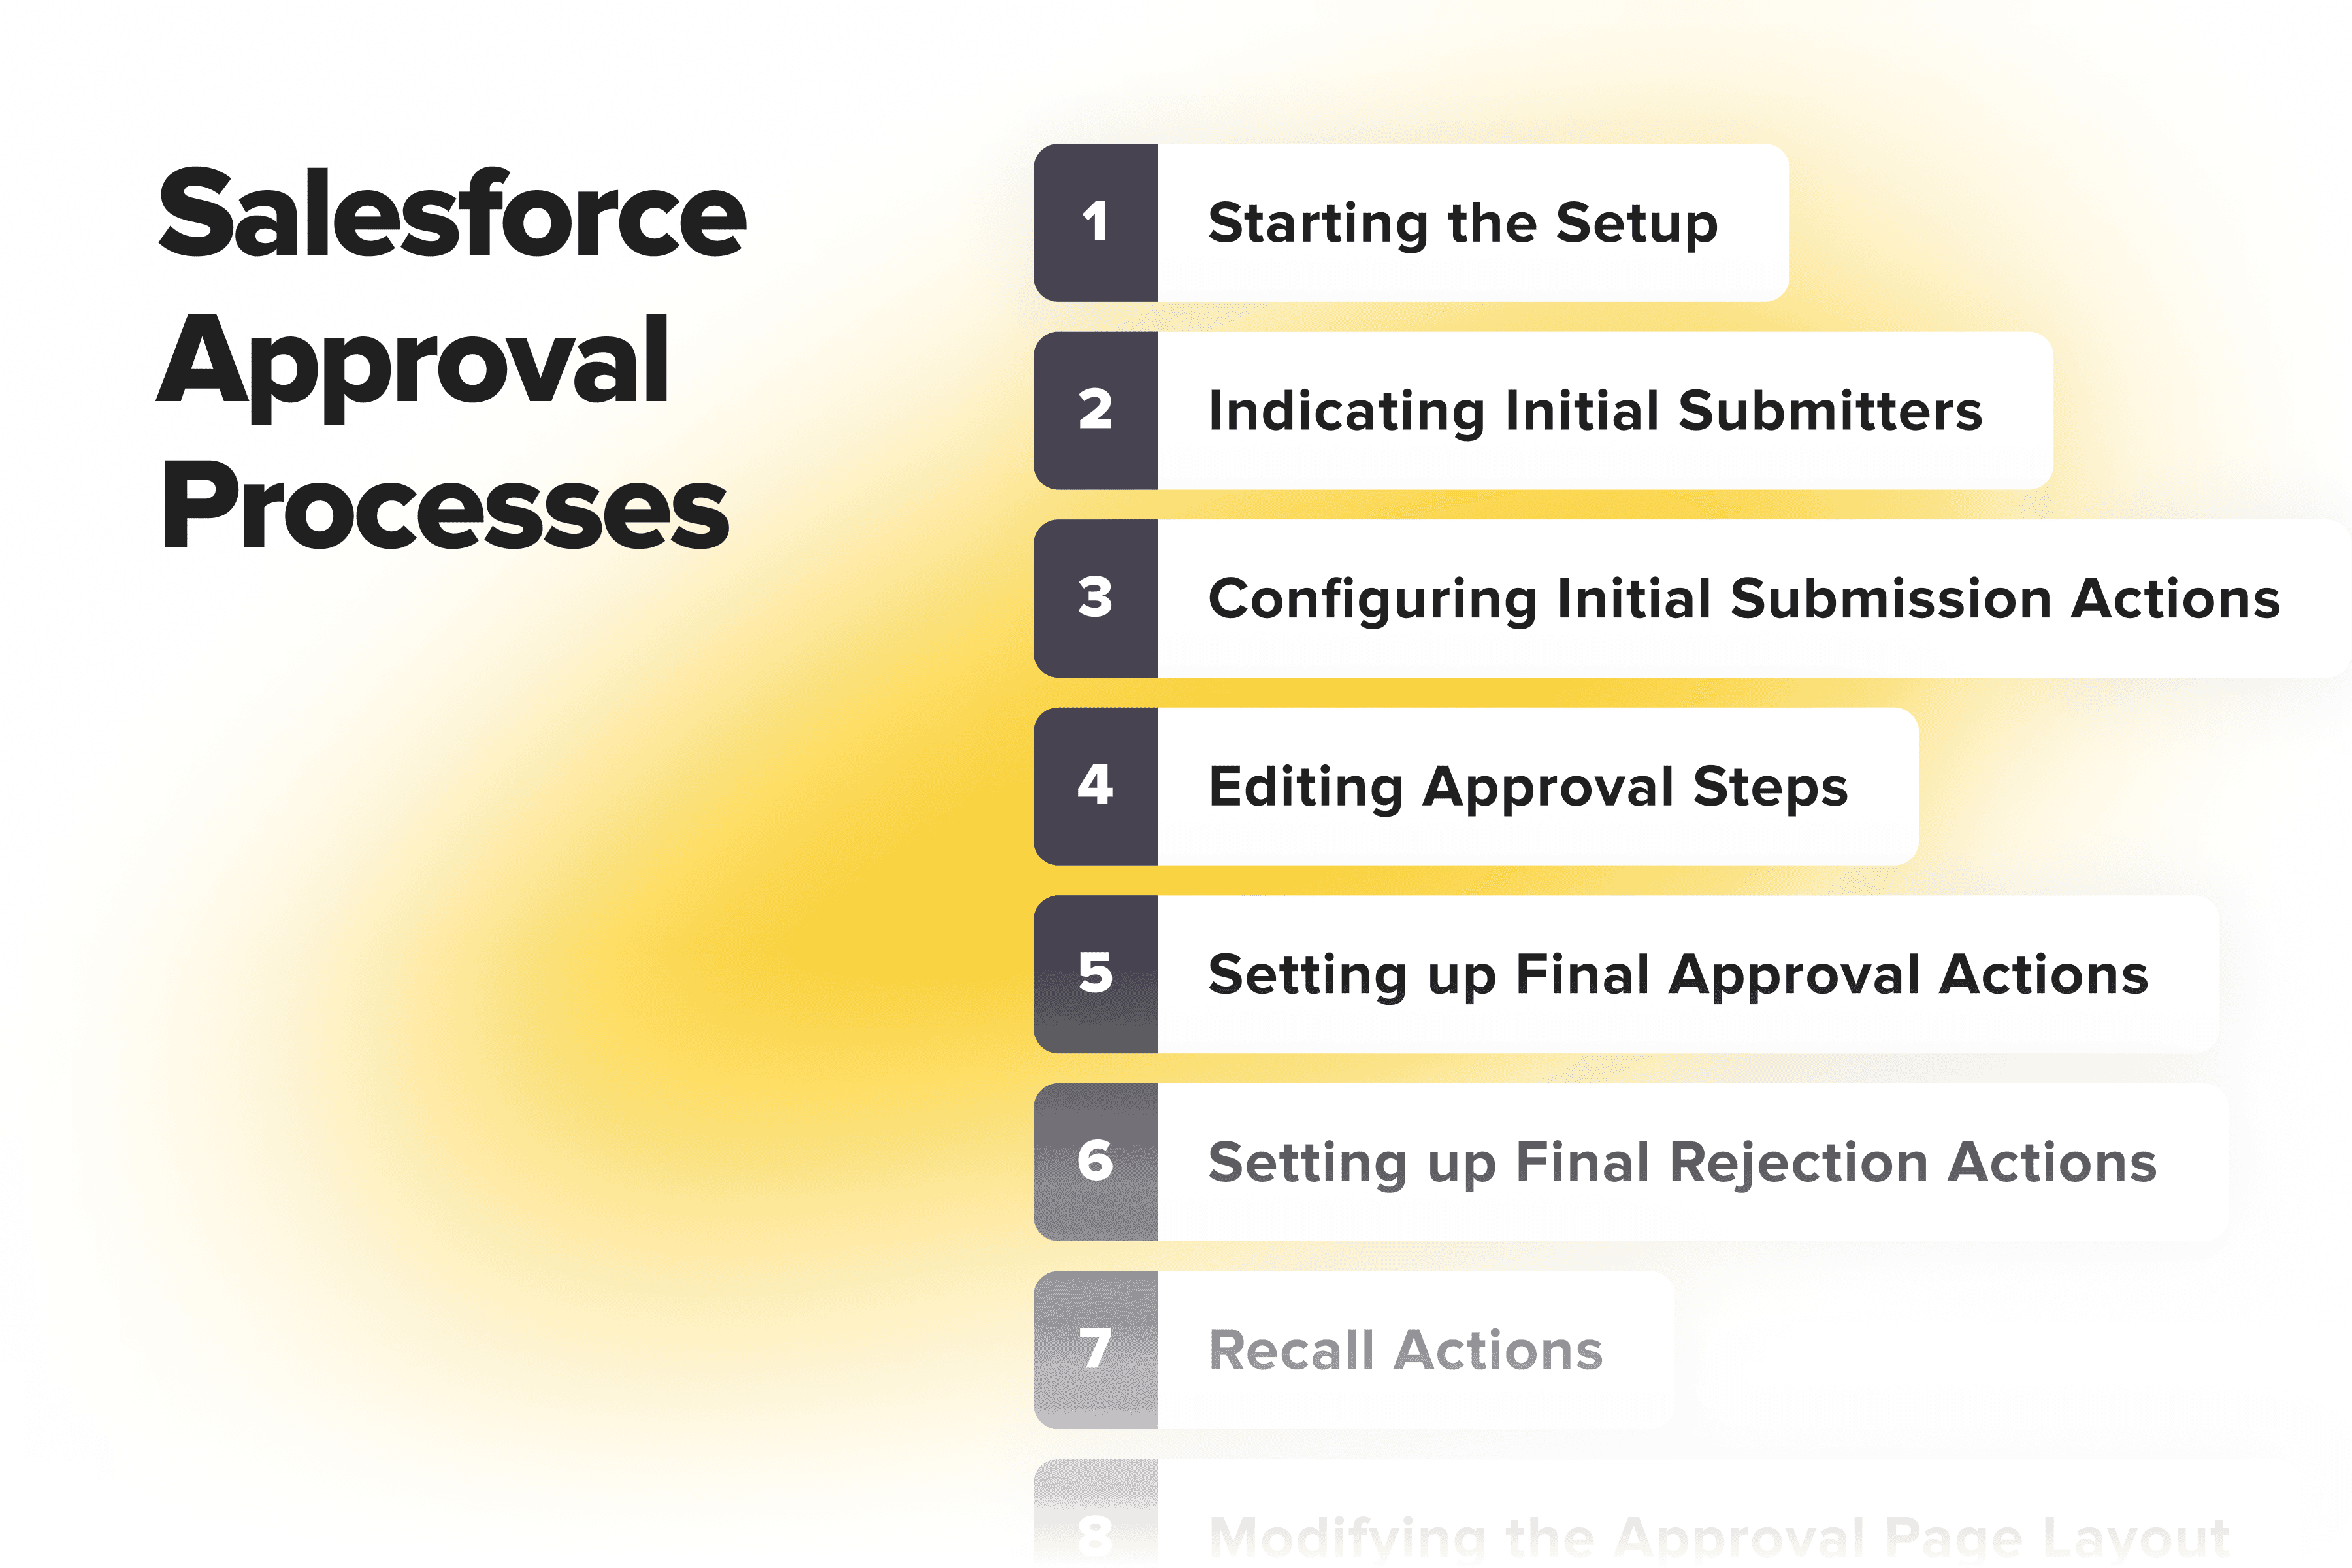
Step 1: Starting the Setup
- Type in “Approval Process” in the Quick Find, and select “Approval Processes” under “Process Automation”.
- Click on the “Create New Approval Process” button and select “Use Jump Start Wizard”.
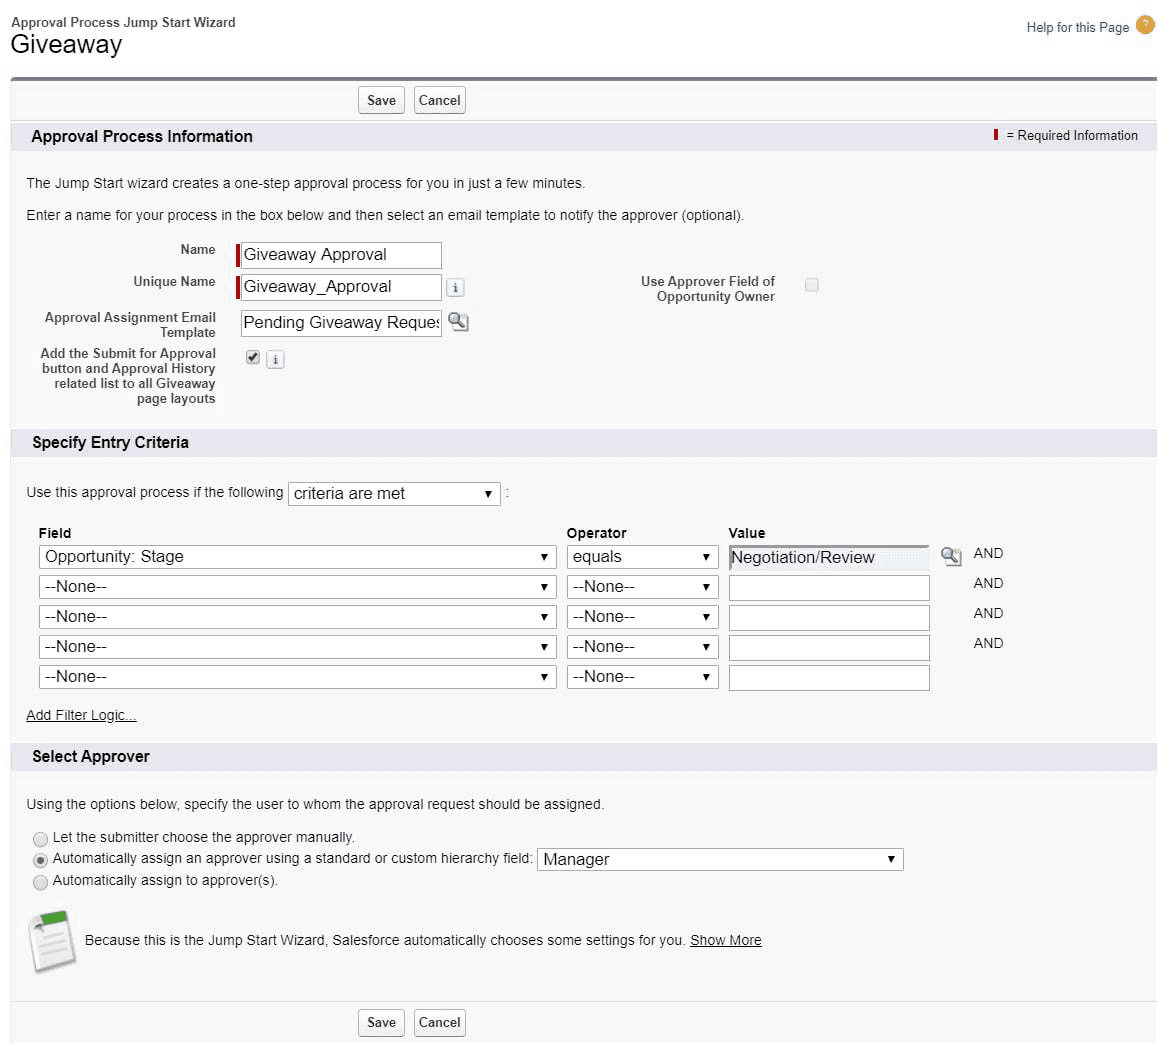
- Fill out the “Name” (Giveaway Approval), select the “Approval Assignment Email Template” (select the name of the second email template that was previously created in the email step for the approver about a new pending request).
- In the “Specify Entry Criteria” section indicate the condition (in the case with the Giveaway, the condition should determine when a request can be created; select the “Field” → Opportunity: Stage, “Operator” → equals, “Value” → Negotiation/review).
- In the “Select Approver” block check the “Automatically assign an approver using a standard or custom hierarchy field”, select “Manager” from the drop-down list, press “Save”.
Step 2: Indicating Initial Submitters

Continue the setup process by indicating who can create requests, to a certain extent, this deals with . We’ll configure the initial submitter lines that are marked with yellow spots on the image above.
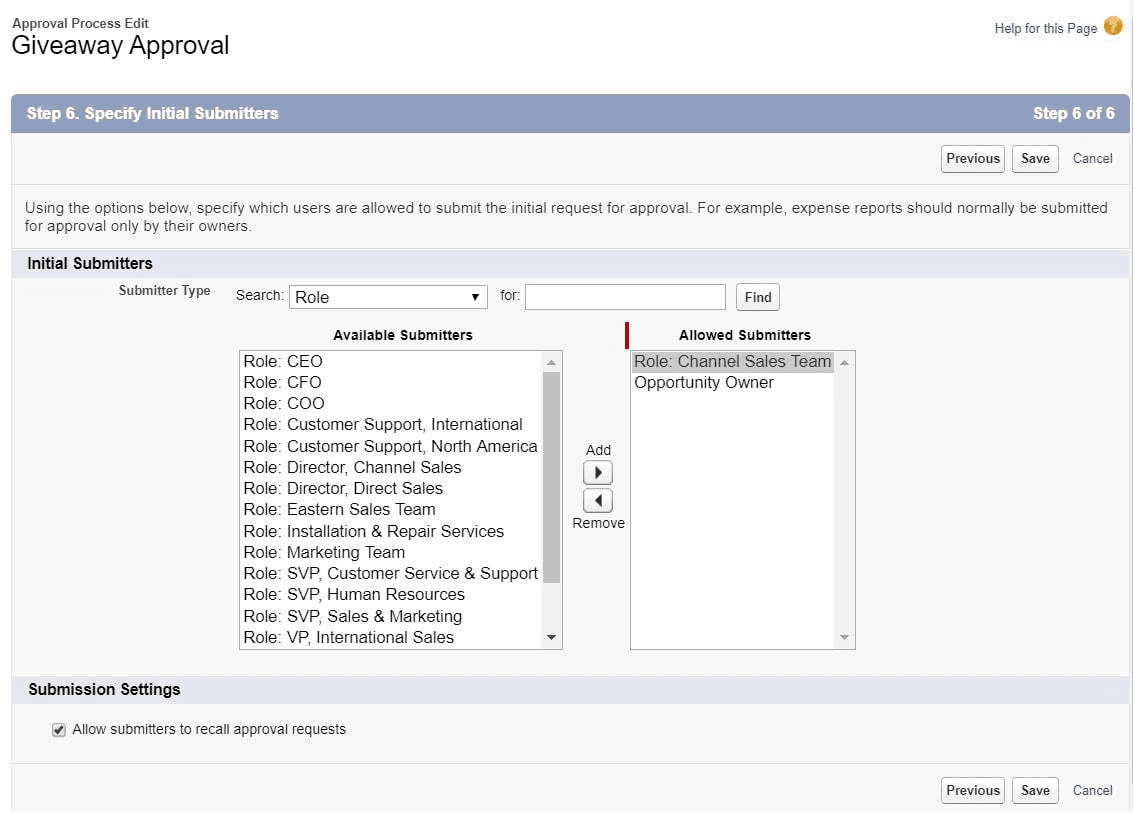
- Click “Edit” on the Approval Processes Giveaway Approval page that’s before you, select “Initial Submitters” from the drop-down list.
- In the “Submitter Type” section’s “Search” field select “Role” in the drop-down (for the Giveaway case we need to allow the Sales Team to create approval requests, therefore, find the “Role: Channel Sales Team” among “Available Submitters” and place it to the right column of “Allowed Submitters” using the arrow button “Add”).
- In the “Submission Settings” section, check the box “Allow submitters to recall approval requests” so that requests can be canceled by the submitter, press “Save”.
Step 3: Configuring Initial Submission Actions

Let’s proceed to the actions which should be fired when a Giveaway request is submitted. Scroll to the “Initial Submission Actions” section of the Approval Processes Giveaway Approval page, here we should take care of two things:
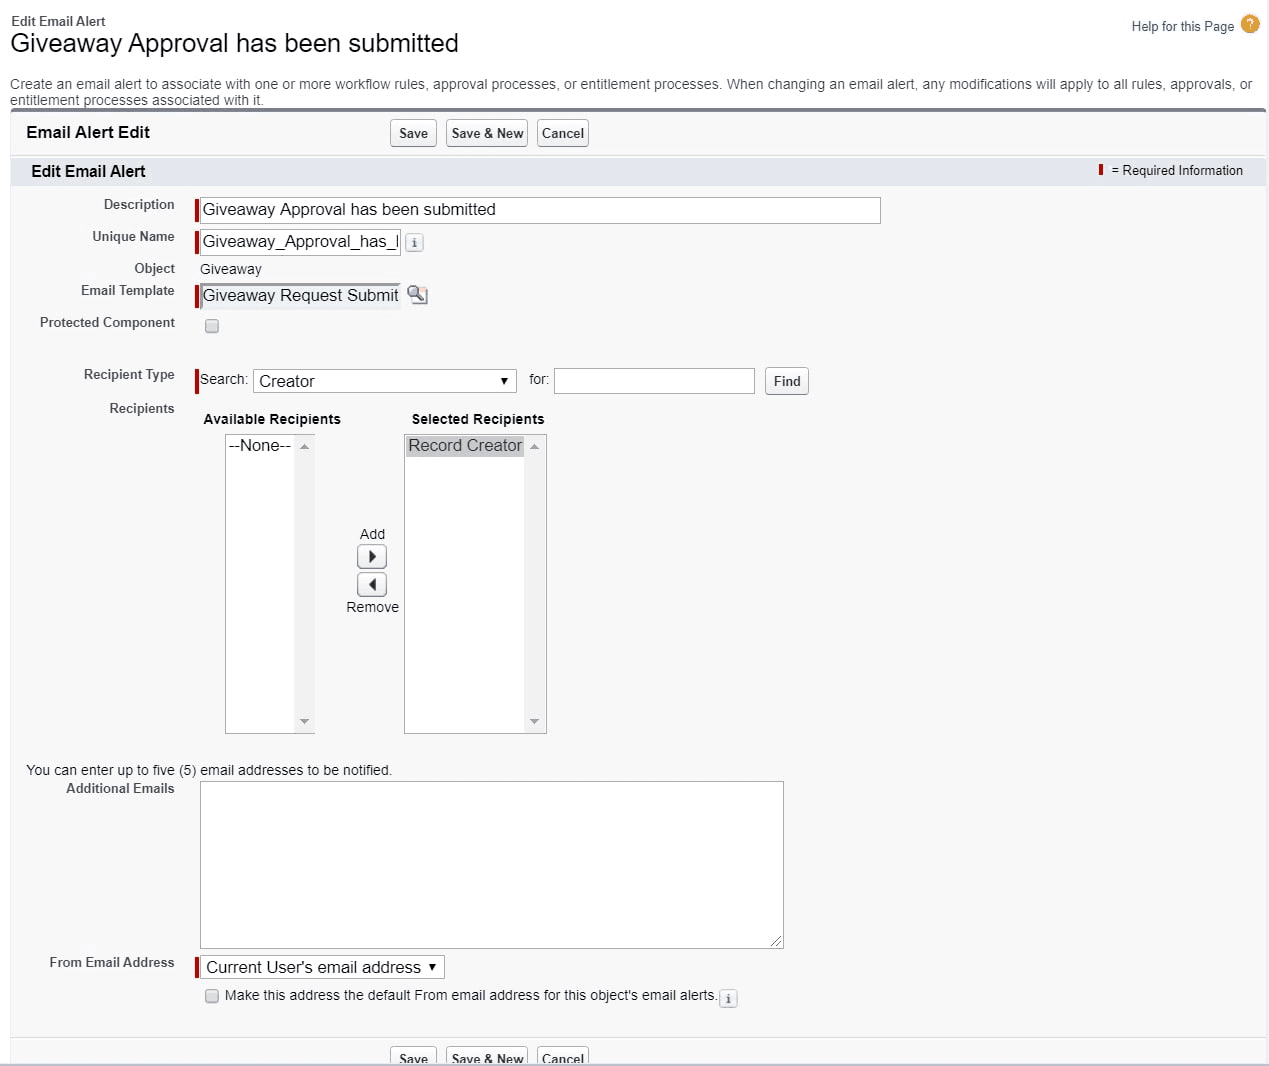
1. Add an email alert (a notification that would send the submitter the email template, confirming that the Giveaway request has been submitted).
→ Press the “Add New” button and select the “Email Alert” from the drop-down list.→ Fill out the “Description” (Giveaway Approval has been submitted), choose the email template (type in the name of the first email template that was previously created in the email step for the submitter, notifying that the request has been submitted).→ In the “Recipient Type” section’s “Search” field select “Creator” in the drop-down (for the Giveaway case we need to find the “Record Creator” among “Available Recipients” and place it to the right column of “Selected Recipients” using the arrow button “Add”), press “Save”.
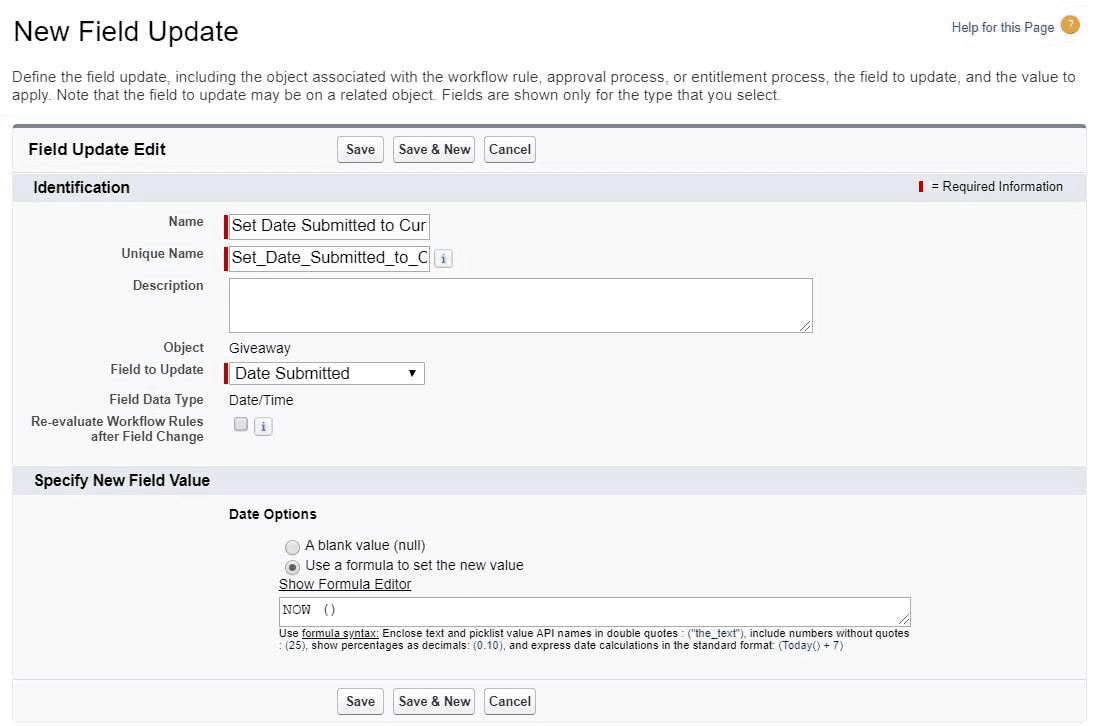
2. Also, we need to make sure that the field “Date Submitted” will be set automatically on the Giveaway request object.→ Press the “Add New” button in the “Initial Submission Actions” section and select the “Field Update” from the drop-down list.
→ Fill out the “Name” (Set Date Submitted to Current), in the “Field to Update” choose the Custom Field “Date Submitted” from the drop-down.→ In the “Specify New Field Value” section’s “Date Options” select the “Use a formula to set the new value”, type in “NOW ()” in the formula value field, press “Save”.
Step 4: Editing Approval Steps
Moving on to the next section, we’ll make sure that apart from the Head of Sales, the assigned deputy would have the opportunity to approve Giveaway requests when he is away or on vacation.
Scroll to the “Approval Steps” section of the Approval Processes Giveaway Approval page and click on the blue “Edit” to the left of Step 1. Press “Next” twice to get to the third step where you should check the box “The approver's delegate may also approve this request” and press “Save”.
Step 5: Setting up Final Approval Actions
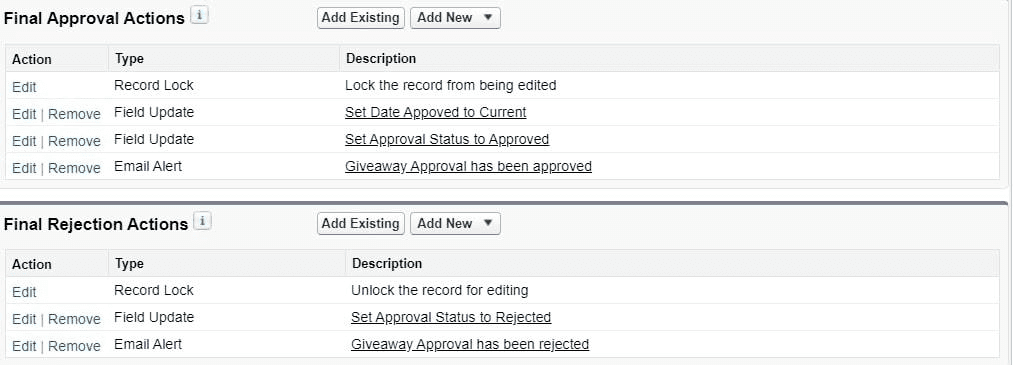
Now we need to configure which actions should take place when a Giveaway request is approved.
Scroll to the “Final Approval Actions” section of the Approval Processes Giveaway Approval page. Similarly to what was done in the step “Indicating Initial Submission Actions”, in the “Final Approval Actions” we need to take care of three things:
1. Just as last time, we should set up an email alert notification that’ll send the submitter the email template, stating that his Giveaway request has been approved.
→ Press the “Add New” button in the “Final Approval Actions” section and select the “Email Alert” from the drop-down list.→ Fill out the “Description” (Giveaway Approval has been approved), choose the email template (type in the name of the third email template that was previously created in the email step for the submitter, informing about request approval).→ In the “Recipient Type” section’s “Search” field select “Creator” in the drop-down (find the “Record Creator” among “Available Recipients” and place it to the right column of “Selected Recipients” using the arrow button “Add”), press “Save”.
2. As done before, we should set up the field “Date Approved” on the Giveaway request to be auto-filled.
→ Press the “Add New” button and select the “Field Update” from the drop-down list.→ Fill out the “Name” (Set Date Approved to Current), in the “Field to Update” choose the Custom Field “Date Approved” from the drop-down.→ In the “Specify New Field Value” section’s “Date Options” select the “Use a formula to set the new value”, type in “NOW ()” in the formula value field, press “Save”.
3. The third thing to take care of in the “Final Approval Actions” is to automatically change the status field on the Giveaway object when a request is approved.
→ Press the “Add New” button and select the “Field Update” from the drop-down list.→ Fill out the “Name” (Set Approval Status to Approved), in the “Field to Update” choose the Custom Field “Approval Status” from the drop-down.→ In the “Specify New Field Value” section’s “Picklist Options” select “A specific value”, and choose “Approved”, press “Save”.
Step 6: Setting up Final Rejection Actions
The actions to be configured in the Final Rejection section in much copy step 5. There are two things to set up:
1. The email alert notification that’ll send the email template to the submitter stating that, unfortunately, the Giveaway request has been rejected.
→ Press the “Add New” button in the “Final Rejection Actions” section and select the “Email Alert” from the drop-down list.→ Fill out the “Description” (Giveaway Approval has been rejected), choose the email template (type in the name of the fourth email template that was previously created in the email step for the submitter, informing about request rejection).→ In the “Recipient Type” section’s “Search” field select “Creator” in the drop-down (find the “Record Creator” among “Available Recipients” and place it to the right column of “Selected Recipients” using the arrow button “Add”), press “Save”.
2. The status of the Giveaway object should also change automatically if the request is rejected.
→ Press the “Add New” button and select the “Field Update” from the drop-down list.→ Fill out the “Name” (Set Approval Status to Rejected), in the “Field to Update” choose the Custom Field “Approval Status” from the drop-down.→ In the “Specify New Field Value” section’s “Picklist Options” select “A specific value”, and choose “Rejected”, press “Save”.
Step 7: Recall Actions
The last section of the Approval Processes Giveaway Approval page deals with the automatic actions that are needed in case a submitter changes their mind about the sent request. If the sent request is no longer necessary or relevant, the submitter has the opportunity to recall it. If this is the story, we need an auto-update for the status. Just as previously,
→ Press the “Add New” button in the Recall Actions section and select the “Field Update” from the drop-down list.→ Fill out the “Name” (Set Approval Status to Recalled), in the “Field to Update” choose the Custom Field “Approval Status” from the drop-down.→ In the “Specify New Field Value” section’s “Picklist Options” select “A specific value”, and choose “Recalled”, press “Save”.
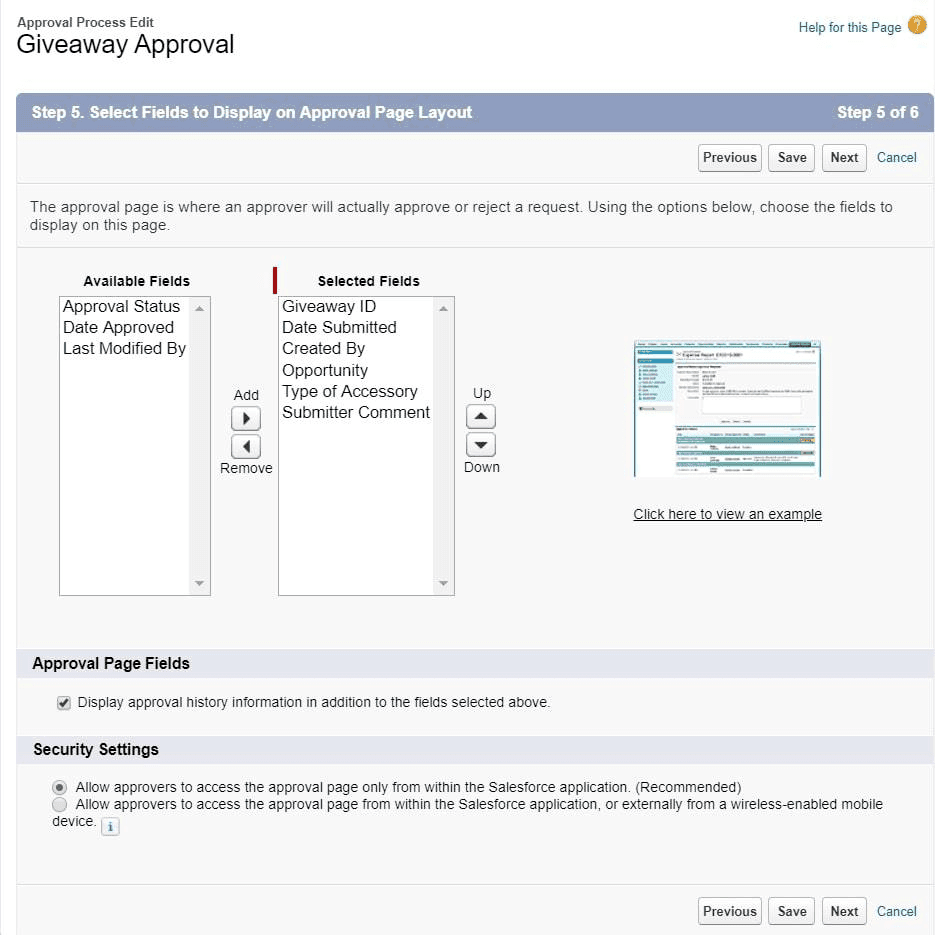
Step 8: Modifying the Approval Page Layout
Getting closer to the end of the setup process, it’s time to modify what the approval request will look like once an approver receives it. On the top of the Approval Processes Giveaway Approval page press “Edit” and select the “Approval Page Layout” from the drop-down list.
In the “Available Fields” choose and pull the following custom fields to the right “Selected Fields” using the “Add” button: Date Submitted, Created By, Opportunity, Type of Accessory, and Submitter Comment; press “Save”.
Final Step: Activating the Approval Process
The final step to launch the process is pressing the “Activate” button on your Approval Processes Giveaway Approval page. Congratulations, your Giveaway approval is now complete and active!Keep in mind, though, that once you activate the new approval process, you won’t be able to add any more approval steps.
Summary
So, to summarize, we’ve learned that the opportunities for applying Salesforce approval processes are boundless. With clearly set up rules, roles, and workflows, problems such as overlaps in employees’ paid time off requests become history. We hope this detailed guide was helpful, and if you’ll need any assistance, here at Onilab, we’d be happy to offer you !