The question of data accessibility and what each individual can see and do in your Salesforce organization is indeed a vital one, especially as your teams grow.
To help you get to the bottom of the topic, professionals from our have gathered everything you need to know about how permissions are granted to users in Salesforce. Plus, we’ll gladly introduce you to all there is to Sharing Rules, when this function should be used, what are the different ways you can configure Sharing Rules in Salesforce, and even show you how to set them up on use case examples.
Table of Content
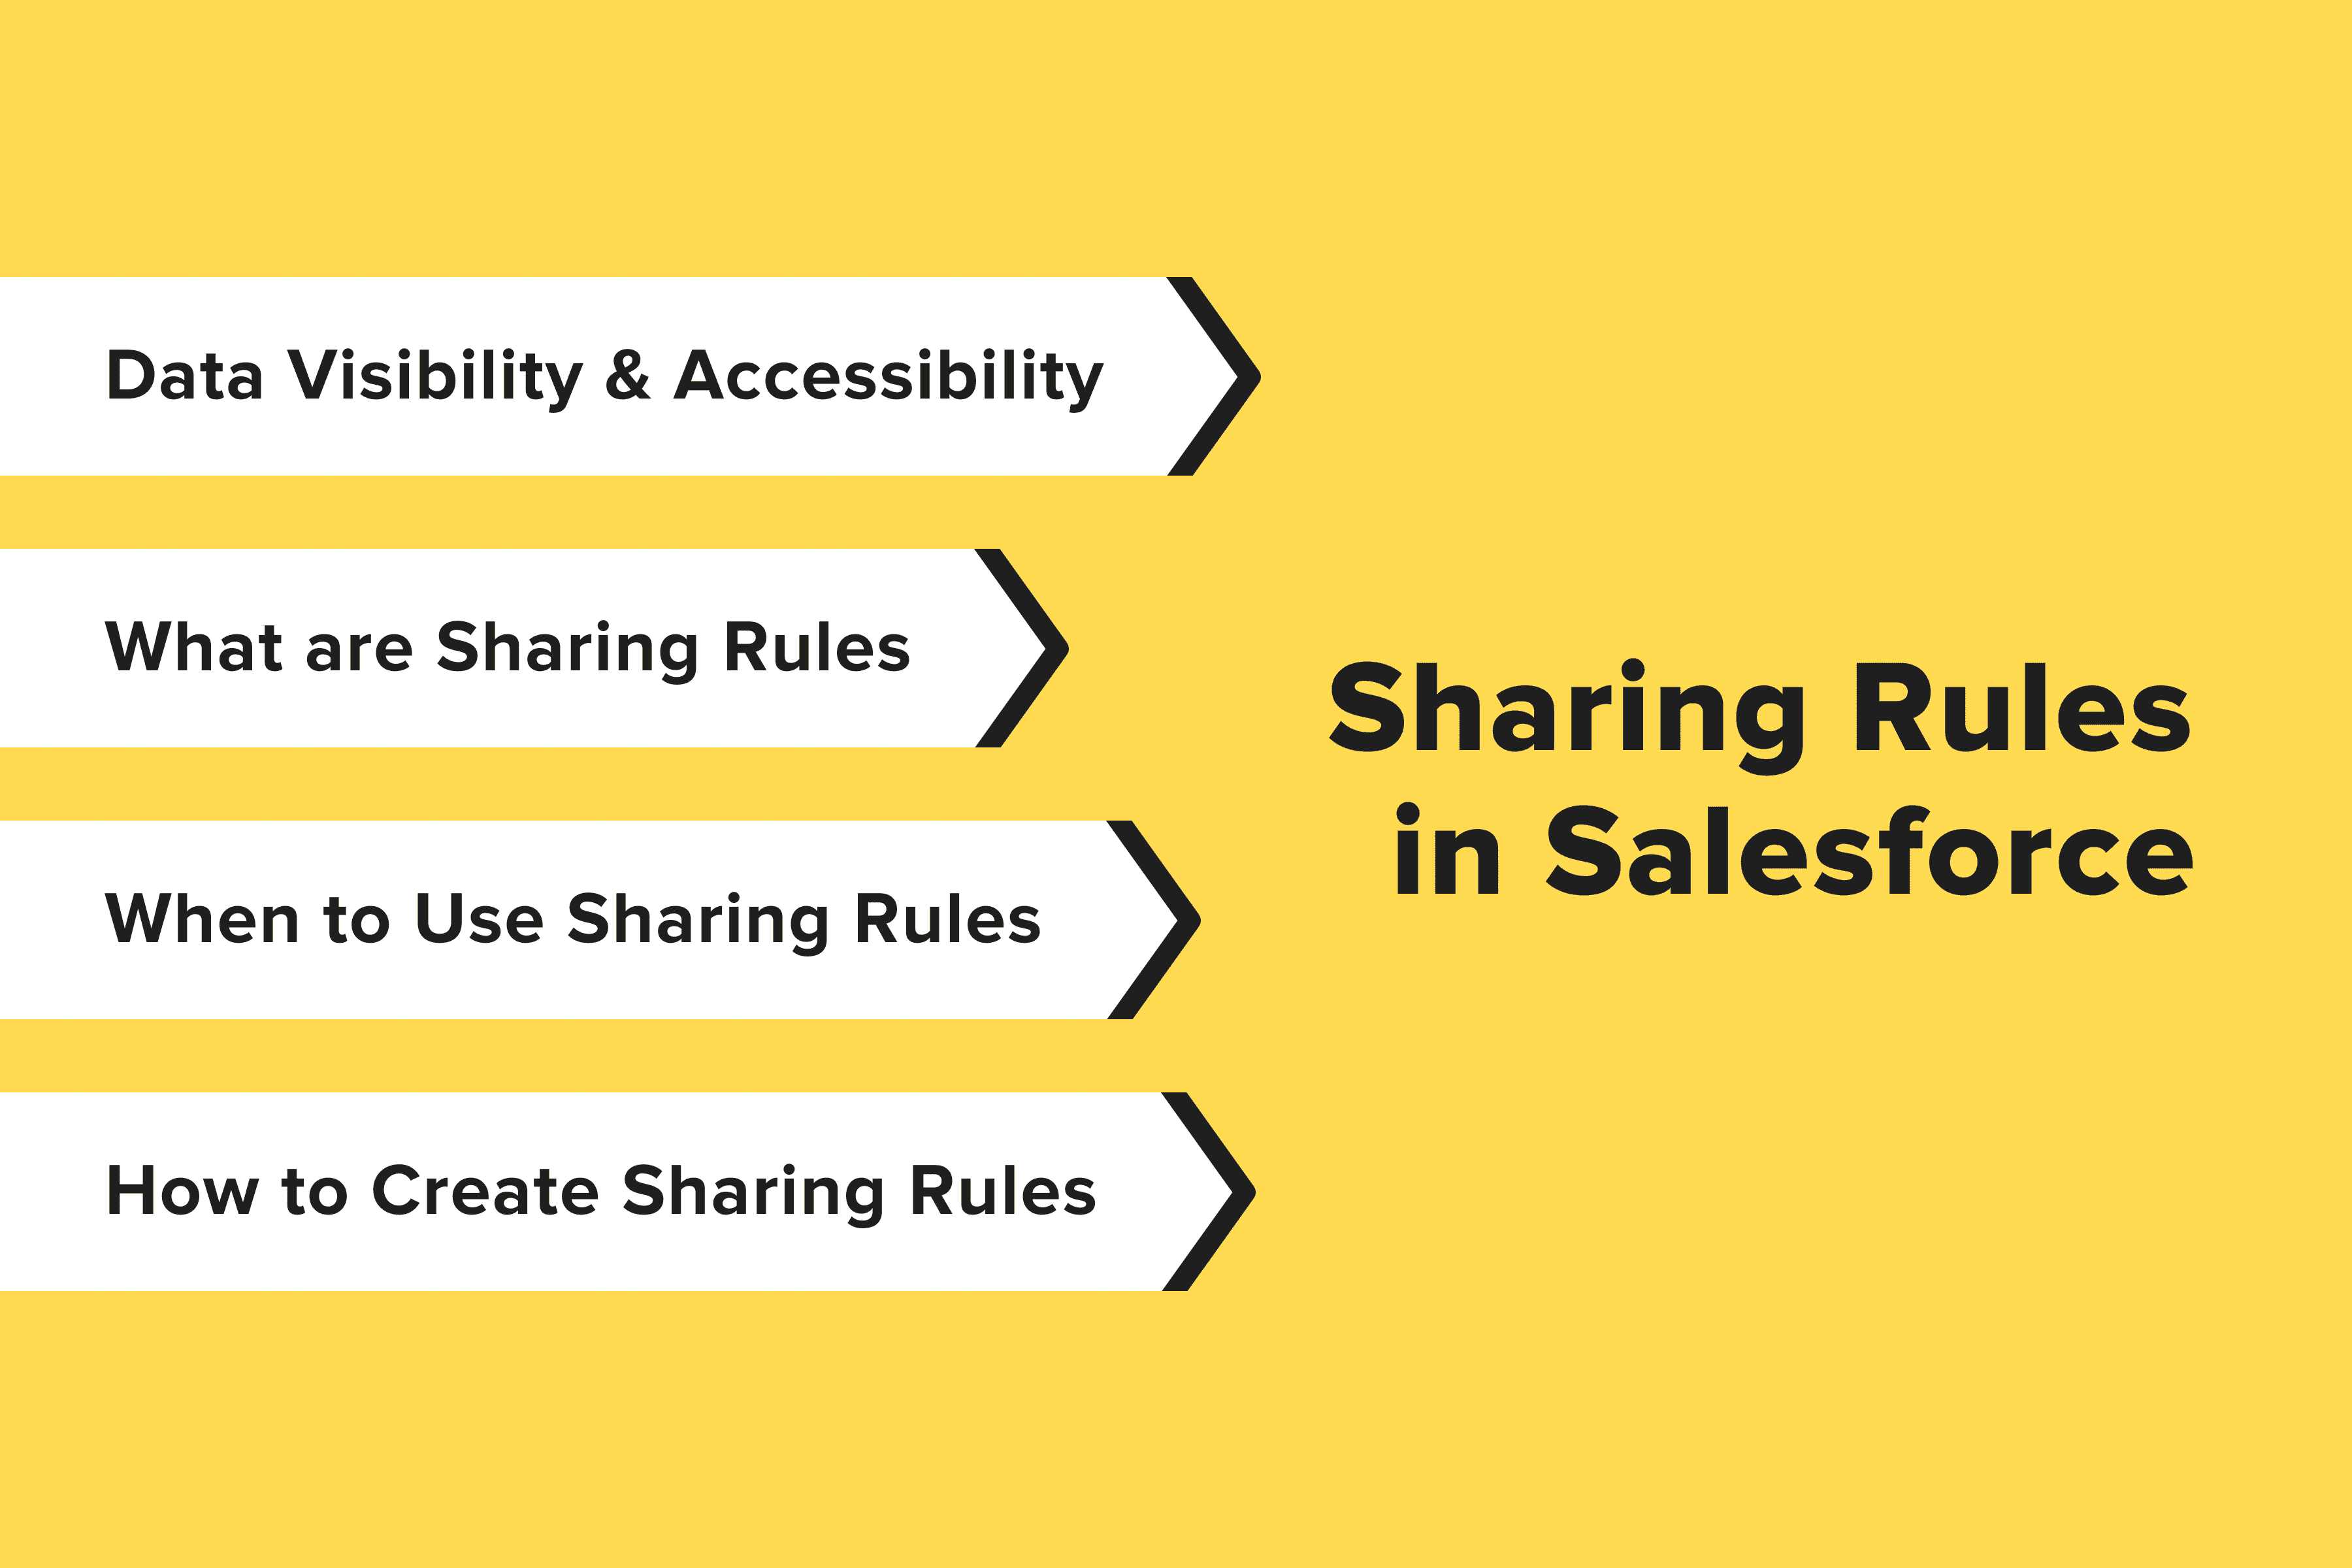
An Introduction to Data Visibility & Accessibility in Salesforce
In order to avoid confusion right off the bat, it is important to understand that the way users are given permissions and access to various elements that are used in your organization in Salesforce is multi-layered. As such, what a user sees and is allowed to do is determined by the following:
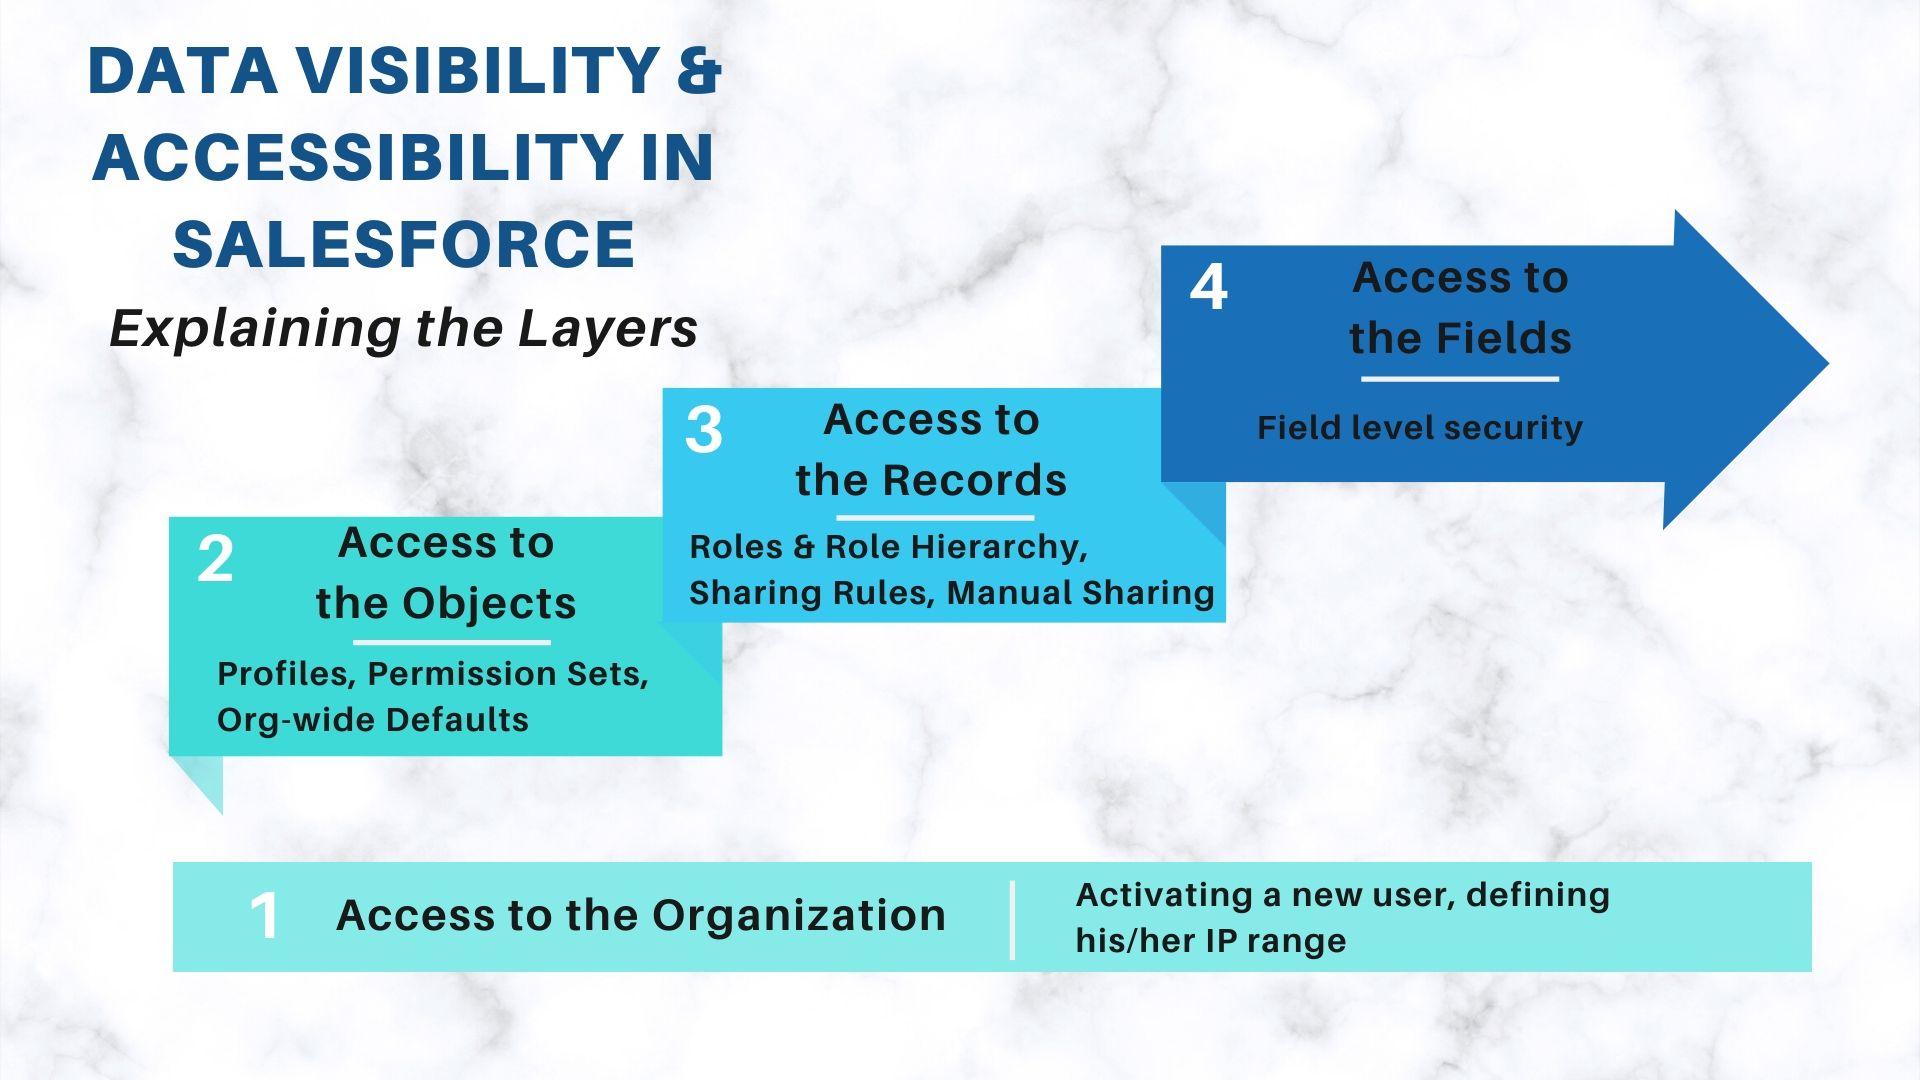
1. Access to the Organization
Firstly, a person is able to log in and use the org after the Salesforce administrator has created and activated a user for them with a defined IP range and, optionally, indicated permitted hours and/or days. That’s where you need to know for configuration and testing, and only after that can you proceed to the specifics of access levels and permissions. We gladly share the article where you can read more about this process. Alternatively, you may order specialized to manage these tasks effectively.
2. Access to the Objects
Object access is then determined by:
a) Profiles
This is the baseline accessibility level which a user will have to all records along with what they’re allowed to do with the objects, fields, which tabs they can see, etc.
Every user is obligatorily assigned a Profile. This can either be a Standard Profile that is provided by Salesforce or a Custom Profile which can be created by cloning and modifying a Standard Profile.In their turn, Standard Profiles can be of several types, including:
- the Standard User (who can create, read, edit and delete the records that they own);
- three user types which derive from Standard Profiles: Marketing User, Contract Manager, Solution Manager;
- as well as the Read Only User (who has access to the same things a Standard User does but can only view, not edit or etc);
- and, finally, the System Administrator (who can see and modify anything).
b) Permission Sets
Although every user must have a Profile (and most commonly there are many users of one Profile, for instance, all members of the Customer Support Team), each user can have numerous Permission Sets. Permission Sets are indispensable when only some users that are grouped under one Profile type need additional access to some settings, tabs, objects, etc (not the entire Profile with all participants).
c) Organization-Wide Defaults
Also called Org-wide Defaults or simply OWD, these permissions define an object’s visibility level that’s given across the entire organization. They are used to restrict the Profiles (not give more access to users) and determine what they can/can’t do regarding objects.
Mentioning the records a user owns, OWD can allow to:
- Create & read an object (CR),
- Create, read & edit an object (CRE),
- Create, read, edit & delete an object (CRED).
As for the records that aren’t owned by a user, Org-wide Defaults can allow:
- Public Read/Write/Transfer (gives the permission to users that don’t own the record to not only view and edit the record but to even change the ownership; importantly, this isn’t applicable to anything but Leads and Cases),
- Public Read/Write (allows viewing and editing an object if you aren’t the owner),
- Public Read Only (grants the opportunity to view an object’s records but not to edit or do anything else with it),
- Private (gives utmost restriction and doesn’t allow anyone but the owner of an object to see it or do anything with it).
3. Access to the Records
Which records are allowed to be seen and changed are then limited by:
a) Roles & Role Hierarchy
Roles and their position in the hierarchy can give access to the records vertically. Meaning, those who are higher in the Roles “tree” have the same access as those who are lower them.
For instance, via Role Hierarchy, you can give the Head of the Customer Support Department “View and Edit” access to Accounts which were created by a Support Specialist who he/she manages. Or, if needed, to restrict Support Specialist “A” from browsing the records made by Support Specialist “B”.
In case the Org-wide default settings are “Private” or “Public Read Only”, with the help of Role Hierarchy, you can extend the accessibility. Keep in mind, though, that Role Hierarchy can not give more than what’s defined by the Profile and yet no less than what’s been given by OWD.
The access via Role Hierarchy can be:
- View only,
- View and edit,
- No access.
b) Sharing Rules
As mentioned above, the Role Hierarchy allows assembling the roles and defining accessibility vertically. When there’s a necessity to extend access to records parallelly in a linear or more horizontal way, Sharing Rules are used. As such, no matter where a role is in the hierarchy, Sharing Rules can grant the user Read Only or Read/Write access to groups or even territories. This point should be kept in mind when choosing between using Role Hierarchy or Sharing Rules in Salesforce.
The Sharing Rules feature is especially handy when there are several specialists with similar job positions but who are placed differently in the Role Hierarchy and beneath different managers. For instance, in cases when Sales Reps are divided into teams by regions of sale, ideally they should have access to each other’s Accounts or other objects, Sharing Rules can be used for providing such horizontal access.
c) Manual Sharing
Also referred to as User Managed Sharing, Manual Sharing Rules in Salesforce are applicable in cases when the Record Owner wishes to share the record with another user or user group via clicking the button “Share” that’s located on the record itself. Apart from the actual Record Owner, usually, users who are placed above in the Role Hierarchy also have the opportunity to share the record manually.
4. Access to Fields
Field level security is required in situations when specific fields shouldn’t be visible to users. As such, a common example of that is the “Salary” fields that are kept on the employees’ Accounts. Fields that should remain private and be visible to only certain privileged individuals (based on their profile) can be hidden.
Field-level security allows to make a field on the record:
- Hidden,
- Read Only,
- Visible.

Get a Free Salesforce Audit Example
Explore our Salesforce audit report on diagnosing common bottlenecks in the Salesforce ecosystem.
What are Sharing Rules in Salesforce: Explained From A to Z
As stated previously, Sharing Rules are one of the ways to grant distinct users of specific groups, roles, or territories additional “Read Only” or “Read/Write” access on an exceptional basis. Such access to records owned by other groups of users goes beyond what was set up by Org-wide Defaults of “Public Read Only” or “Private”. So, answering the question of “what is the use of Sharing Rules in Salesforce”, their main aim is to provide additional access to users. This means that with Sharing Rules, particular users or groups can have more access than what was given initially by Organization-Wide Defaults, but not less (this makes up the main difference between OWD and Sharing Rules in Salesforce).
Components of Sharing Rules
Three main things make up a Sharing Rule:
- What records are shared? Determined by types of Sharing Rules (which record or object is shared can be based on record ownership or based on whether the indicated criteria are met on a record);
- With which users are they shared? (these can be role-based groups of users, territory-based groups of users, or public groups; note that public groups can be created by admins and could be made up of various individual users, roles, territories, etc assigned to it);
- What access is granted? (either Read-Only or Read/Write).
How Sharing Rules work in Salesforce: What can be shared?
Sharing Rules can be applied to most objects, including those that are custom-created and specific to your org. Here are some examples:
- Lead
- Account
- Opportunity
- Case
- Campaign
- User
- Individual Sharing Rules
- Account Territory
- Asset
- Contact
- Custom Object
- Data Privacy
- Flow Interview
- Location
- Order
- Product Item
- Product Request
- Product Transfer
- Service Appointment
- Service Contract
- Service Crew
- Service Resource
- Service Territory
- Shipment
- Time Sheet
- User Provisioning Request
- Work Type
- Work Type Group
What’s for the Sharing Rules Salesforce limits, bear in mind that a single object can have up to 300 Sharing Rules, 50 max of which could be criteria-based.
Types of Sharing Rules in Salesforce
A Sharing Rule can be based on the following two types:
- Record Owner-based Sharing Rules in Salesforce (the Sharing Rule will function depending on the selected owner of a record; generally these can be Public Groups, Roles, or Roles with Subordinates).
- Criteria-based Sharing Rules in Salesforce (such Sharing Rules will grant access to users only if specific conditions that were indicated in a rule were met on the record).
When to Use Sharing Rules in Salesforce
Mentioning specific use cases for Sharing Rules in Salesforce, we’ll give you two examples based on the selected type of the Sharing Rule.
Record Ownership Based Sharing Rule Use Case
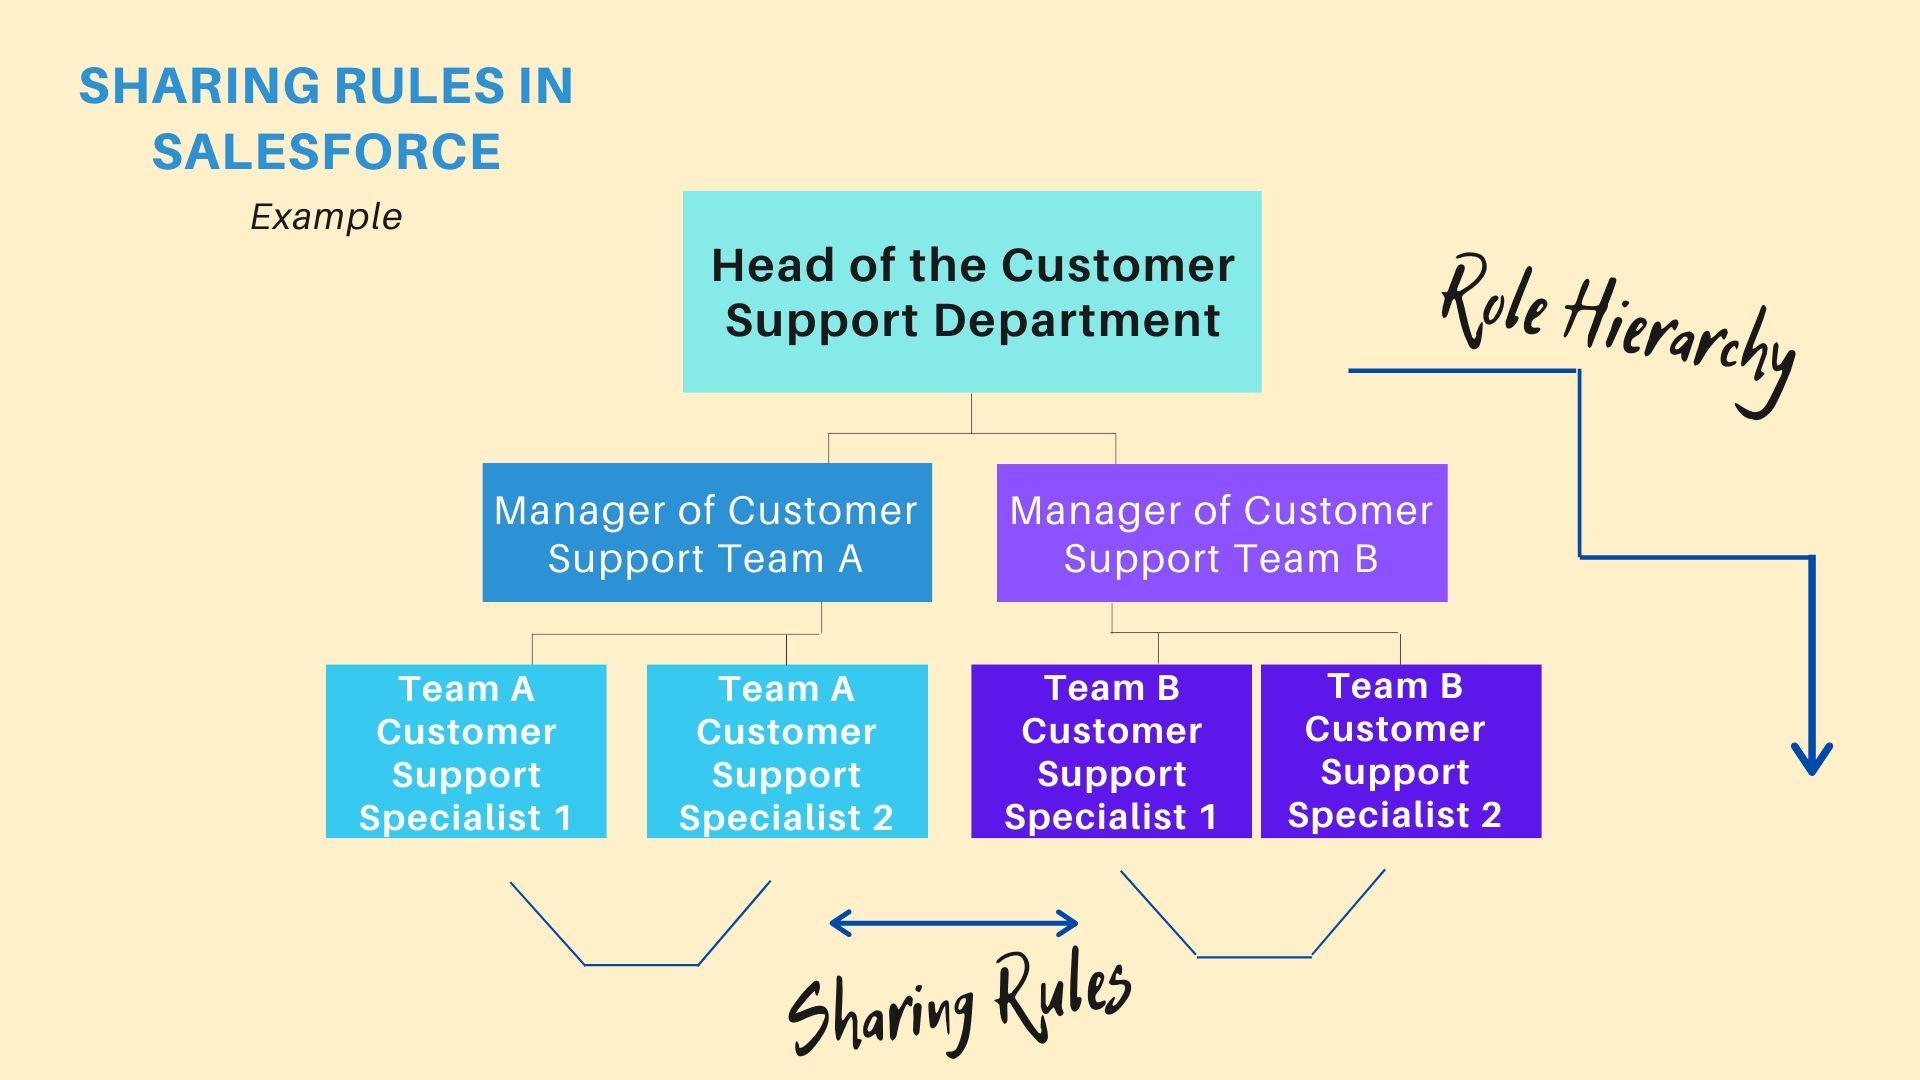
Imagine that there’s a large department broken down into smaller sub-departments, say, two or more Customer Support teams that are split by the product lines that they service. Although these teams are allocated in the Role Hierarchy under different managers, they should have the chance to view some of each other’s records, like Cases or Opportunities. In this scenario, via Sharing Rules that are record ownership-based, you can allow Customer Support Team A to view the records owned by Customer Support Team B (and vice versa), regardless of the fact that these groups of people aren’t placed under the same manager in the hierarchy.
Criteria-Based Sharing Rule Use Case
Similarly, an example of using criteria-based Sharing Rules in Salesforce would be with Leads. Usually, Leads are privately owned records by default, yet in some cases, they should be accessible to other people in the company. Let’s assume that a Sales Rep has worked with a potential client, yet the customer isn’t quite ready to buy yet, the Lead Status is changed to “Unqualified”. In this situation, the client needs more nurturing to be urged to make the purchase, one such way is by using Marketing tools. In this scenario, it makes sense to give Marketing Specialists the ability to view Unqualified Leads so that they can, for instance, add the client to an email campaign. This way, the Sharing Rule won’t give Marketers access to all the Leads, only the ones they need to see and work with.
How to Create Sharing Rules in Salesforce
Now that we have a better understanding of what can be shared and with whom, let’s proceed to setting up Sharing Rules in Salesforce step by step.
Case 1: Sharing Rules on the Grounds of Record Ownership
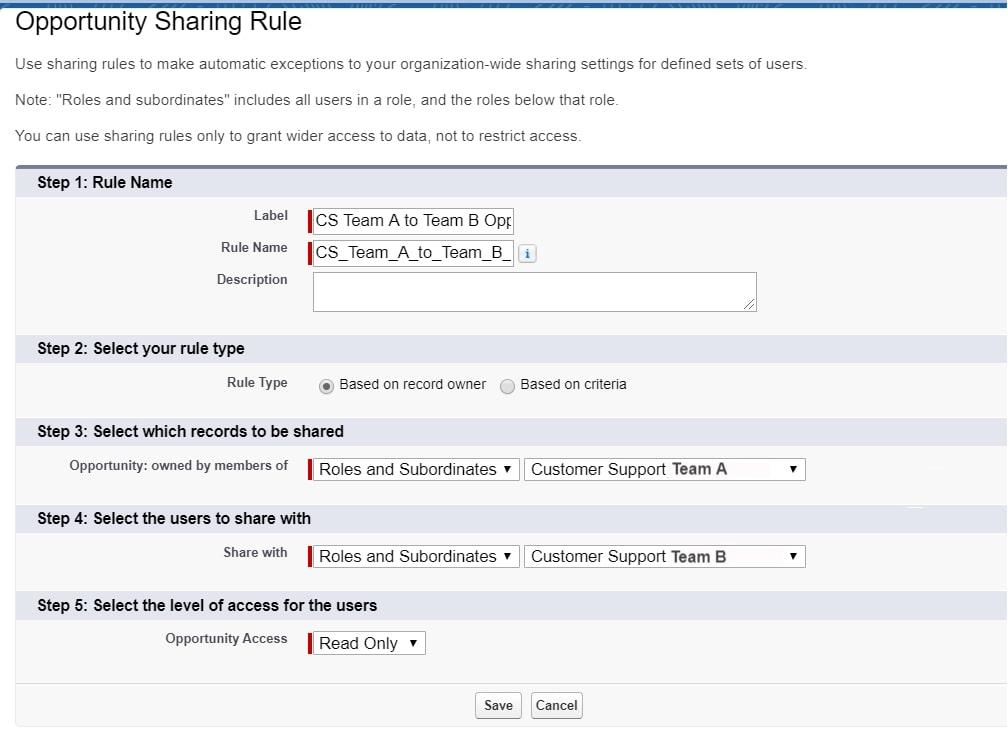
Based on the record ownership use case example above, let’s give Customer Support Team A the permission to view Customer Support Team B’s Opportunities (and the other way around).
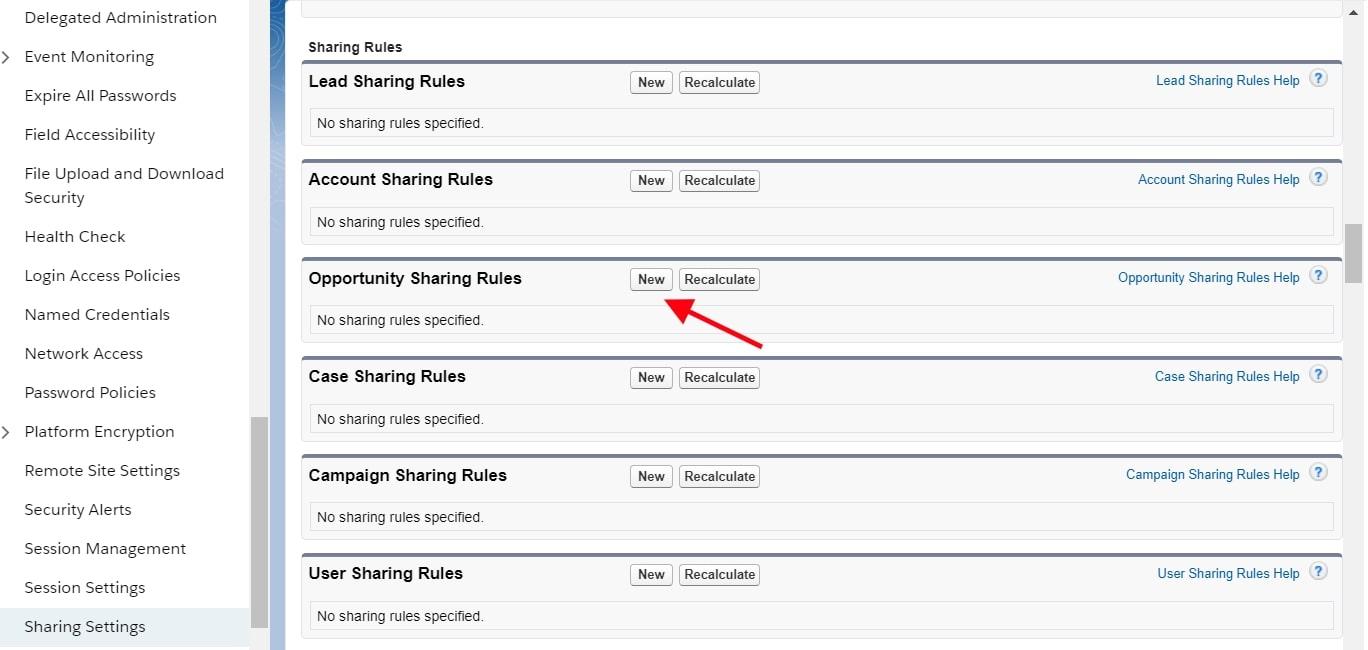
Step 1: Where to find Sharing Rules in Salesforce?
You can allocate the Sharing Rules by following this path:Setup → Settings → Security → Sharing SettingsScroll down under “Default sharing settings” of Org-wide Defaults to the “Sharing Rules” section. Press “New” in the “Opportunity Sharing Rules”.
Step 2: Establishing the rule from Team A to Team B
Fill out the following fields:
- Label → “CS Team A to Team B Oppo Share”
- Rule Type → Select the first radio button “Based on record owner”
- In the “Records to be shared” select the “Opportunity: owned by members of” select “Roles and Subordinates” from the first drop list and the “Customer Support Team A” from the second drop-list right next to it.
- In the “Select the users to share with” find “Roles and Subordinates” from the first drop list and the “Customer Support Team B” from the second drop-list right next to it.
- In the “Level of access” indicate the Opportunity Access as “Read Only” (optionally, if you want to allow them to make changes, select the second “Read/Write” option).
- Press → “Save”
Step 3: Setting up the rule from Team B to Team A
Now that we’ve given Customer Support Team B the chance to view Team A’s Opportunities, we must create one more rule for granting access vice versa in order for Customer Support Team A to see Team B’s Opportunities too. Repeat the second step for that, changing around the “owners of the records to be shared” with “the users to share with”.
Case 2: Sharing Rules Based on Criteria
Following up on the second use case example mentioned above, let’s give Marketing Specialists the opportunity to see Leads that are privately owned by Sales reps but only those Leads that are marked with the Status “Unqualified”. Marketers can then nurture potential customers with this status and try to induce them to make the purchase.
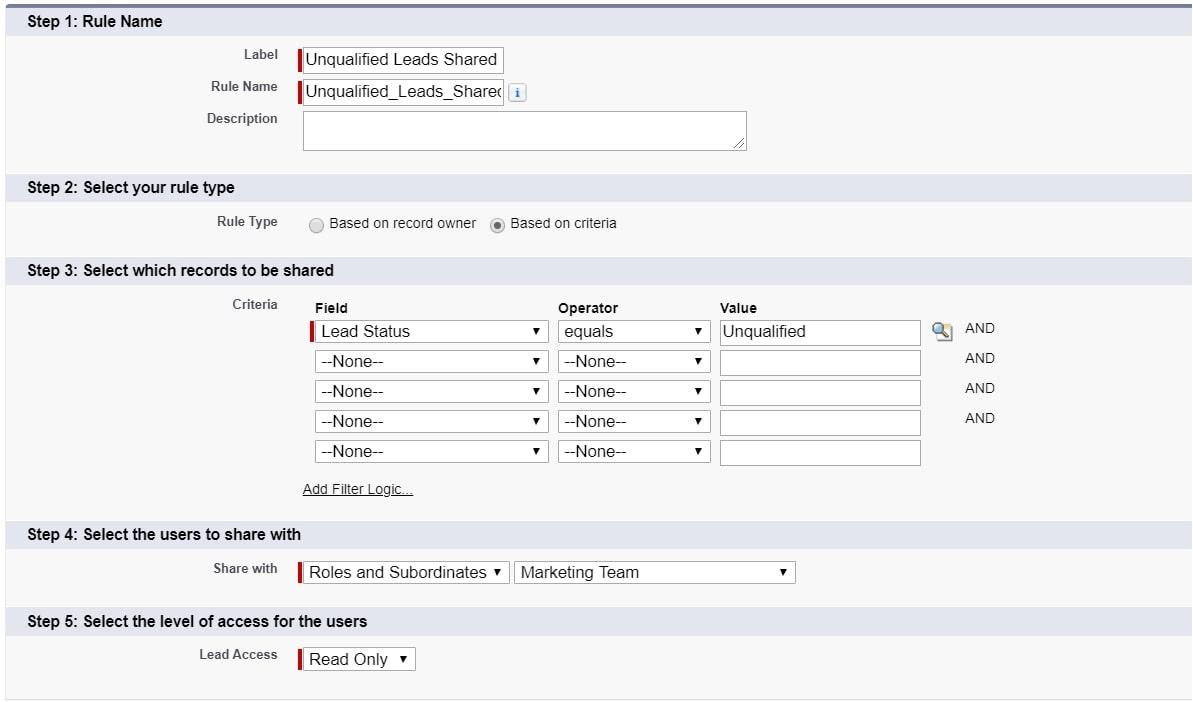
Step 1: Adding a New Sharing Rule
From the Setup go to Settings → Security → Sharing Settings. In the “Sharing Rules” section, click on “New” in the “Lead Sharing Rules”.
Step 2: Creating the Rule
Fill out the following fields:
- Label → “Unqualified Leads Shared with Marketers”
- Rule Type → Select the second radio button “Based on criteria”
- In the “Records to be shared” define the criteria: in the “Field” select the “Lead Status”, in the “Operator” choose “equals”, in the “Value” indicate “Unqualified”
- In the “Select the users to share with” find “Roles and Subordinates” from the first drop list and the “Marketing Team” in the drop list to the right of it.
- In the “Level of access” indicate the Lead Access as “Read Only” .
- Press → “Save”
Summary
Summing up, as you can see, there are many layers of granting users access to records and objects in Salesforce. We’ve overviewed the different ways to control what users can view and do in Salesforce, explored what Sharing Rules are in detail, and even browsed examples of creating Sharing Rules in Salesforce. In any case, if you have any additional questions or need , you’re more than welcome to reach out to us for assistance!