Magento 2 is not a lightweight eCommerce platform. It was built to serve thousands of users at once. But without proper optimization, you can end up with a website that is a pain to use and an eyesore to look at.
Slow Magento stores irritate your buyers and negatively affect the conversion rate. Plus, poor website speed is bad for your SEO rankings. Yet the good news is that you can speed up Magento 2. Most likely, just one fix won't be enough for Magento to perform better. This process involves a comprehensive approach.
In this Magento performance optimization guide, we've gathered insights from our in-house experts and focused on the actionable tips that work. In this post, you'll find all the major Magento 2 performance optimization fixes and recommendations to make your store run faster. As a result, you'll improve your Time to First Byte (server response time), Google PageSpeed, and Core Web Vitals scores, and, ultimately, customer satisfaction, among other things.
Table of Content
1. Assess Your Magento 2 Performance
Magento 2 speed optimization starts with a website performance audit. Before making any fixes, you need to know how your store currently performs. Your website comprises many pages, but you should overview the main ones most of your users see. These are the:
- main page;
- category page;
- product page;
- cart page;
- checkout page.
Successful Magento page speed optimization must result in the acceleration of all these crucial pages.
1.1 Run Google PageSpeed Insights Tests Before Jumping Over to Magento Store Performance Optimization
Aa a first step, run tests for these pages (by the way, here's a detailed guide with tips).
Once you run the tests, you'll get scores with results. If they are marked orange or red, then the Magento speed is poor.
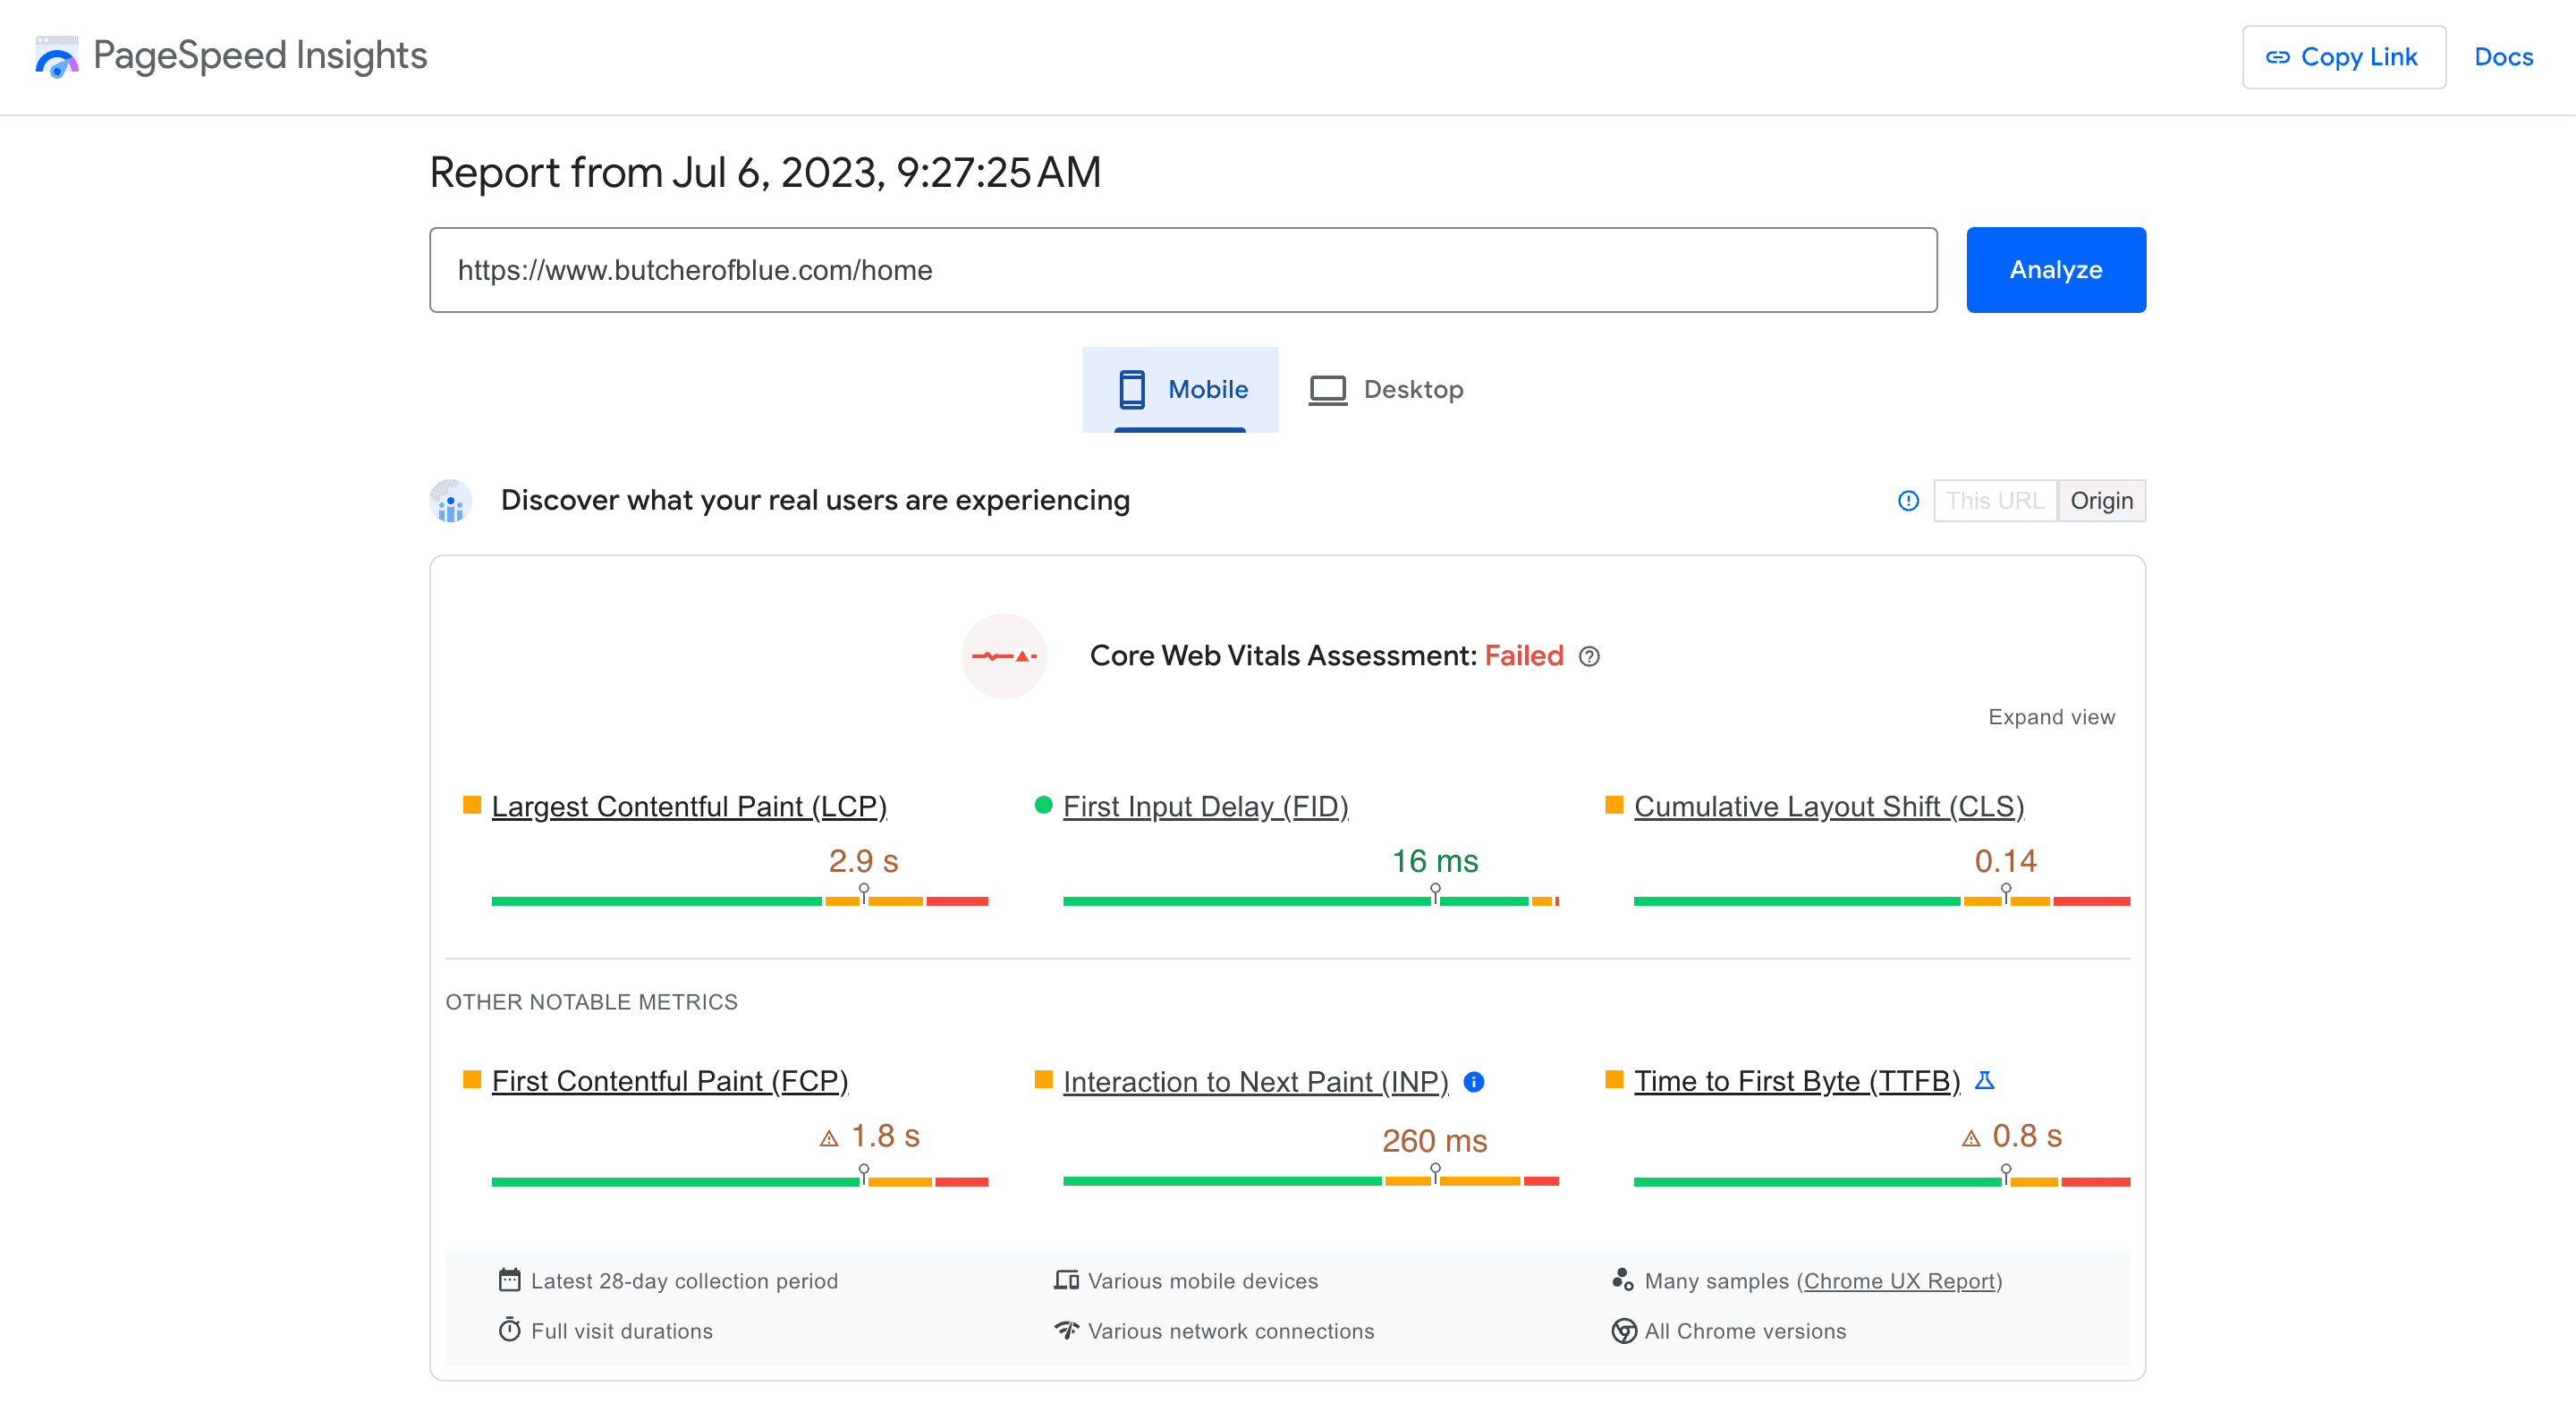
Then, take a look at the Core Web Vitals assessment scores that are shown a bit lower. Again, red and orange are a sign of poor site performance. Such metrics as First Input Delay and Largest Contentful Paint are part of a new Google page experience algorithm that influences SEO. So, learning is crucial to getting better search rankings.
Below is a screenshot showing the PageSpeed Insights results for the homepage of , a Magento-based store. As you can see, the site can benefit from some improvements.
1.2 Check the Server Response Time
The next step to speed up Magento 2 is to find out how much time the server takes to respond. TTFB (time to first byte) determines the time when the server sends your browser its very first byte.
It is best to check it without the full-page cache (Magento 2 FPC). In this case, if the response time isn't less than one second, then this isn't good. It means that the code causes a large load on the server, and each time the cache is flushed, users have to wait for a long time.
Therefore, if your store has thousands of products, the full-page cache might not even have enough time to generate. Magento full-page cache auto-generation can significantly reduce this lag. Yet, you should optimize the website to work quickly without the full-page cache.
If you're checking TTFB with full-page cache (f.e., using Redis or Varnish), ideally aim below 100 ms. I.e., Google states that it should be 200 ms or less.
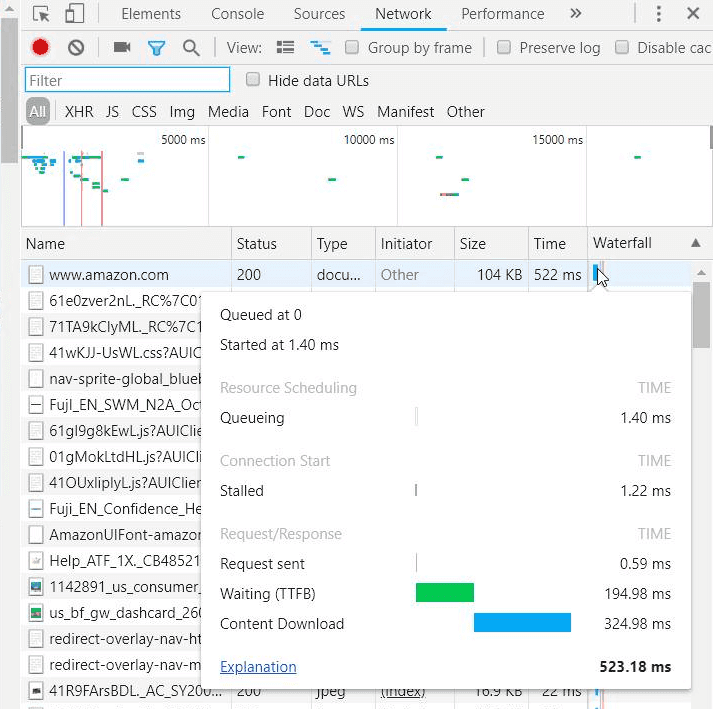
How it’s done
You can easily measure your own TTFB by using the Chrome developer console. This is how you do it:
- Go to yourwebstore.com.
- In Chrome, hit F12 to open the developer console.
- Go to the "Network" tab.
- Sort by "Waterfall" and hover your mouse over the first entry.
Feel free to browse our guide on for more recommendations for slow server response time optimization.
2. Make Possible Upgrades
In fact, Magento website speed optimization should start with this vital step: updating and upgrading as much as possible. There's a big chance that your Magento 2 performance could benefit from upgrading to a fresher version of the Magento platform and PHP, among other things. So, let's take a closer look at what to boost.
2.1 Update Magento 2 to the Latest Stable Version
This fix is needed for: the backend and frontend
Problem explanation
Magento keeps releasing new versions of the CMS almost every three months. And each release brings Magento performance upgrades, which explains why it is unreasonable to stick to an older version.
How it will help
Upgrading to the latest Magento version means more features as well as bug and security fixes. Plus, every update helps to speed up Magento 2.
How to upgrade the Magento version
At the time of this writing (June 2023), the latest and the most optimized version is 2.4.6. You can check Magento versions .
Keep in mind that the upgrade to a fresher version may get tricky. For instance, if your store customizations have errors, upgrading to the next version can cause issues. If you want to migrate to the latest version hassle-free, turn to our .
2.2 Make Sure Your Magento Store Uses Suitable Hosting
This fix is needed for: the backend (sometimes for the frontend too)
Problem explanation
Magento consumes a lot of resources. If you have cheap shared web hosting, it can slow you down. Most problems occur when there's a load increase. I.e., almost any hosting can handle one user, yet when their number grows, say, to 100, its capacities aren't enough. Server requests get piled in a queue, so each user has to wait for the previous requests to be executed.
How it will help
Increasing the server capacity will allow you to optimize Magento speed and serve more users in parallel. Increasing the server capacity as a Magento speed optimization tactic will also allow you to serve more users in parallel. This way, requests won't accumulate in the queue, and the site will perform faster.
How it’s done
Make sure that your hosting meets Magento's minimum system requirements. You can browse them . If everything is alright, you should decide whether it's worth changing your .
You'll make this decision based on the number of users you have on the site simultaneously and on the load it has. Figure out how many resources one user needs, including how much time the server spends on one user. Then determine how to distribute the resources.
For instance, you know that your dual-processor server and 4 GB of RAM can process 100 parallel requests without a full-page cache. Parallel means that there are no requests in the queue. So, to process 500 requests, you'll need a five times more powerful server. Make sure your CPU and RAM are below the 80% use rate. This 20% window will give you enough leeway to deal with the occasional spikes and, at the same time, will not strain your budget too much.
2.3 Use HTTP/2 Instead of HTTP/1.x
This fix is needed for: the frontend
Problem explanation
Magento has a considerable amount of static files (such as JS, CSS files, media, etc.). If you use HTTP/1, it creates a new server connection for every file. On the contrary, HTTP/2 is capable of processing many static files in parallel in one connection.
How it will help
For Magento, we are most interested in the ability of HTTP/2 to:
- compress headers;
- use multiple server requests at the same time;
- work in parallel on a single connection (by processing static files like JS, CSS, etc., from the server; this way, it saves time on subsequent connection setup).
As a result, time isn't wasted on making consistent connections. So, with this tactic to speed up Magento 2, the website will load faster and have quicker rendering.
Switch to HTTP/2
99% of all Magento hosting web servers (Apache 2.4.17+, Nginx 1.9.5+, ) support HTTP/2 by default. The same goes for CDN providers (Cloudflare, MaxCDN, KeyCDN, etc.). Use this to find out if HTTP/2 is enabled in the server settings. It also supports QUIC, which is the next-gen protocol, HTTP/3.
2.4 Switch to an Optimal PHP Version
This fix is needed for: the backend
What's the deal with PHP?
Each new version of PHP usually performs better than the previous ones. If you're not using the latest version of PHP, it makes sense to make the switch.
Use PHP 8.1 or 8.2 for now
We advise using PHP 8.1 or 8.2, which are the most stable and fast. The code performs faster, decreasing the time to first byte. Note that the PHP 8 version has already been released. We conducted research and experimentally tested PHP 7 vs. PHP 8 on Magento. We considered the Magento speed and performance on PHP 7.3 and compared it to PHP 8.0 with enabled and disabled JIT.

40 Hours of Magento Services. FOR FREE
Try our custom development, optimization, support, and design services. One week, free of charge, no strings attached.
3. Profile and Review Third-Party Modules & Possible Logic Issues
This fix is needed for: the backend
Problem explanation
Generally, default Magento with simple data performs quite well. The biggest issue Magento is facing emerges when adding customizations like extra modules, which often slow down the store. Other issues may occur due to large data volumes or because your pages are jammed with too many elements, like widgets or sliders.
You have to understand that using just a Magento performance extension might not be enough for store optimization. Moreover, using multiple add-ons from different vendors can significantly degrade website performance. This happens because each module usually works independently, re-requesting the data it needs (for example, on a product), even if another module has already requested it.
The thing is that every module you add slows down your code, which gets burdened with “one-fits-all” logic. Why is that bad? Because third-party product vendors create universally applicable logic that wasn't tailored to the needs of your store. So, the more unoptimized add-ons and plugins you use, the more problems they can create.
How it will help
Where do you start? To tackle this issue, you must begin by investigating where your store stands today. Figure out the pain points slowing down your store and whether you need all your plugins. When you're through with that, either optimize the extensions or remove them. We'll cover this procedure in more detail.
3.1 Review Page Performance With Profilers
How to approach profiling
Let's start the Magento performance optimization by determining what's slowing the store down. Then, based on the findings, you'll decide which modules, plugins, event observers, etc., are worth optimizing or getting rid of.
You can obtain such information and understand how to speed up Magento 2 by using a profiler. There are a few possible paths with profilers.
a) Opt for the Magento Profiler for simple profiling. It is a built-in tool inside the Magento 2 performance toolkit for inspecting database queries and the calls of various methods. Magento Profiler is great at finding bottlenecks, slow-downs, and other hidden Magento performance issues. Plus, it doesn't require any additional profiling tools and may be used on its own.
Note that profiling via this tool is available when certain logic is present in the code. Such logic is already provided by default, and you can always add your own. For instance, this may be the case with functions that call execution time measurement.
\Magento\Framework\Profiler::start("someName");
\Magento\Framework\Profiler::stop("someName");
There are several ways to enable Magento Profiler. Feel free to check out the detailed instructions . If you have never worked with Magento Profiler, , and we will assist you in inspecting your store.
b) We recommend using specialized tools that work atop Magento Profiler if you want to do more with this standard solution. They expand its profiling features and give more detailed results. Here are two examples of such add-ons:
- is a simple add-on that's easy to use. It offers a timeline showing which areas of the store are underperforming and deserve attention.
- is a free add-on that works atop the Magento Profiler. It is very similar to Mirasvit Module Profiler and uses the same technology. The main difference is that MGT provides better and broader data representation, improvements in plugins and events/observers inspection, and other goodies.
Also, unlike Mirasvit, MGT gives information about plugin lists, observer lists, etc., allowing you to get a more detailed insight into the issues.
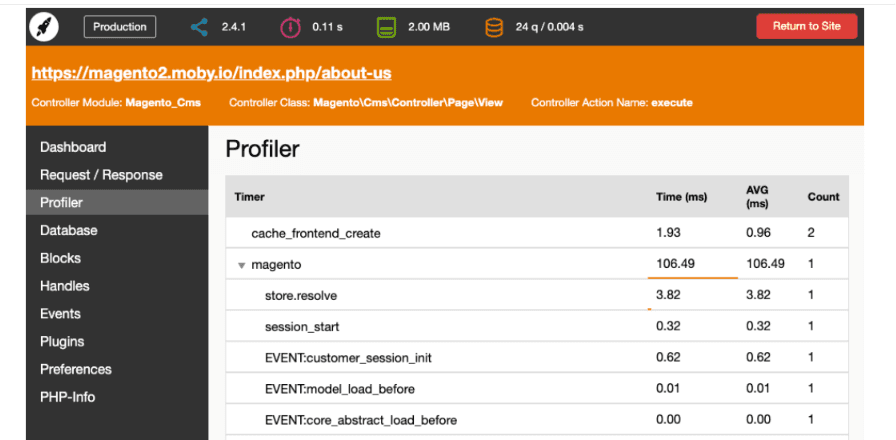
Screenshot taken on
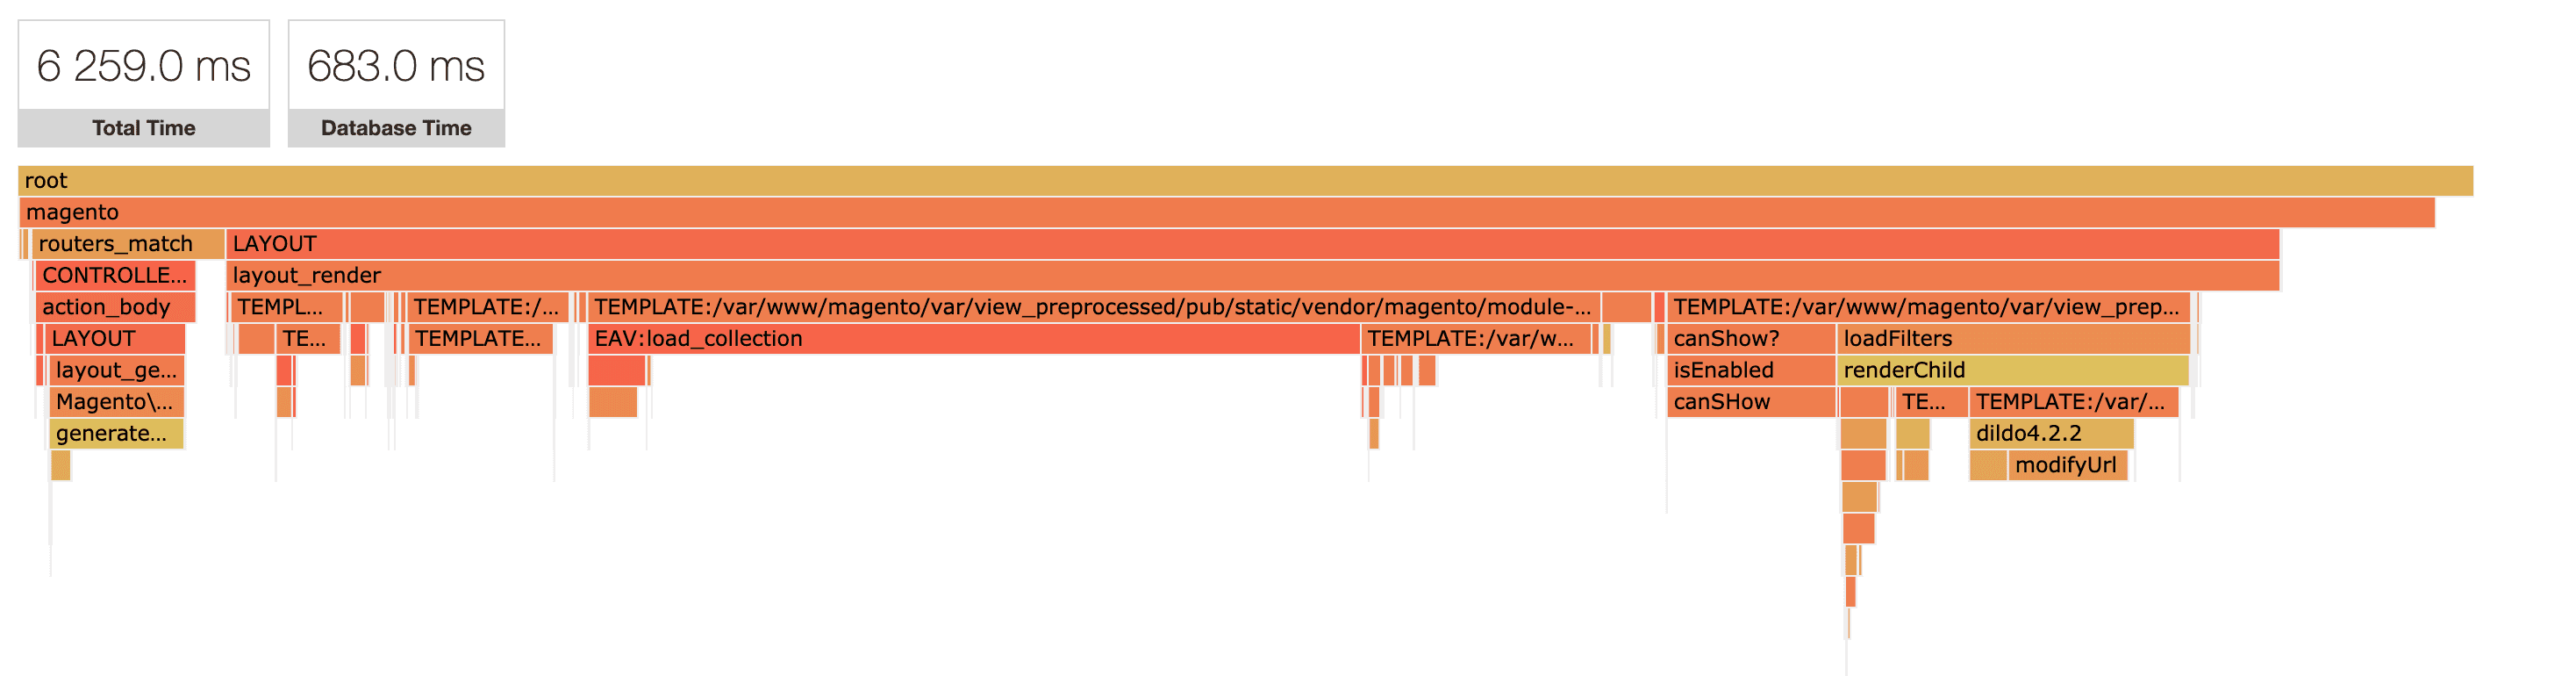
c) For highly detailed profiling, you can use the . This external tool works “outside” Magento at the PHP level, collecting data during the process of execution of PHP scripts. Unlike the two tools mentioned earlier, PHP Xdebug Profiler can provide highly detailed data on the calls, even if there are millions of them. So, you can find out which narrow issues you have and make better conclusions on how to speed up Magento.
After profiling is complete, you'll know which problems to tackle to eventually speed up Magento 2. Most often, the Magento performance optimization needs come down to this scenario example.
You have a page that takes a couple of seconds to load, and these poor results are caused by two or three heavy site elements and several plugins that negatively affect website speed. One plugin might not be necessary at all, and it's possible that you have unused chunks of code. Such problems need to be handled.
3.2 Optimize or Remove Plugins, Event Observers, etc.
As a result of the profiling, you received data on the problem areas in performance. You now know which file, class, module, plugin, event observer, etc., has issues. So, there are two options for Magento speed optimization. You either get rid of something in favor of performance or optimize it.
How it’s done
a) Removing Plugins
Module uninstallation is a relatively rare scenario. Why? Because usually, eCommerce businesses need everything they've added and most likely paid for. Yet, if you do have modules that you don't use, it makes sense to discard them.
It would also help if you eliminated those modules that create numerous logs on all pages. For instance, you can have 5 or 6 modules responsible for “health checking” the site. If something breaks, you get a notification and a corresponding record in the log. Such modules initiate a load of unneeded tests and logs, creating a time-consuming process that can take about 15% of the page load time.
Of course, there are simpler alternatives that don't require so many resources. As a rule, hosting provides optimization service solutions required for a site's health check. Therefore, logging is necessary only for critical errors (always present by default) instead of for everything. Plus, additional logging is excessive and significantly burdens the file system with records.
How to Uninstall Magento Plugins
If you've decided to remove a module to speed up Magento 2, keep in mind that it could be located in several directories: in the app/code or the Vendor folder. Depending on that, one of the two optimization tips below is applicable for deleting a Magento plugin.
a) Method 1: app/code (bin/magento)
For Magento 2, use SSH with the following commands to disable and then delete the module you don't need anymore. We are using TestModule here to give you an example:
- For Developer mode:
bin/magento module:disable TestModule --clear-static-content
bin/magento setup:upgrade
cd app/code/TestModule/
rm -rf TestModule- For Production mode:
bin/magento maintenance:enable
bin/magento module:disable TestModule --clear-static-content
bin/magento setup:upgrade
bin/magento setup:di:compile
bin/magento setup:static-content:deploy en_US de_DE
bin/magento maintenance:disable
cd app/code/TestModule/
rm -rf TestModule
b) Method 2: Removing Extensions via Composer
Here are the steps to remove additional modules using Composer.
- Log in to your domain using SSH/CLI, then make your way to your store's root.
- Get a list of enabled modules using this command bin/magento module:status to allocate the module you'd like to remove. In our case, it'll be onilab_Demo.
- To disable the module, use this command: bin/onilab module:disable onilab_Demo
- Remove the module from all activities of the store: bin/magento setup:upgrade.
- Go to the module's root directory and find the composer.json file, such as /vendor/onilab/module-demo/composer.json.
- Finally, return to your store's root and run this command: composer remove onilab/module-demo.
What to Note When You Remove Magento Extensions
One supplier can have 5 or even 10 modules. So, when you discard a module, make sure that you're deleting a specific one instead of the entire vendor folder.
Be careful when implementing these Magento performance optimization tips. Note that you may delete separate modules that have a common one that serves as a foundation for them. If all of them are located in the same folder, rm -rf TestModule will delete everything, not just the one you meant to remove. Please consult the user manual for the correct uninstallation process.
b) Optimizing Plugins & Other Weak Spots
The rest of the cases deal with optimization. Having plugins integrated with Magento isn't a problem; the main issues lie in their code.
The thing is that plugin vendors usually sell universally applicable solutions, and they generally don't give Magento performance optimization much consideration. Most often, modules aren't tested on a large data scope when they're created. So, there's a big chance that you'll face the problem that a module's logic for data load slows down the store.
This might not be apparent for small data volumes, but you definitely need an optimized approach with 10.000 products. For the plugin's code not to hold back performance, it has to be optimized or customized specifically for your store. Turn to us to improve your performance modules' code to fit your specific needs.
Possible Problems You Can Face During the Magento Optimization Process
During the process of optimizing Magento code, you can encounter various issues. They may regard the performance of your plugins, event observers, modules, helpers, etc. Let's take a look at a couple of them.
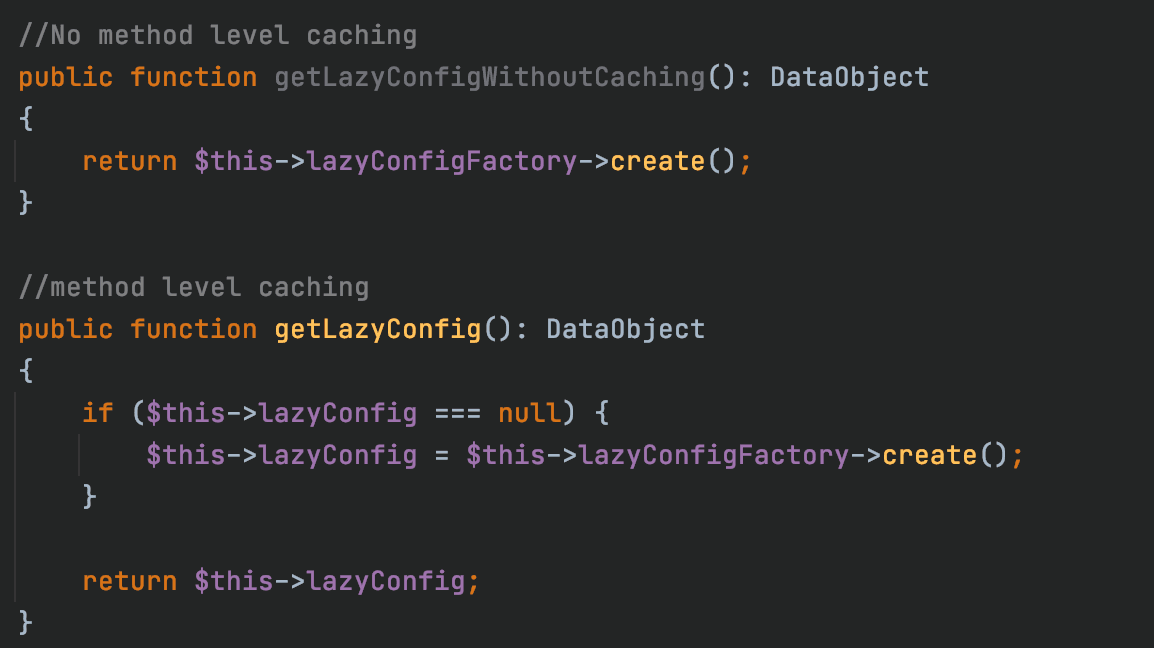
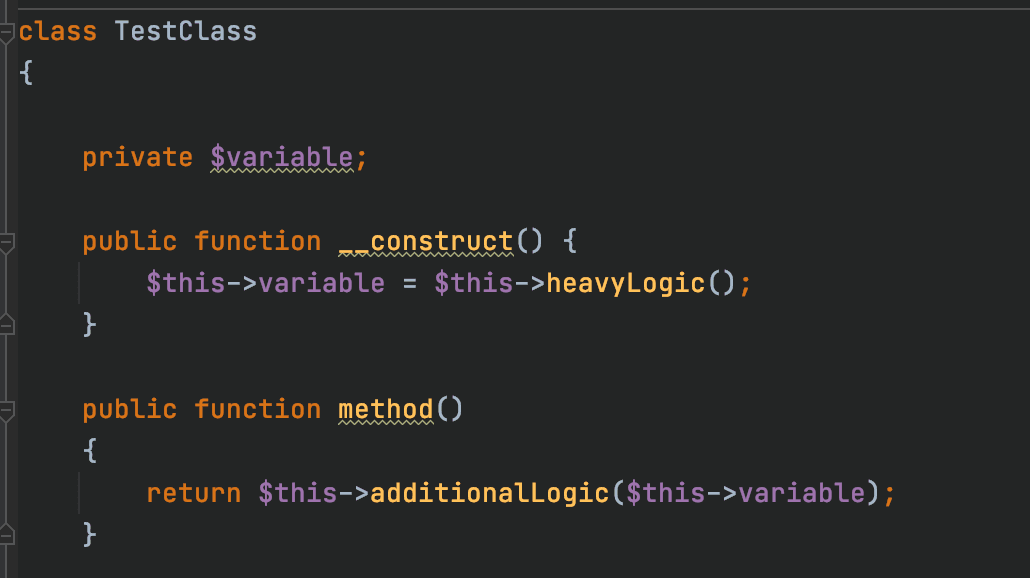
- No caching on the level of class methods.
Let's assume that one of your store's pages shows something 20 times using the same data. If you don't use caching, this data will be requested 20 times to receive the same result. Duplicate calls take up a lot of time. So instead of having 20 requests, your store can narrow it down to one variable that'll return data in subsequent calls. This is done using caching.
To clarify, this screenshot shows the same method in two variations. You can compare the "No method level caching" function with "method level caching".
- Executing unnecessary logic in the class constructor.
There are cases when a certain code (f.e., the results of a curl request) is needed only within one specific method, not at all times. Possibly, not during the page load but later on (as a result of some AJAX request).
However, other methods of this class may be used during page load. At the same time, the constructor is always executed when a class instance is created. This leads to the call of unneeded logic that'll negatively influence performance.
One workaround is placing the code from the constructor to the method so it's executed only when needed. If it's executed all the time, it takes up valuable time.
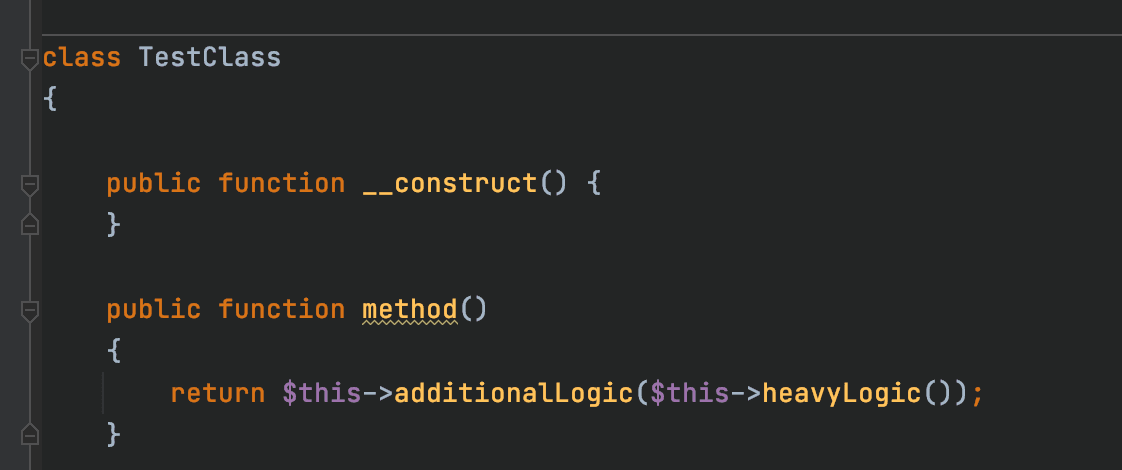
Of course, removing logic from constructors isn't obligatory. Below we bring you a unique case with heavy and irrationally executed logic. As you can see, the constructor executes a method called "heavy logic". The result can be used somewhere in the method, but we don't care much about where else this method is called.
I.e., the constructor executed possibly necessary logic, yet not during the process of basic page load. Perhaps this "heavy logic" is required only after executing some AJAX request instead.
On the contrary, this screenshot shows how to optimize the previously described process. We removed "heavy logic" execution from the constructor. Now the logic will be executed only where and when necessary instead of during class initialization.
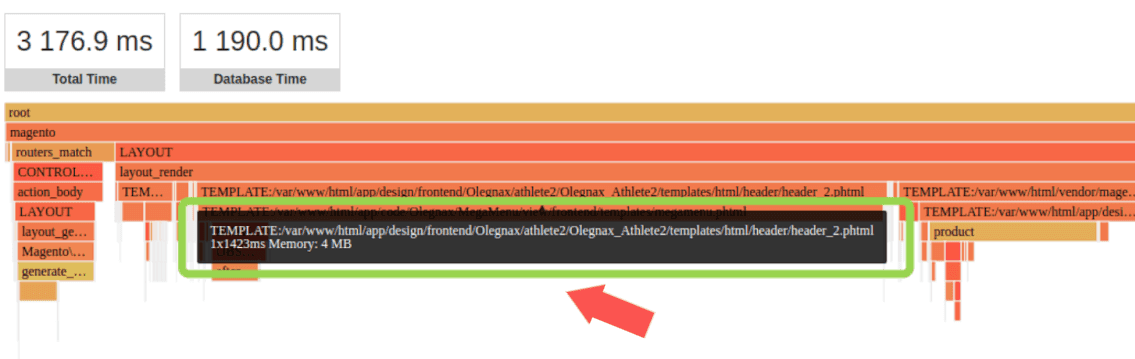
- Lack of caching for blocks that are present on all pages.
Certain page elements are displayed across the entire site, for instance, the mega menu. Typically, the menu with lots and lots of product categories is a heavy entity in Magento with a complex structure. When there is no caching for such blocks, they load each time from scratch, which is time-consuming.
This is an example of the general timeline of a page that takes 3 seconds and 176.9 milliseconds to load. The black rectangle shows how long it takes to load one particular block displayed on every page. Such code can be cached to optimize the performance.
- Event observers in Magento.
Magento 2 is moving away from observers and encourages developers to use plugins instead. But for now, both tools are present in the system. You can read more about the differences in our guide.
In Magento, event observers are attached to certain events and can dispatch them when needed with the help of the Event Manager. However, today observers are pretty limited in what they can do and are mostly present in M2 as a legacy tool. Nonetheless, some developers use events and their observers to extend basic Magento 2 functionality with custom code.
Event observers still have a place in Magento 2 development, but they should be your last choice. We advise you not to use them. Keep this in mind during your Magento 2 performance optimization works.
- Issues with plugins.
You can come across various issues with plugins. Many of them will be individual cases of performance slowdown caused by the integration with your store and its custom peculiarities. Yet, the most common problem is loading a large volume of data within the plugin.
Here's a real case that we encountered on our client's project. The store features a simple slider element with all the sold brands and links to them. Although only 6 brands are shown on the screenshot below, there are about 20 of them in the slider.

Yet apart from the logos and links, a plugin was used to display the number of products belonging to each brand. Each of the brands had thousands of products. Such calculation logic took a lot of time and slowed down the store.
I.e., it took almost 20 seconds to load the data without a cache. In essence, the number of products per brand didn't bring users much value. Redeeming from this logic allowed us to significantly optimize the loading speed of the page without cache.
3.3. Consider Whether You Need Magento Performance Extensions
Magento performance extensions are one of the ways to boost the Magento store. However, as we’ve already made it clear, they don’t always do their job well. So let’s inspect them in more detail to help you make a decision. Here are the situations where you can count on extensions:
- HTML/JS/CSS minification;
- browser caching;
- restructuring code positioning;
- image size optimization;
- applying lazy loading;
- caching translated strings and “is saleable” results;
- preventing some conflicts with the help of asynchronous indexing;
- merging CSS according to the requested page and the device;
- signing cached content to let the browser know when to update it (but you may face restrictions with content hosted on external servers or domains);
- lowering the number of gallery image inspections.
There are some good extensions on the market to deal with these tasks. We’ve tested some of them in our projects and can recommend to you:
- ;
- ;
- ;
- ;
- .
Yet, we need to state that extensions won’t replace a professional developer, even if the website seems to have minor performance issues. Why? Because let alone they don’t support all the aspects of optimization, they’re usually only a partial remedy for the intended problem.
For example, you may purchase an extension for minifying HTML/JS/CSS. That’s where you should bear in mind the two points:
- If you’re using a CDN, it may already have built-in minification capabilities. So it’s an unnecessary cost.
- Magento extensions that promise such optimizations perform their operations using PHP on the backend, i.e., server-side scripts. Depending on the efficiency of the script and the server’s capabilities, this can add overhead and, paradoxically, slow down the website.
The modules can also turn out to be too technical. So you’ll need to ask coding experts to help install them on the server. The post-setup process also isn’t a breeze. And to wrap it up, extensions are incapable of performing the following tasks:
- CSS delivery optimization;
- server tools installation;
- solving complex issues seen in large stores with numerous modules and customizations;
- optimizing third-party database queries.
All in all, you may try some of the best extensions to fix minor bottlenecks in the store. But you shouldn’t expect too much from them.
4. Static Content Optimization (CSS, JS, Images)
Most content that your browser has to download is photos and graphic elements. Let's find out how to speed up Magento 2 by optimizing static content.
4.1 Make Visible Content a Priority
This fix is needed for: the frontend
Problem explanation
Also referred to as “above-the-fold” content, visible content is the first part of the page that you see prior to scrolling down. To a great extent, the Google PageSpeed score considers visible content parameters. If it's not optimized, this negatively affects the user experience.
How it will help
To make your site visitors happier, it makes sense to give such content priority in terms of its load and display. How is this done?
a) You can start by placing “above-the-fold” content before everything else. This is done by analyzing and checking the HTML of your pages to see whether it comes first.
b) Furthermore, you can optimize the size of your visible content. As such, give attention to your media, compress images, as well as get rid of anything that's excessive or unnecessary. After all, you can make a browser's life easier if there is less content to process and download.
c)Revise the rules that you have for “above-the-fold” content in the CSS files and in JavaScript. Usually, all the JS and CSS are moved to the very bottom, and critical styles are left at the top. Again, the goal here is to cut down the time the browser needs to parse the page's <head> section.
We'll cover these and more content optimization methods in more detail in the sections that follow. They are applicable for optimizing all content, including the one above the fold.
4.2 Optimize CSS Files for Faster Load Times
This fix is needed for: the frontend
Problem explanation
There's a lot that can be done to speed up Magento in terms of CSS files optimization. Sadly, all too often, pages are overburdened with CSS styles, causing a drop in performance.
For instance, here's a widespread case and one of the biggest problems to tackle. Sometimes CSS styles written for a specific page are placed together with the rest of the common CSS. This makes the entire CSS file, which is loaded on all pages, heavier.
In addition, unused styles create a problem because they take up space and increase download time. So, the more unnecessary styles you use, the longer the file will take to load, negatively influencing overall page speed.
How it will help & how it's done
There are numerous ways to optimize CSS files. Below we bring you our recommendations.
Method 1: Merge & Minify
This method significantly reduces the number of requests to the server. Secondly, it makes the size of CSS files smaller, thanks to “minify”, which removes unnecessary spaces (since each space takes up data volume).
There are a few tricks you can implement right from your Magento Admin Panel to achieve this.
Option 1: Via Developer Mode
a) Switch to Developer mode to access these settings. Fire up SSH and type:
php bin/magento deploy:mode:set developerb) Now go to Stores > Configuration > Advanced > Developer (this is a new tab you can now see), and find "CSS Settings".
Set both "merge CSS files" and "minify CSS files" to "Yes". This tool will try to shorten and optimize existing CSS code in other ways to help the browser download it a bit faster.
Merge is also quite useful: browsers will maintain only a limited number of connections per server. A few big files will download faster than a dozen of small ones.

Option 2: Without Developer Mode
You may opt for a simpler way to address Merge and Minify. Alternatively, you can use the following commands. They allow you to do the same thing without switching to the developer mode back and forth. Mind that you'll need to clear the Magento cache.
bin/magento config:set dev/css/merge_css_files 1
bin/magento config:set dev/css/minify_files 1
Method 2: Defer Non-critical CSS Styles
CSS styles can be divided into critical and non-critical ones. Critical styles are used so that the visible content (a.k.a. above-the-fold content) doesn't look broken when a page is first opened. Non-critical CSS styles are used after the initial load since they take more time to render.
The method of deferring non-critical styles works in conjunction with the Merge and Minify method. I.e., the CSS that was merged and minified is put off for post-loading. This means that non-critical styles will be loaded after the full-page content load.
To achieve that, place non-critical styles at the bottom of the page. They'll be initiated upon some event, such as an unload JavaScript event or until the user starts scrolling the page.
Method 3: Creating Critical Styles
You need to create critical styles for the first part of the page that's visible when opening a site. Critical CSS is inserted directly inside the page using inline styles (not through a file). This allows for the first-seen content to look good straight away.
In addition, thanks to the critical styles, nothing jumps on the page, which also positively affects performance. As the user scrolls down, non-critical styles will be loaded for the remaining part of the page.
Method 4: Split Styles by Certain Page Types & Delete Unused Styles
Such unused styles can accumulate, creating a whole set of CSS that isn't applicable anywhere. They take up space and add weight to the overall CSS file, deteriorating the loading speed. Therefore, audit your styles and remove unnecessary bloat.
There are many cases when all CSS styles are piled together and loaded on all site pages. Yet, it is smarter to separate the styles required for one specific page type with a unique design (f.e., the checkout). Such CSS isn't added to the common structure nor shared styles that are needed for all pages.
Take a look at the screenshot below. It has a table with the percentage of unused styles. In the middle part of the screenshot, you can see a list of CSS files and their Total Bytes. Look at the lower part of the screenshot; the Unused Bytes column shows how often one of the CSS files is used in percentage. What do we have? One of the largest files isn't used in 93.7% of cases, and one of them isn't used 100% of the time.
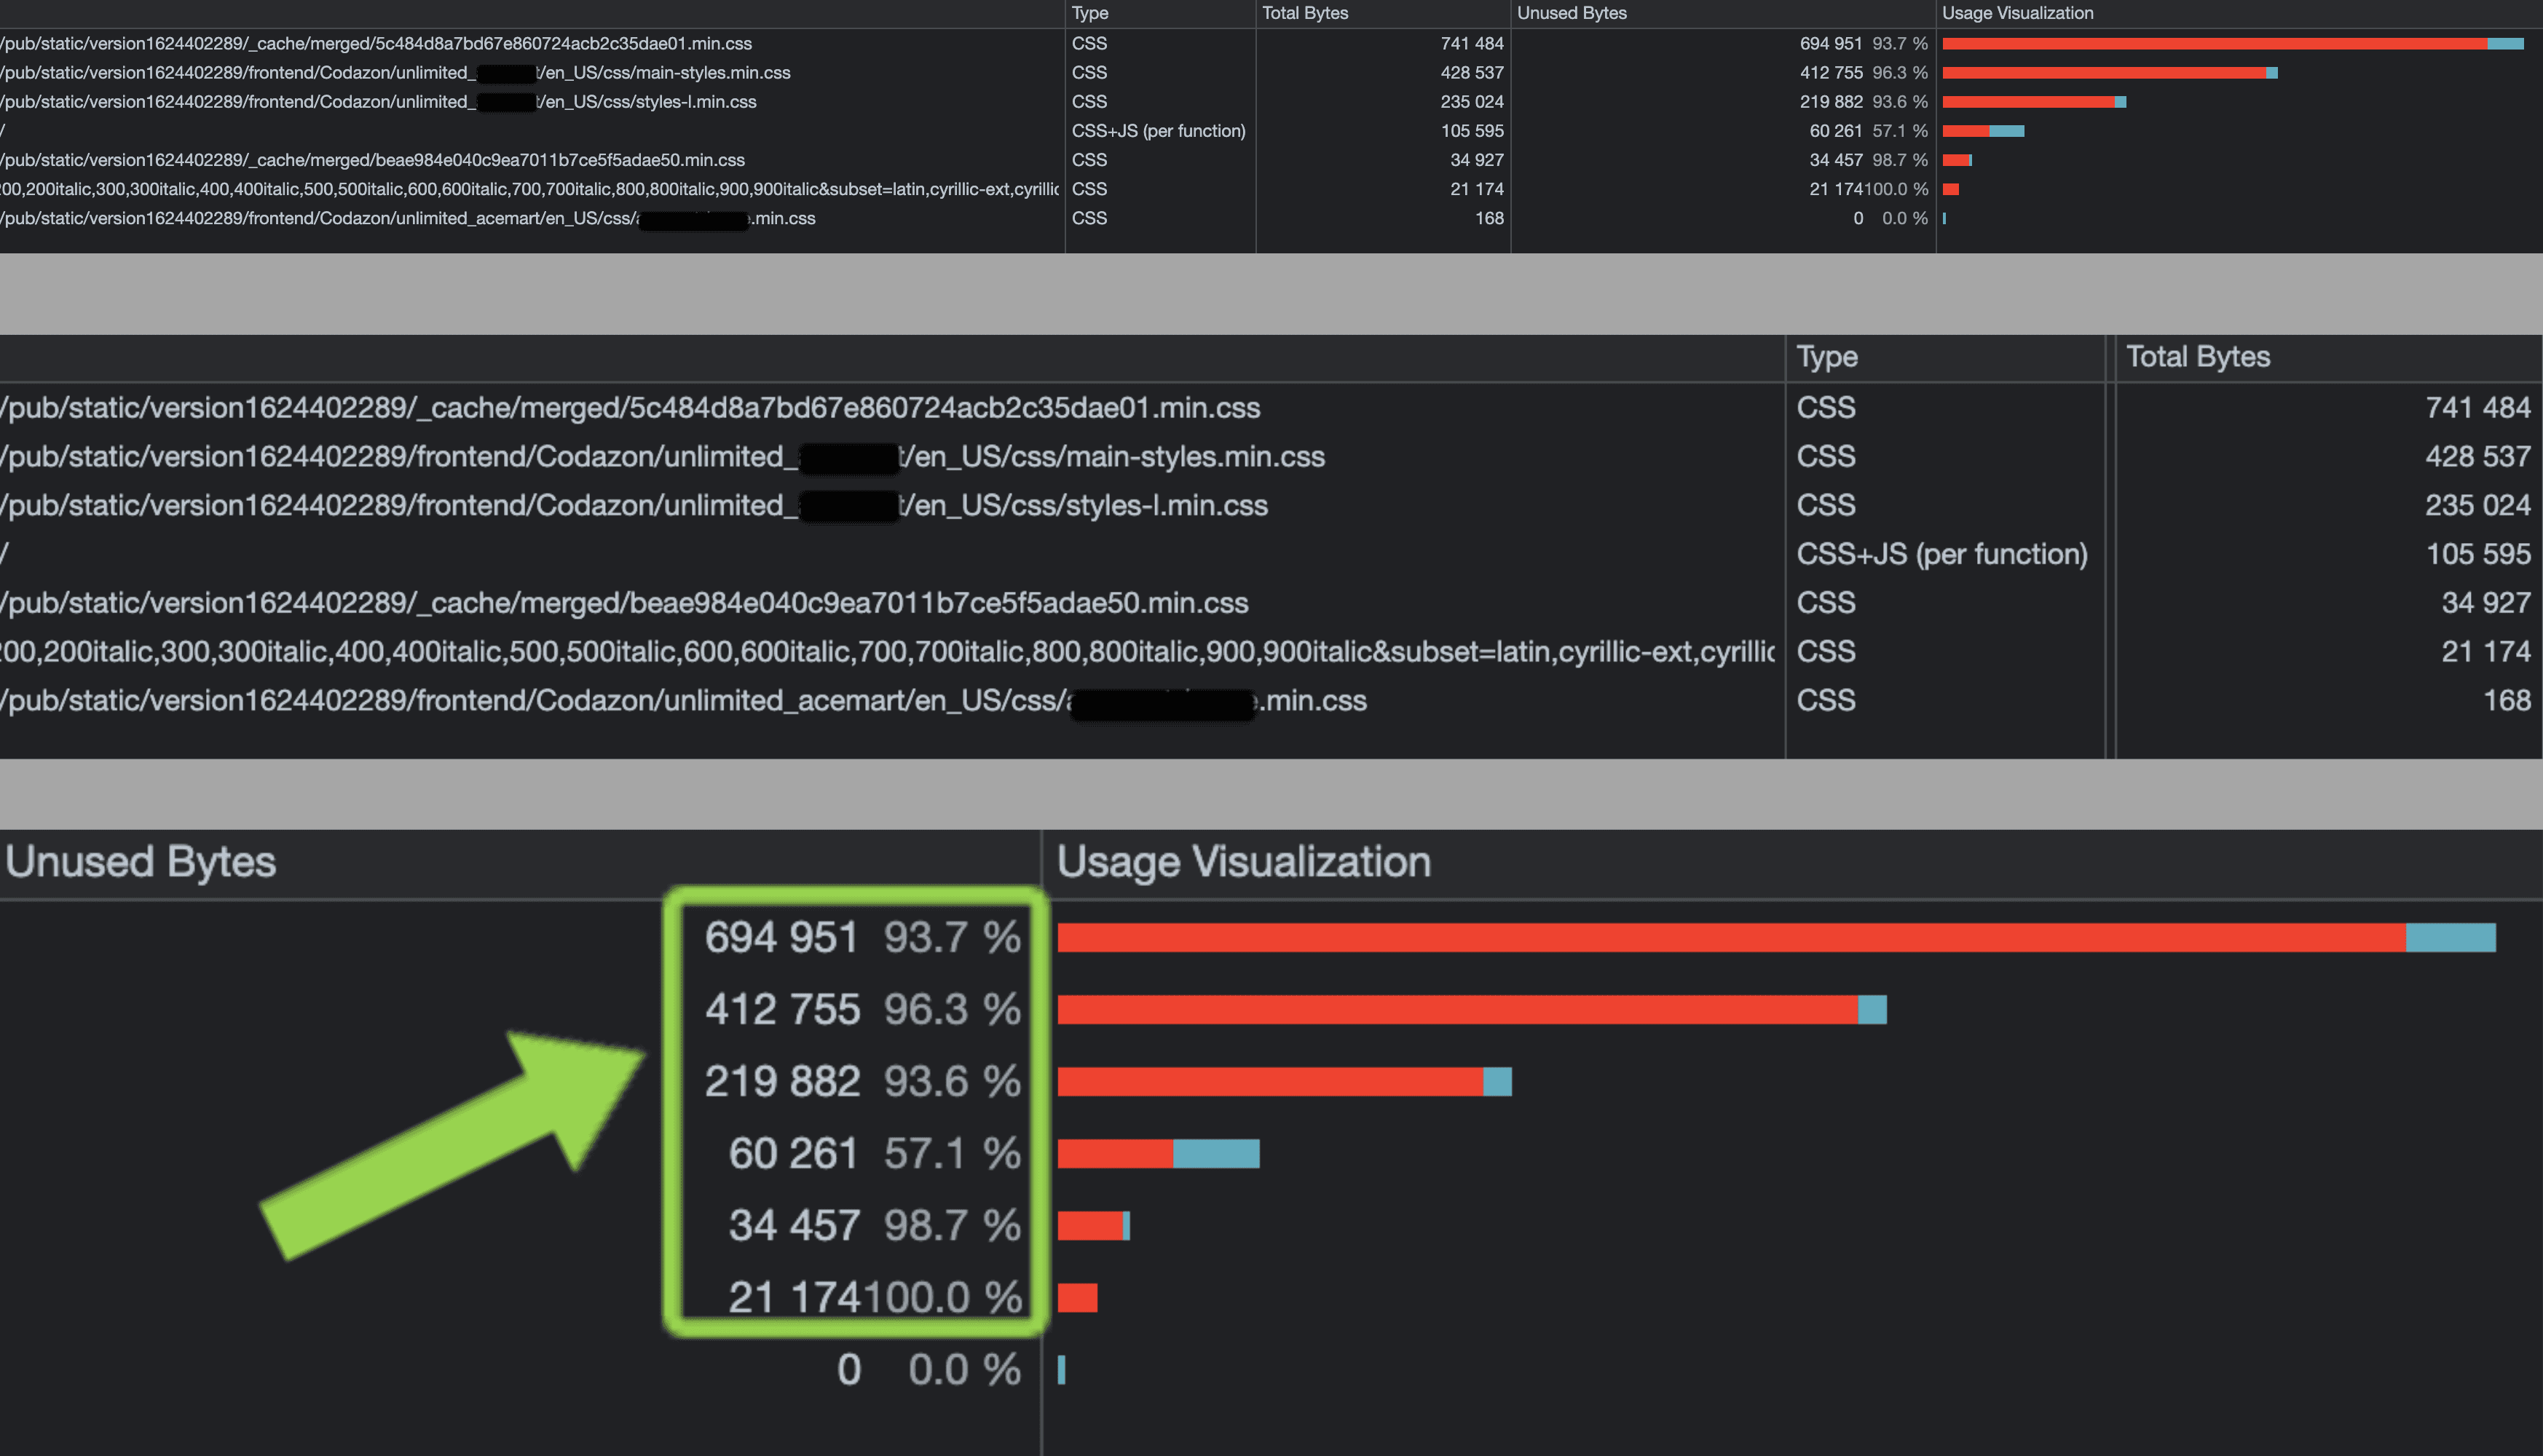
Magento combines the styles into a single file by default. But in the end, your page can need only 5% of the styles. Therefore, it makes sense to split them into separate pages. This approach partially solves the issue of unused styles and boosts Magento website speed.
4.3 Optimize JavaScript
This fix is needed for: the frontend
Problem explanation
JavaScript optimization is among the largest chunks of work in Magento 2 speed optimization. Sometimes you must rewrite JavaScript parts because it consumes a lot of CPU due to many changes on the page. Or there can be heavy JavaScript logic that consumes all the RAM. This section gives tips on what to fix.
a) Remove Unused Scripts and Move the Rest to the Bottom
How it will help & how it’s done
A great way to optimize Magento website performance is to remove unused scripts from your store and push the rest to the bottom of the page. During the page load process, your browser reads the page as separate parts: the head and the body. The browser will read the code from top to bottom, sometimes waiting to download specific JS files before going further down the page.
This is, of course, an simplification. Your browser will try to optimize this process as much as possible, downloading files in parallel and whatnot. But we don't need to make its life any harder than it has to be. In fact, we can help.
- First, identify whether there is JS code on the page that will never be executed and get rid of it.
- Now move the code that is actually useful to the bottom. This way, the code will stop blocking static content from loading. As a result, your users will see an improvement in page render speed. Instead of staring at a blank page, store visitors can now read the text and see product pictures even before the rest of the page is rendered.
- Alternatively, add async or defer attributes to JS tags so that they can load asynchronously, not blocking rendering.
b) Common JavaScript Optimization Cases
How it will help & how it’s done
Let's go over some common cases of JS optimization to increase Magento website speed and improve render speeds.
1. jquery.ready
As such, jquery.ready will load all its JavaScript functions as soon as the page DOM becomes safe to manipulate. This means that instead of serving the user with meaningful content, the browser will wait for the JS code to load, taking up valuable time and spoiling the user experience. It's especially aggravating for CPU-heavy functions that can completely disrupt a smooth page-loading process.
The solution here is to avoid CPU-intensive, non-critical JS code running in .ready(). Instead of crowding all functions into this handler, use a more flexible approach.
As a valid middle ground where you have to balance both JS code load and content delivery times, we recommend using $(window).ready() and $(window).load().
2. Intervals and timeouts
Heavy JavaScript code can be divided into smaller bits with mini-intervals. For added flexibility, you can measure how long it takes the browser to execute a CPU-heavy code and add or reduce the amount of work for the next batch.
For instance, the first batch is always 100 lines. But depending on the browser performance, you can instruct to execute a workload of either 50 or 200 lines for this user next time.
For our purposes, setInterval(func, delay) and setTimeout(func, delay) are the main methods that can break down longer JS into smaller parts. And if you would also like your code to change the delay in a more flexible way, use recursive setTimeout instead of setInterval.
3. Delay JavaScript initialization on scroll/touch/mouseover
Initializing any components and widgets takes quite a long time. This is because the HTML structure is being rebuilt, some elements get pulled, and there may be additional connections. If you leave all of this in a one-page load thread, you'll encounter slow JavaScript execution.
JS works step by step, synchronously in some cases and asynchronously in others, altogether slowing down performance. To solve the issue, you can postpone the initialization of many JavaScripts until the user starts scrolling down the page (touching the phone screen).
Let's assume that some parts of the page are not visible and shouldn't be visible to the user right away. For instance, you can have a slider somewhere at the bottom of the page (not above the fold). Then, it isn't necessary to load it immediately.
Yes, the browser will see the JS for the slider because it receives all the page content. But we can initialize the slider's load only when the user starts scrolling. In this case, by the time the user scrolls to the area with the slider, the content will already be loaded, and Google PageSpeed won't see it anymore.
The code below shows how to add a scroll event. The func part represents the logic that is executed on a scroll trigger. But there may be other options, such as initializing the slider, connecting something, or anything else you can postpone on scroll.
window.addEventListener('scroll',func);4. Getting rid of heavy JavaScript logic
Restructuring HTML to make a page interactive is among the most challenging processes that take place on a page. This is one of JavaScript's main responsibilities. But if JS is not optimal, your performance will suffer. The thing is that your JavaScript could have been created non-optimally from the very beginning.
You can start JS optimization by finding ways to minimize page restructuring and performing fewer document searches. Postponing JS initialization on the scroll can be another workaround.
Postponing AJAX requests is one more necessary optimization move. All AJAX requests have a significant impact on performance, especially those to external URLs. There are two main reasons why it makes sense to postpone your AJAX requests on a scroll or on a timeout.
- If a site spends a lot of time waiting to receive and process AJAX requests, Google Pagespeed considers the site slow.
- Plus, if the AJAX requests are to third-party services, they might return results with not only code. They may, for instance, return the connection of extra media, fonts, or styles, altogether burdening the site.
For example, your store could be using a third-party live chat module. The service can provide a link with a JavaScript file path. Since it's an external URL, a lot of time will be spent on the connection and on downloading the needed files. Why? Because they're on a different server.
But your users might not need the live chat right away. So, to facilitate page loading, you can postpone its script for a while.
c) Use JS Bundling Properly
How it will help & how it’s done
Magento will try to combine all JS files into a few big bundles to improve loading procedures. But JS bundling prevents page load until the browser finishes downloading all JS bundles.
JS bundles can be 10+ MB large. They are way bigger than CSS, so merging JS is not the best idea because Magento loads them whenever your browser requests a new page.
The JS Bundling fix works great in conjunction with a CDN (Content Delivery Network) upgrade that we'll cover in the next section. Smaller JS files will make individual pages lighter, and your content delivery network will take care of delivering these smaller files to your customers faster.
Remember we are still in Developer mode? Good. Let's make sure your Magento JS settings are optimal.
- Go to: Stores > Configuration > Advanced > Developer > JS Settings.
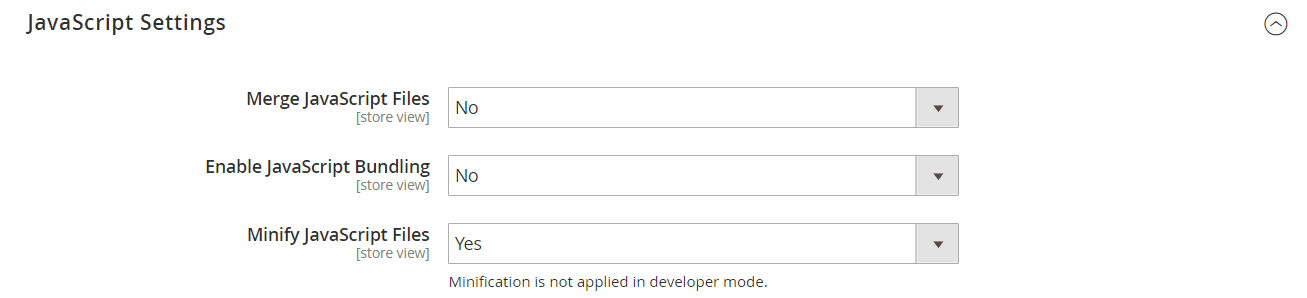
- Set your JavaScript as shown in the image above. “JS Merge” and “Bundling” should be “Off”. JS minification should be set to “On”.
Opt for Advanced JS Bundling
Standard Magento bundling is cumbersome. It connects a lot of extra JavaScripts and puts them in piles that are run through all pages. Is there a better approach to bundling? Onilab's team uses a more refined solution called Advanced JavaScript Bundling.
Advanced JS Bundling handles the matter more efficiently. It initially goes through all the pages, collects the necessary JavaScript for connections, and then bundles them. This way, only the required bundles are used on the page.
Furthermore, it allows adding any JavaScript minification. This means that Advanced JS Bundling can be used for merging, bundling, and minifying, encompassing the three options in one solution. In this case, Advanced JS Bundling eliminates the need for additional settings on the admin panel: the “Merge JavaScript Files”, “Enable JavaScript Bundling”, and "Minify JavaScript Files" settings should be set to "No".
4.4 Enable HTML Minification for Magento Performance Optimization
This fix is needed for: the frontend
Problem explanation
If the content is updated very often, it is better to minify HTML. This will speed up the loading of the document and reduce the page size.
How it will help & how it’s done
HTML minification will cut out developer comments, replace variable names with shorter versions, and generally tidy up your code and reduce clutter.
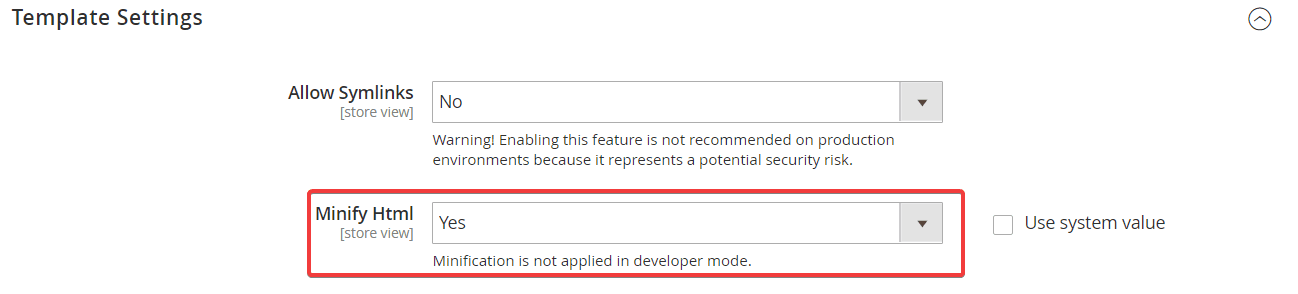
Minify HTML is only visible as an option in Developer mode.
a) Find: Stores > Configuration > Advanced > Developer > Template Settings.
b) Tick off “Use system value” to access the “Minify HTML” option.
c) Set it to “Yes”.
4.5. Conduct Magento Image Optimization
These fixes are needed for: the frontend
Problem explanation
Media files can take quite a long time to load. That's why numerous techniques are used to speed up media content loading. We'll go over several of them, but you may look into more tricks given in this , as they can bring you fruitful results.
a) Magento 2 Speed Optimization Techniques: Use Lazy Loading for Images
How it will help & how it’s done
A selective approach to page loading order offers a significant performance boost without a lot of investment.
Lazy loading is a perceived performance pattern that can help you load images, GIFs, and other heavy media as they enter the viewport. This means that the browser will not try to load the whole page at once. Instead, it will prioritize loading visible content first.
As the user scrolls to the bottom of the page, new content gets loaded on the go. First, lazy loading shows a lower-resolution image or a placeholder image; then, it will switch on the fly to the high-quality source image. Below is an example of how it works.

Screenshots taken on the website
For the user, the implementation of lazy loading will mean:
- A smoother perceived performance, especially on low-end machines and tight bandwidths.
- Faster image load for media that the user can already see inside their viewport (needed for user engagement).
For a Magento 2 store, lazy loading means:
- Better perceived loading speed (important for user experience).
- SEO-friendly implementation (search engines will crawl images as usual).
- Bandwidth savings (since not all users will scroll to the bottom of the page).
However, be careful with lazy loading. By default, lazy loading for Magento 2 optimization is enabled for all page images. But, ideally, it shouldn't be applied to above-the-fold content; these images should be visible straight away. So, make sure that lazy loading is applied to below-the-fold content and the images in the drop-down menu if you have any.
b) Magento Performance Tuning: Use HTML <picture> Tag
How it will help & how it’s done
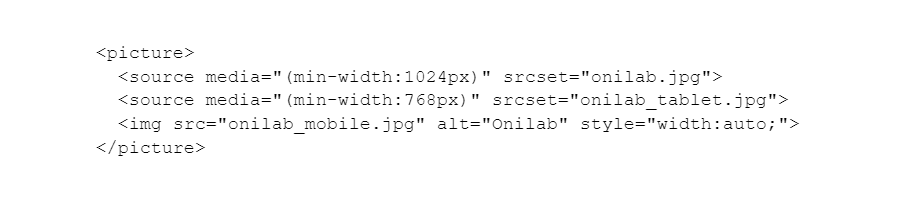
The HTML <picture> tag is most useful for responsive designs and pages with lots of images. With this tag, you can define multiple image sources within a single <picture>. The correct image selection will depend on the viewport and the min-width parameter of the image.
This is beneficial when you want to offer the browser the ability to choose the best-fitting image for a certain dimension. The most common example would be a desktop vs. mobile browsing experience where the viewport value will fluctuate quite a bit. Again, this is a good tip for users.
It can be time-intensive to implement <picture> tags from the ground up for the entire website. You'll need to teach other add-ons on your store how to work properly with the <picture> tag. Here's a sample code of how it's done:
c) Get a CDN to Speed up Content Delivery
How it will help & how it’s done
CDN, or Content Delivery Network, helps you increase website speed by caching your files on remote servers and serving each user from the nearest server to them.
Using a content delivery network is a great Magento 2 speed optimization tactic. It's a way to improve website performance when you have a very diverse target audience, literally customers from all over the world. The CDN will ensure all of them can access your store at the same high speed no matter where you are hosting your Magento store.
A CDN is a nice alternative to physically moving your server. Just bear in mind that you'll see the most benefits from a content delivery network if your Magento store is installed on-premise and not in the cloud (in this case, there will be another CDN configuration via Fastly).
Option 1: Use Cloudflare
For new users, we recommend Cloudflare. It can resize and compress images. Moreover, it allows you to set caching rules; for example, this is applicable if you need to exclude caching of frequently changing data. It's user-friendly and easy to install:

- a new Cloudflare account.
- Add your website when prompted.
a) You’ll have to know your registrar’s login+password since a part of the configuration process is done outside of Cloudflare, at your registrar’s admin panel. Login to your registrar’s account.
b) Navigate to the nameserver configuration tab.
c) Write down the current name servers, then change them to the ones Cloudflare has provided you with.
d) Save changes.
3. Check your domain using a to make sure Cloudflare nameservers are up and running. It might take a while until they update. Up to 72 hours in some cases.
You can download the extension and see the speed difference for yourself.
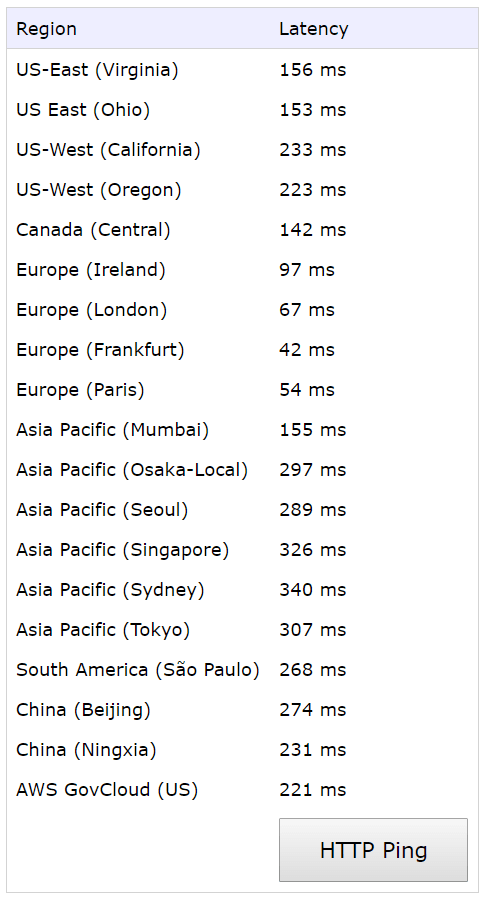
Option 2: Rent a server
If your customer base is not very diverse, rent your server in the same country most of your customers come from. The closer your servers are to the users, the faster your Magento site speed will be.
Latency depends a lot on distance and routing. As a cool example, helps you see how different Amazon Web Services locations range in latency.
4.6 Use Magento Gzip Compression
This fix is needed for: the backend
Problem explanation
If server responses aren't compressed, the size of transmitted data can be larger than needed. Yet if compression occurs during runtime, this may lead to overhead resource consumption, which slows down the performance.
How it will help
Compression is the foundation of a performance-oriented store. This Magento performance optimization technique is used to boost loading speed and reduce the consumption of resources. The solution offers an interesting compromise between bandwidth reduction and Time to First Byte.
What is Gzip compression? It's a web server function for compressing content. It will reduce the size of every file that a user requests from the server. So, for example, a 64 KB file will be sent to your browser as a 10 KB Gzip archive. This may be compared to when we send data in archived ZIP files because they weigh less.
Alternatively, you can also use Brotli compression, which is an analogous and more modern algorithm. This Google-developed solution is suitable for many browsers and is a great fit for compressing textual data. Its major distinction from Gzip is that it uses a dictionary, returning keys instead of full keywords. As a result, files compressed via Brotli can be up to 15% smaller than those via Gzip.
How it’s done
Gzip compression can be implemented in several ways, for instance, using NGINX or Apache.
We'll bring up NGINX because it's very user-friendly. It takes care of compression prior to providing responses to users, so it doesn't harm Magento's performance. Moreover, it won't compress server responses the second time if this was handled previously, say, by a proxied server.
Notice that compression takes up CPU time which means your web server will have to compromise between data savings and fetch time.
Most environments support the Gzip module from the get-go. But it is unlikely that you'll configure NGINX yourself. But the good news is that usually, Gzip compression is included in the hosting settings. So, to ensure it's running on your Magento website, ask your hosting provider to turn it on.
5. Database & Search Updates
Clearing your store's database logs and optimizing the search are beneficial Magento 2 performance optimization tactics not to overlook.
5.1 Stop Using Flat Catalogs
This fix is needed for: the backend
Problem explanation
For many years, one of the Magento 2 speed optimization best practices was to switch to a flat catalog. The setting is available in both Magento 1.x.x and Magento 2.x.x versions and was designed to gather the applicable Product Attributes within your database and merge them into a more lightweight table. Flat catalogs are supposed to lead to fewer database queries per action by consolidating data and keeping it together.
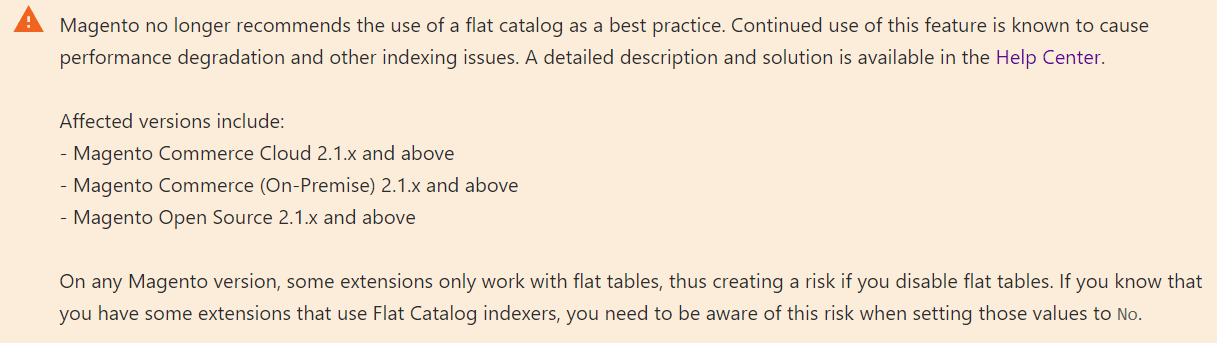
But as it turned out, they only complicate the process due to the appearance of heavy dependencies. The thing is, newer Magento versions underwent major changes in architecture. So, this tip DOESN'T WORK anymore! For Magento 2.1.x and above, it's recommended to disable flat catalogs due to possible indexing and overall performance issues. You can find this warning on the official Magento website.
How it will help & how it’s done
According to Magento, if you don't stop using a flat catalog, you will face slow running, performance degradation, and other problems. Unfortunately, there are currently no flat catalog alternatives, so you should disable it. To disable the function:
a) Go to Stores > Settings > Configuration.
b) Next, choose "Catalog" in the left panel and expand the "Storefront" section.
c) Now, set "No" in both the "Use Flat Category" and the "Use Flat Catalog Product" fields.

d) When you finish, press the "Save Configs" button.
5.2 Clean Database Logs to Speed up Magento
This fix is needed for: the backend
Problem explanation
If your store is quite old, database logs can grow to hundreds of MBs with millions of data entries. This clutter will slow down the Magento store and can even create a space shortage if your disk is already full to the brim. For this reason, you should .
How it will help
Sadly, Magento 2 doesn't even have a basic cron job task for clearing database logs. The is already over 5 years old, but we still haven't heard anything from the official Magento developer team about the option to automatically clean entries. There are no suitable modules available yet, either. This means we'll have to get creative to speed up Magento 2.
How it’s done
To start the cleanup, you'll need to have access to the PHPMyAdmin Panel in your hosting tools. There's no universal path for reaching the PHPMyAdmin Panel, it's different for each hosting.
Magento the following list of tables with logs:
- dataflow_batch_export;
- dataflow_batch_import;
- log_customer;
- log_quote;
- log_summary;
- log_summary_type;
- log_url;
- log_url_info;
- log_visitor;
- log_visitor_info;
- log_visitor_online;
- report_viewed_product_index;
- report_compared_product_index;
- report_event;
- index_event.
Here is an example of an SQL query that allows you to clean up the tables and logs that you need.
SET FOREIGN_KEY_CHECKS=0;
TRUNCATE dataflow_batch_export;
TRUNCATE dataflow_batch_import;
TRUNCATE log_customer;
TRUNCATE log_quote;
TRUNCATE log_summary;
TRUNCATE log_summary_type;
TRUNCATE log_url;
TRUNCATE log_url_info;
TRUNCATE log_visitor;
TRUNCATE log_visitor_info;
TRUNCATE log_visitor_online;
TRUNCATE report_viewed_product_index;
TRUNCATE report_compared_product_index;
TRUNCATE report_event;
TRUNCATE index_event;
SET FOREIGN_KEY_CHECKS=1;
5.3 Use ElasticSearch/OpenSearch to Speed up Magento Search
This fix is needed for: the backend
Problem explanation
If your Magento store can't keep, search, process, and analyze large data volumes and return answers very quickly, this can slow down your overall performance (and eventually the conversion rate). ElasticSearch is a solution for both Magento 2 speed optimization and search accuracy improvement (learn more on how to in our article).
Another very similar option approved and supported by Adobe is OpenSearch, which of a fork of Elasticsearch from Amazon.
How it will help
It is worth noting that ElasticSearch is obligatory for Magento 2.4 and up. So, if you are using a version that's before 2.4, then consider installing it. By the way, if you switch to ElasticSearch now, it will be easier for you to upgrade to the newer 2.4 version of Magento.
How it’s done
The exact ElasticSearch installation process to Magento versions before 2.4 will depend on what setup you use. However, we would like to emphasize a few points:
- Install ElasticSearch on a separate host.
- Use clustering for best performance and scalability.
- Please note that you will need root privileges and some additional software to complete the installation. The ultimate guide for CentOS and Ubuntu is .
After you install ElasticSearch, turn it on in the Magento 2 Admin Panel.
- Go to: Stores > Settings > Configuration > Catalog > Catalog > Catalog Search.
- Find “Search Engine” and switch to Elasticsearch for better Magento 2 speed optimization.
5.4 Arrange Magento Indexers
This fix is needed for: the backend
Problem explanation
Magento uses indexers to get faster access to data. For example, in order to not calculate some specific data every time, it can pull already calculated data from the indexers. This way, instead of continuously making complex MySQL queries, you can obtain data for the requests from a table that stores all the necessary results.
How it will help
To avoid store performance slowdowns and optimize Magento speed, you have to organize your indexers.
a) Update Your Indexers
How it’s done
Load time can also be decreased since Magento allows you to handle bulk data. To achieve this, Magento's indexers must be reindexed. The reason for that is that the indexers usually get updated by the core system on every by default stored object. Yet because the procedure has its flaws, it is best to carry out the indexer update by hand.
If you have a store up on Magento 1, you may update your indexers right within the Admin Panel. If your store is up on the second Magento, run the CLI command below in the root directory with the help of the SSH terminal:
php bin/magento indexer:reindexb) Possible Issues with Indexers
How it’s done
Of course, you may face issues with indexers during Magento optimization. Let's go over the main ones.
- For instance, you need to display a special price for products that are on a limited-time discount. These prices will be calculated according to the indicated set of rules. Indexers provide such pre-calculated data so that there's no need to send calculation queries for each separate product price.
- However, a site can noticeably slow down when a rule is triggered. So, if the indexer has flaws, it can create a large load on the server while the indexers are calculated.
- Also, when a rule is triggered (for example, during price calculation), the process might take a lot of time. In this case, data won't be pulled from indexers. It will instead be calculated in real-time. If a Magento store operates without indexers, this can also result in additional loads on the server.
c) Making Your Own Indexers
How it’s done
You can also develop your own indexers, for example, an indexer for product labels. Stores often use label tags to reflect a product's advantages (its properties, if it's in stock or on a discount, etc.). One page can have several sliders with 20 or 50 products. In this case, labels are recalculated for each product.
Since these labels are updated once a day or based on certain actions, you may make an indexer that'll save the calculated labels for each product. In such a scenario, recalculation could occur once a day, or if it deals with warehouse updates, you can call the reindex of one record when the number of items in the warehouse changes.
Feel free to browse this detailed on how to create an indexer.
6. Improve Caching for Magento 2 Optimization
Handling caching properly is a huge chunk of Magento 2 speed optimization efforts. It's a way to increase loading speed and reduce the database and server load. There are several peculiarities in your Magento store worth noting.
6.1 Built-in & Varnish Full-Page Cache
This fix is needed for: the backend
Problem explanation
The first time a user stops by the website, he sees the page that's generated and shown by Magento. In turn, a Magento store automatically makes a copy of the page and saves it in the cache where it'll be stored. Later on, when the user wants to revisit the page, Magento shows the cached version of the page instead of regenerating it again. Obviously, this can greatly influence Magento performance and visibly improve your store's speed.
How it will help
There are two main types of Magento full-page cache: built-in and Varnish.
1. Built-in Cache
Magento 2 is already equipped with a built-in full-page cache. This default cache is available out of the box, but if it's off for some reason, you can switch it on using the instructions in .
2. Varnish
Varnish is a caching solution that works as an additional layer between the web server and the user. As a matter of fact, the official Magento team recommends using Varnish.
Here are a couple of main Varnish advantages:
a) It can be used for caching both static and dynamic content.
b) It will cache frequently requested files into RAM, prioritizing those files that are requested more often than others. RAM is way faster than any SSD, and it will return cached files in a fraction of a second. So instead of a long wait, the user will see the page almost instantly and get faster results.
c) As a result, because the internal server database processing time is decreased, time to the first byte (TTFB) is reduced.
What else should you know about Varnish?
- Varnish is more flexible than the default cache in Magento. But this flexibility comes at a price. If you configure Magento 2 Varnish incorrectly, it will actually slow you down.
- Varnish will bring in even more benefits when combined with a CDN upgrade, described in the fourth section of the article.
How to Switch to Varnish?
How it’s done
Before implementing the Varnish cache to speed up Magento, you'll need to take a closer look at the page code. Take into consideration:
- the number of cacheable=false blocks,
- content with undefined TTL.
This kind of content will obviously work poorly with Varnish since it'll not be cached and will still load from your web server. Take these challenges into account when you are planning an upgrade.
Varnish is one of the major upgrades to your store. That's why we recommend you use a separate Magento instance to check for system stability and avoid downtime.
All in all, to understand whether it's a worthwhile upgrade, you need to know how much faster Varnish can be. On average, we are talking about a 50-100% improvement in loading speed.
In any Magento store, the default setting is a built-in full-page cache. So, let's go ahead and switch to Varnish.
a) First, make sure your hosting provider supports Varnish.
b) After you do that, go to Stores > Configuration > Advanced > System > Full Page Cache.
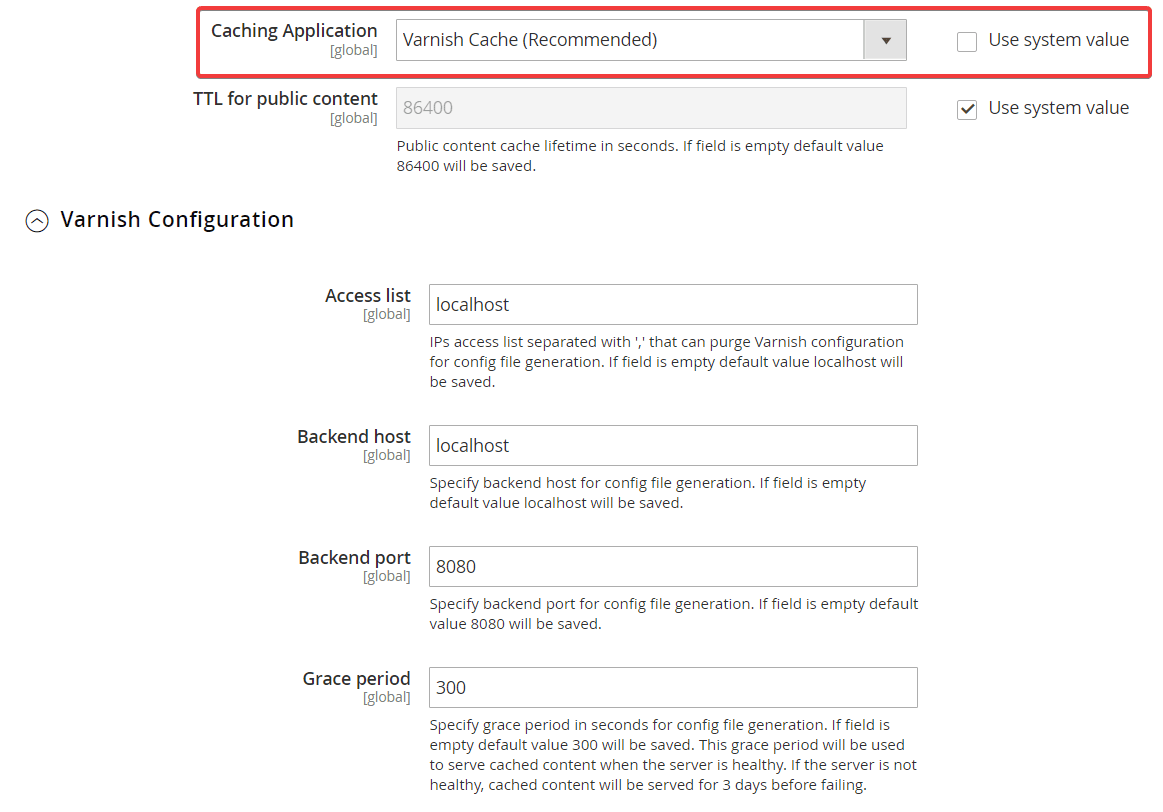
c) Tick off “Use system value” and turn on Varnish. You can leave Varnish configuration options as they are.
d) And with this fix done, we are finished with the Developer mode. Use the command to return to Production:
php bin/magento deploy:mode:set production6.2 Configure Redis
This fix is needed for: the backend
Problem explanation
Not only the frontend of an online store can benefit from caching. Magento site performance optimization also involves setting up a proper backend caching solution.
How it will help
There are several caching tools for the backend of the Magento store, including Redis and Memcached. We'd advise using Redis as Memcached is quite outdated.
Keep in mind that Redis is a separate upgrade from a content delivery network or from Varnish.
Redis is an in-memory distributed data structure storage used as a key-value database to improve Magento performance. Unlike traditional databases, it allows the server to move the most frequently used page content from the disk or SSD drive to RAM. Because Redis has in-memory data storage, it doesn't require constant disk access for most of its operations. This greatly increases the number of performed operations and reduces the response time, all leading to better store performance with millions of operations per second.
Using Redis eliminates the delays with the search and provides access to data in microseconds. As a result, this increases the response rate when the user makes database and API calls or wants to load a webpage.
What else does Redis do and is used for?
- It optimizes Magento session storage, enables on-disk saves, and improves website stability, making your store faster and more reliable.
- Redis is applicable for caching query results, web pages, long-term sessions, and numerous objects that are used frequently (images, meta information, etc.). You can use this guide to find out how to use .
- Mentioning how to increase Magento website loading speed even more, Redis is also commonly used for session storage. It allows getting fast access to session data like user profiles, credentials, status, and individual user settings. Find out how to configure Redis for Magento store session storage .
To get acquainted with Redis even more, here's a nice you can read.
7. Use a Progressive Web for Magento Speed Optimization
You must have heard about PWAs. The eCommerce world is currently buzzing with technology, which can also be deemed as powerful means of Magento 2 performance tuning.
Progressive web applications are designed to blur the gap between responsive websites and mobile apps, keeping the best of each channel. With , Magento store owners can deliver an app-like experience to customers while they are on the website. Another major benefit of transforming a store into a PWA is that it helps to noticeably speed up Magento. These enhancements lead to significant results like a higher conversion rate and a growing share of regular customers.
The Onilab team has a solid background in building PWAs on Magento. is a good case in point. The French IoT provider reached out to our team to fix issues impacting its bottom line. The core challenges stemmed from a slow website speed, a standard Magento frontend with a poor UX, and legacy backend modules full of bugs.
The store’s pressing demand was to improve performance, which we successfully fulfilled. We also devised the ideal solution for the brand by completely revamping the site and creating a PWA on the Magento 2 platform. Our bespoke theme, built from scratch with plain ReactJS, was of great avail.
You can find many in our article and learn more about , about how to or how to in our guides.
But how can a PWA make a Magento store faster?
PWAs relieve pages from the necessity to reload. Thus, when a user visits the website for the first time, JS and CSS files are rendered on the storefront while all the updates are executed on the backend. Developers can achieve this by using .
So, when the user goes to another website page, it loads much faster as all JS and CSS files are already loaded. For instance, the browser doesn’t need to load the page header or footer whenever the user goes to another page, as they are already loaded on the PWA storefront. Therefore, you'll see an increase in Magento speed.
If you have questions about creating progressive web apps or want to find out , contact us for professional .
8. Lastly, Is the Magento Store in Production Mode?
As easy as it sounds, it actually helps to improve Magento performance. So, a helpful tip/reminder: of three existing modes (Default, Developer, and Production), you should always select the latter. Developers often just forget to switch after implementing changes. But the Production mode is already optimized to a certain extent and is up to 30% faster compared to the Developer one.
Boost Your Magento Store Further
Magento is a complex solution that can work faster or slower depending on how well you optimize it.
We wanted to give you advice that is applicable to almost any Magento 2 setup. But Magento stores are so diverse. Magento runs on countless different configurations powering up stores all over the world.
If you want to speed up Magento 2 even further, don’t hesitate to turn to us for , optimization services, and Magento customizations. We’ll look into your particular setup and make the store performance flawless.