With so many changes in Salesforce records made by employees on a daily basis, it may be hard to keep track of the quality of the input data. With the help of Validation Rules, Salesforce offers a solution to safeguard users from making mistakes (such as indicating phone numbers in the wrong format), as well as to establish verification boundaries and standardize the data requirements in general.
On this page, we’ll share what validation rules are, how and where they can be applied, cover the common limitations, and help learn how to create a Salesforce validation rule on a case step by step.
Table of Content
What are Validation Rules in Salesforce?
Validation rules are one of the five rule types in Salesforce which are processed in this sequence: Validation Rules → Assignment Rules → Auto-response Rules → → Escalation Rules.
What is a Validation Rule Used for?
The main purpose of a validation rule is to make sure the data the user has input, updated, or removed on a record fits the specified standards before saving. In case it doesn't, the validation rule automatically shows an error message with a short explanation of what was entered incorrectly, preventing the user from saving the changes with invalid data. This clean and accurate data is crucial for the effectiveness of various operational domains within the organization. For instance, if you leverage Salesforce's , maintaining accuracy and consistency is vital for generating reliable predictions and insights.
Take Salesforce address validation as an example. By practicing it, you ensure that the address data entered is formatted correctly and adheres to postal standards. The goal is to reduce returned mail or shipments and enhance the overall reliability of address-related operations within the CRM. Another example is Salesforce address verification. Its purpose is to check and confirm whether the provided address actually exists and is accurate. By having such rules, you can avoid incorrect values and unnecessary confusion.
Setting up multiple validation rules that evaluate the data entry in one or more fields might take lots of time and effort. Get in touch with our to ensure they meet the required standards.
How Do Validation Rules Work?
A validation rule triggers every single time there’s an attempt to save the record in Salesforce clouds. The required conditions of the validation rule are indicated in the formulas. They contain one or more criteria to meet in order to pass validation and save the record.
Put simply, validation rules check whether a specific field (or fields) corresponds to the indicated criteria. If the data is correct, the record gets saved. If not, the rule displays an error message, signaling the mistake. This means that unless the user modifies the fields to match the criteria, they won’t be able to go through verification. It applies both for cases when users create a new record or try to save changes in an existing one.

Get a Free Salesforce Audit Example
Explore our Salesforce audit report on diagnosing common bottlenecks in the Salesforce ecosystem.
Examples of Validation Rules in Salesforce
In order to have a better understanding of where such rules can be applied, let’s take a look at some validation rule use cases in Salesforce.
- One of the most common validation rule examples in Salesforce is restricting users from filling out a date field in the wrong format. For example, if too many or not enough digits/symbols were indicated, unallowed symbols were written (e.g., “+”), or the date was entered in MM-DD-YY format instead of DD-MM-YY. This is especially handy when it comes to filling out fields with phone numbers, IDs, passport numbers, birthdates, or any documentation data, for instance, on Contact objects.
- Mentioning other sample validation rules in Salesforce, they’re often used for restricting status changes. For instance, by setting up a rule, you can limit the status field and not allow it to be changed back. E.g., if a specialist has already been in touch with the potential client and the status was changed to “Contacted” on Lead objects, you cannot switch the status back to “New”.
- Another example scenario could be using the validation rule when there is a connection with dependencies between several fields. I.e., if necessary, you can set up a rule which will tie two fields together and won’t allow saving the record if one field is filled out without the other. A use case like this could be if a payment type is selected on an Order, so you must also choose the currency to save changes.
- Similarly, a validation rule can be useful for indicating addresses and fields with various types and subcategories. An example of this is making it obligatory to select a region/state/province/etc. if you’ve chosen the country on an Account (such as when selecting “USA”, you must pick a state “Idaho”).
- Verifying ranges of numbers is also a frequent use case. Such validation rules help to avoid typos which can, for example, make the price a negative sum or make sure that it doesn’t exceed the standards (say, not allowing to save the record when an extra “0” was added by accident, making the cost jump from 5k to 50k).
In addition to these validation rules, Salesforce also offers powerful tools for optimizing sales processes, such as CPQ (Configure, Price, Quote). For those looking to streamline their quoting process and ensure accuracy in sales proposals, learning about can be incredibly beneficial.
Feel free to browse more for Salesforce provided by the Trailblazer Community.
If you came up with creating such rules, are stuck on the process, and need a hand in setup, our are ready to assist. We create validation rules for fields, objects, and campaign members to make all your processes work seamlessly.
Cases When Validation Rules Are Skipped
It's important to mention that validation rules aren’t applicable in all cases. As such, if the verification needs to be performed on a cross-record basis or on multiple objects, validation rules won’t be the solution (generally, Apex triggers could solve such cases). What is more, there are some limitations to validation rules. Below are some examples of when Salesforce skips validation rules:
- Provided there are validation rules for activities, and an activity is created during the lead conversion process, although the lead will convert, a task won’t be created
- Comparably, during , the validation rules will only be applied in case lead conversion validation and triggers are enabled in Lead Settings.
- Validation rules will also be ignored by Campaign hierarchies.
- When it comes to applying the Mass Transfer tool for changing the owner on numerous records, the validation rule won’t work. On the contrary, if the owner is changed only on one record individually (without the Mass Transfer), the validation rule will continue to work.
How to Write Validation Rules in Salesforce: Explained on a Case
What a Validation Rule Consists Of
Before we jump to the case for which we’ll make the setup, let’s quickly define which elements a validation rule consists of:
- object: this is where the rule will run field checks, f.i. Contact, Account, Opportunity, Custom object, etc.);
- formula: states the specific criteria to be met in order for the verification to go through; it always includes information about the field(s) to be checked;
- error message: the text shown to the user if they make changes not meeting the criteria for the record to be saved; the message states the mistake;
- error message location: where it’s displayed on the record: at the top of the page or right under the field that has invalid data.
Case Description
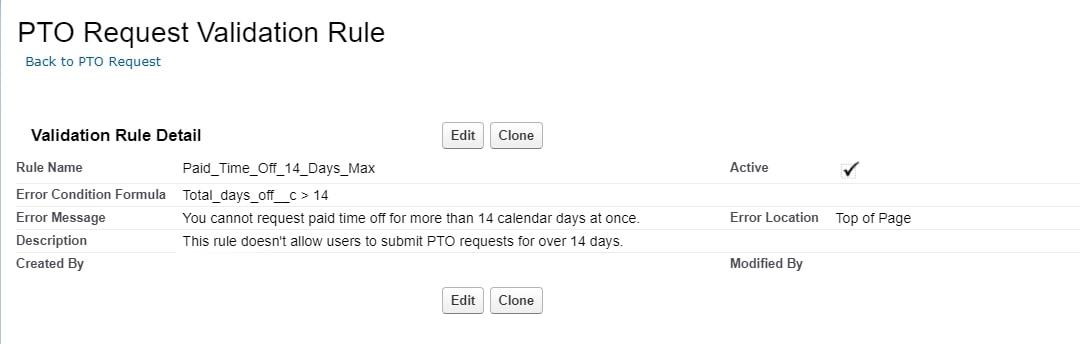
When the staff of Everest FLP Ltd. surpassed the 100-people mark, the requests for paid time off started to become a mess. As per the company policy, employees aren't allowed to request vacation time for more than 14 calendar days at once in PTO requests. Therefore, there’s a need to create a validation rule with such a limit in their Salesforce CRM.
Step 1: Select your Object
Go to the “Setup” section. In the “Object Finder”, choose the object on which the validation rule will be configured. In our case, select the PTO Request object, choose “Validation Rules” from the sidebar on the left, and then press “New” in the top right-hand corner.
Step 2: Name the Rule
- Assign a name to the validation rule by filling out the “Rule Name” (Paid Time Off 14 Days Max).
- Tick the “Active” checkbox.
- In the “Description” field, give a brief explanation of what the rule should do.
Step 3: Create the Error Condition Formula
Let's move on to the “Error Condition Formula Section”. Writing formulas is needed to identify the validation rule criteria. The formula is made up of the chosen “Function” (on the right, you can see the box containing a large selection of function categories), the selected field (via the “Insert Field”), and the operator (that’s indicated via the “Insert Operator” button).

Choosing the Type of Function Category
As you can see, the list of Function Categories to select from is very lengthy, consisting of different function types, including Date and Time Functions, Logical Functions, Math Functions, and Text Functions.
It's difficult to name the most commonly used ones in validation rules, but you can , on a Salesforce support page.
Inserting the Field
Secondly, we need to choose which field will be going through the verification process. Press the “Insert Field” button and select the needed field. In the PTO case, choose the PTO Request object’s custom field “Total Days Off” (that is filled out by employees when creating a request manually), then press “Insert”. It should now appear in the large formula field with underscores: “Total_days_off__c”.
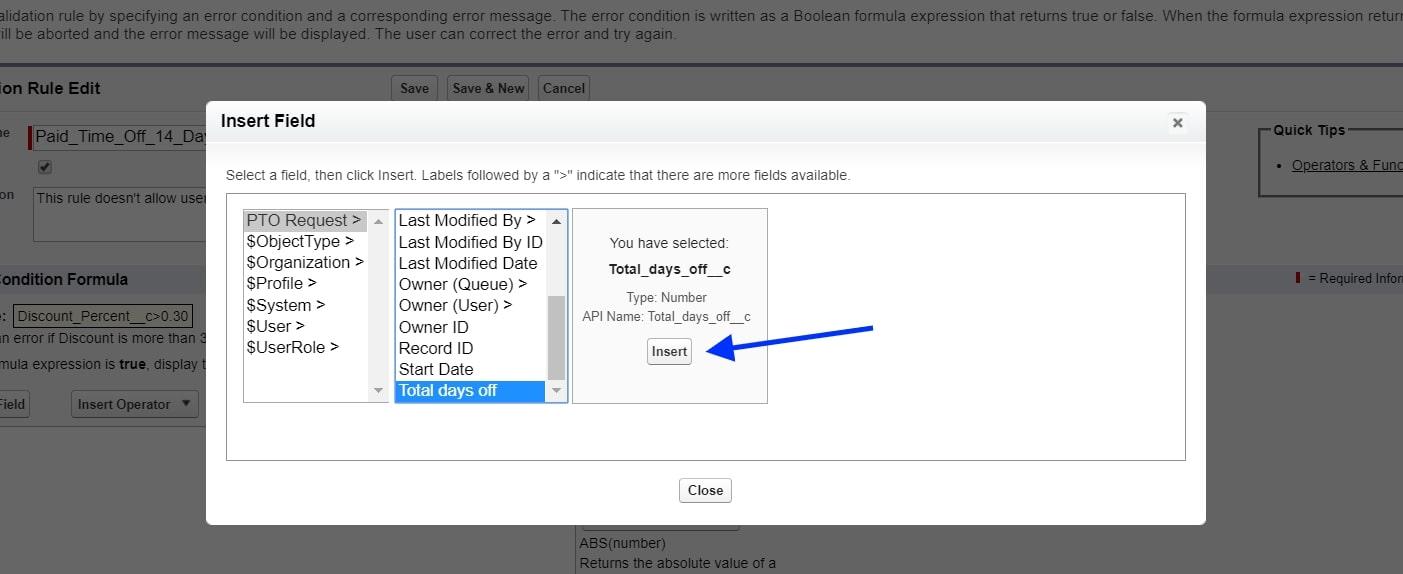
✎ Side note: in case you’ve previously chosen a function, f.e. ISBLANK, followed by (expression) in the formula field, replace “expression” with your field name.
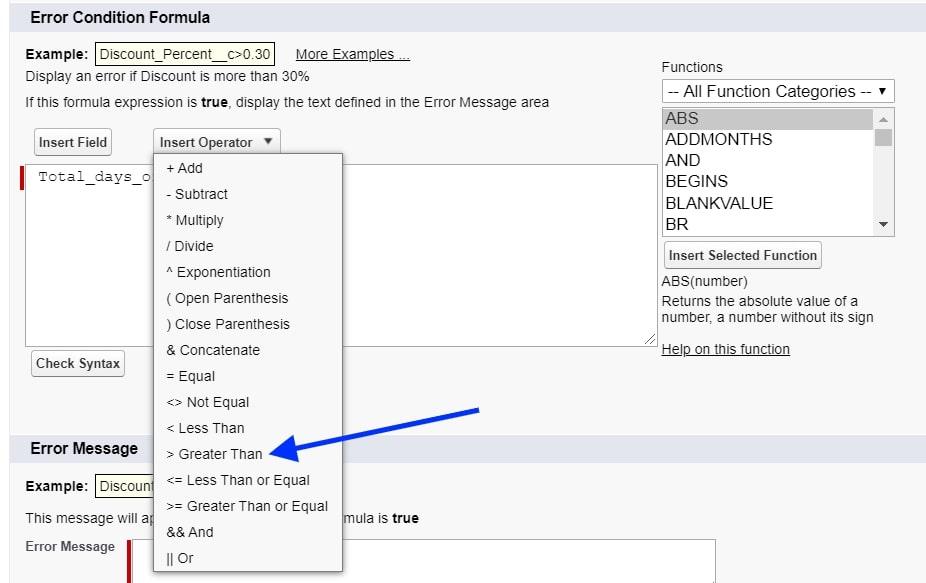
Indicating the Operator
In order to complete the formula, click on the “Insert Operator”. There are two types of Operators before you, Math and Logical. Usually, the Logical ones (such as ‘equal’, ‘less than’, ‘greater than’, ‘and’, ‘or’, etc.) are more commonly used in validation rules.
For the PTO case, we need to select “> Greater Than” and type in the number “14” after it in the large formula field. This way, the formula reads: “The number of Total Days Off is greater than 14”, and that is why the validation rule should trigger, not allowing to save the request.
✎ On a side note, numerous Functions are interchangeable with Operators. In some cases, operators won’t be necessary at all when a certain function is chosen, e.g., ISBLANK, and vice versa. What is more, in case you need to indicate more than one criterion to be met per the validation rule, you’ll need to merge them using the OR Function.
Find OR in the Function category and double-click to select it. In the formula field, within the parentheses, replace the “label 1”, “label 2”, and “...” with your formulas. When done, click on the “Check Syntax” button under the large formula field to see that everything is correct.
Step 4: Defining the Error Message & its Location
The Error Message is a mandatory field when setting up validation rules in Salesforce. Importantly, this message needs to state what was done wrong, i.e., where the user made a mistake, explaining in short how to make the fix. In our PTO case, the message is: You cannot request paid time off for more than 14 calendar days at once.

What’s for the Error Location? Depending on the chosen radio button, the error message will appear either at the top of the page, in case something is wrong with the record, or right under the field that contains an invalid value.
When opting for “Field”, the auto message “Error: Invalid Data” asking to correct the field will appear at the top of the record, and your unique message will appear beneath the field, highlighting its borders in red. For the PTO case, we chose the location of the error message to be “Top of Page”. Finally, press “Save”, and here’s the result:
Step 5: Testing the Rule
Finally, in order to make sure that the validation rule works correctly, conduct a quick test. In the PTO case, this would be an attempt to submit a vacation request for, say, 17 calendar days. And since the validation rule is set up correctly, the Error Message will not let you submit the request until the number of days is equal to or less than 14.
Salesforce comes with a disposable environment where you can run such tests, known as scratch org. If you want to learn , dive into our dedicated article.
To Conclude
Validation rules can be a handy leverage for ascertaining the quality of the data which is added or modified by users. With their help, you can make sure the input values are correct and standardized. We hope you’ve found this post on how to create a validation rule in Salesforce useful, and in case you need a hand with setup or are seeking professional , we’ll be glad to assist!